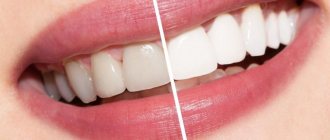
Everyone would like to have a beautiful smile. Sometimes, to realize this desire, the help of a specialist is needed. It is of great importance what materials the doctor uses in his work. Currently, there are composites that will eliminate defects and damage to the front teeth, so that they will be completely invisible. The quality of such materials is many times higher than the quality of materials of previous years. Let's look at one of the new generation composites, Filtek Z250. In what form is it produced, what is included in the composition, as well as what is the technique for carrying out the work, what are the indications and contraindications for use? We will learn about all this further.
What is this?
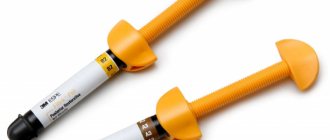
The new generation filling material “Filtek Z250” is a microhybrid composite. It is a light-curing, radiopaque restorative material.
Developed by the famous company ZM ESPE. The latest technologies have made it possible to introduce nanoparticles, nanoclusters and their combinations into the composition of the composite. Thanks to this, the material has acquired significant strength.
A large number of shades of the composite allows the material to be used in the oral cavity on both the front and lateral teeth.
Filtek Z250 is easy to work with, it is elastic, soft for modeling and at the same time very durable after hardening.
general information
Filling material Filtek belongs to the category of light-curing restoration nanocomposites, which have high strength characteristics and an aesthetic appearance.
This allows the substance to be used both to restore the integrity of the chewing elements of a row, and for the purpose of artistic restoration of teeth included in the smile zone.
Sets of filling materials may include many different colors of the substance , including standard tones intended for the body of the tooth, as well as dentin, enamel and transparent shades.
Thanks to this chameleon effect, the filling does not stand out against the background of your own teeth, and the X-ray contrast of the material helps to accurately determine its location in the tooth surface.
Fixation of Filtek fillings in the cavity is carried out using adhesive systems produced by the manufacturer of the material - the American company 3M ESPE.
What's in it
The material "Filtek Z250" contains inorganic particles (about 60%). Their size ranges from 0.01 to 3.5 microns.
The filler contains zirconium. And also the following resins:
- Bis-GMA
- Bis-EMA
- UDMA
The composite is available in several colors using the following fillers:
- Non-aggregated zirconium filler 4-11 nm.
- Silicon filler 20 nm.
- Dispersed zirconium and silicon cluster filler.
The diameter of the particles affects the color of the material; it is 0.5-5 microns.
Transparent shades have particles measuring 0.6-20 microns.
Indications for use
The material "Filtek Z250" is indicated for use for the following work:
- Splinting.
- Restoration of front and molar teeth.
- Indirect restoration.
- Extension of tooth stump.
- For installing inlays, onlays or veneers.
- "Sandwich" technique.
The use of the material for filling cavities of classes 1-4 in frontal and molar teeth indicates its high quality. Let's consider what contraindications to restoration exist.
When not to
It should be noted that there are very few contraindications to the use of modern light-curing materials. Let's list them:
- The patient has an allergic reaction to the composite. Very rare.
- The patient has a pacemaker, the operation of which may be impaired due to the inclusion of a photopolymerizer.
- There is no way to dry the mouth or tooth from moisture.
- Metal-ceramic structures are installed on adjacent teeth.
- You should not combine composites with eugenol, phenol, iodoform and substances that have a phenolic ring in their molecules.
- The tooth is destroyed below the gum level.
We also list several relative contraindications:
- Bruxism.
- Direct bite and pathological abrasion of teeth.
- Close contact between upper and lower teeth along with deep incisal overjet.
- The patient does not maintain oral hygiene.
All these reasons can be eliminated, taking into account their characteristics, and then use a modern composite.
Advantages of the material
Not every filling material has these advantages:
- The high level of density ensures excellent edge seal.
- Photopolymerizability.
- An alternative for the implementation of multi-layer restorations.
- After use, an excellent aesthetic appearance is guaranteed.
- Easy to polish.
- High level of wear resistance.
- Low shrinkage, about 2%.
- Easy to use, does not stick to tools.
- Large selection of shades.
Having such advantages, the material is very popular among dentists.
Work technology
Let's consider what the technology for working with the Filtek Z250 material is. The instructions recommend the activities described below.
Preparatory procedures:
- Clean your teeth from plaque. You need to use pumice and water. This will help you determine the color correctly.
- Determine whether there are concomitant diseases and contraindications to the installation of a filling.
- Determine the depth of the restoration. The shade will depend on the thickness of the material.
Typically, the dental plate is divided into three parts:
- Cervical. Use material in yellow shades.
- Average. Yellowish, brownish and gray shades are used.
- Cutting edge. Use blue and gray tones.
For restoration, it is necessary to work with the material to determine the thickness and shape, as well as to select the required shade. A trial application will help you achieve optimal results.
Next, the tooth is isolated from the gum and cheek. To do this, use a rubber dam or cotton rolls with a saliva ejector.
Preparatory activities
Working with the proposed composites requires certain preparatory work.
The first step is standard brushing of teeth using normal hygiene products. Then the dentist performs a complete sanitation of the oral cavity. It includes treatment, inflammation removal and professional cleaning.
The final stage of preparation is the correct selection of the shade of the proposed filling. It is executed in the following order:
- Dividing the tooth into segments. The body of the tooth has some heterogeneity in color tone in different areas.
To reconstruct it correctly, the entire area is divided into 3 segments. Each of them is filled with a composite that matches the color for the given area.The area near the neck of the tooth is restored with yellow material. For the middle, composites of gray, yellow or brown color are used. The upper (incisal) border is made in grayish or blue shades.
- Selection of shade. The color and its saturation of each of these areas is checked using an auxiliary color scale, corresponding to that part of it that is identical to the thickness and color of the desired area of the tooth.
- Checking the correct selection. To control the correct choice of shade, the composite is applied to the desired location.
After its polymerization, a visual assessment is made using different types of light. If necessary, adjustments are made until the desired effect is achieved. - Isolation and protection of the treated area from other teeth is carried out using a latex napkin (rubber dam). If it is not available, then the use of cotton swabs or a saliva ejector is used.
This concludes the preparatory work before the restoration of damaged surfaces begins. It must go through the full cycle, regardless of which method of tooth reconstruction is chosen.
Direct recovery
It assumes the following execution technique:
1. Cavity preparation:
- Restoration of anterior teeth.
- Restoration of lateral teeth.
2. If the pulp is exposed, it must be protected. Apply calcium hydroxide and gasket material.
3. Matrix placement:
- Restoration of anterior teeth. Plastic, tape or molded dies can be used.
- Restoration of lateral teeth. Place the matrix and secure it. You can do this after the enamel has been etched and apply adhesive.
4. Adhesive system. The instructions for the selected system must be followed for etching, priming, adhesive application and polymerization.
5. Composite preparation:
- Using a syringe. After squeezing the composite onto a special mixing bar, the syringe is closed and the material is protected from sunlight.
- Disposable capsules.
6. Application of restoration material:
- The material must be applied and polymerized gradually, in small layers.
- The cavity must be filled with excess material so that the composite spreads beyond its edges.
- It is necessary to prevent light from entering the working area.
7. Light polymerization process:
- The Filtek Z250 material cures only in light.
- It is necessary to use a high-intensity device for light polymerization. The LED should be kept as close to the restoration material as possible. The duration of exposure depends on the shade.
8. Composite processing. Use bur and finishers to remove excess material. Occlusion is determined using carbon paper.
9. Grinding and polishing. Final point. The restoration is considered complete after final surface treatment.
There are other methods of working with composites.
Filtek Z250 I
UNIVERSAL LIGHT CURING MICROHYBRID RESTORATION MATERIAL
ADVANTAGES - Possibility of multi-layer restorations - High strength - Chameleon effect - High wear resistance - Low shrinkage - Restoration of both anterior and posterior teeth - Does not stick to instruments - Compatible with other composites - 15 different shades
INDICATIONS — Direct and indirect restoration of class IV in anterior and posterior teeth — Inlays, onlays, veneers — Sandwich technique — Core superstructure — Splinting
CHEMICAL COMPOSITION Restorative material Filtek Z250 is a light-curing, radiopaque restorative material. The filler in Filtek Z250 is zirconium/silicon. The content of inorganic filler particles is 60% by volume (without silane treatment) with particle sizes from 0.01 to 3.5µm. The restoration material contains resins BIS-GMA, UDMA and BIS-EMA.
PRECAUTIONS: Filtek Z250 contains methacrylates. A small percentage of the population is predisposed to allergies to acrylic resins. To reduce the risk of an allergic reaction, reduce your exposure to these materials. In particular, exposure to uncured resins should be avoided. The use of protective gloves and non-contact techniques are recommended. If filling material comes into contact with your skin, wash immediately with soap and water. Acrylates can penetrate through normally used gloves. If restoration material comes into contact with a glove, remove and discard the glove, wash your hands immediately with soap and water, and then put on new gloves. In case of accidental contact with eyes or prolonged contact with soft tissues of the mouth, rinse immediately with plenty of water.
APPLICATION I. Preparatory measures A. CLEANING: To remove plaque, teeth should be cleaned with pumice and water. B. COLOR SELECTION: Before isolating the tooth, select the appropriate color(s) of restorative material. The accuracy of color selection can be increased by following these tips: 1. Shade: Teeth are not monochromatic. The tooth can be divided into three zones, each with a characteristic color. a) Subgingival area: restorations in the subgingival area of the tooth will have varying degrees of yellow color. b) Base: Base restorations can be grey, yellow or brown. c) Incisal edge: The incisal edges may have a blue or gray tint. In addition, the transparency of this area should be in harmony with the length of the transparent area of the tooth being restored and neighboring teeth. 2. Depth of restoration: the saturation of the shade of the restoration material depends on its thickness. The shade must be taken from that part of the shade scale that is as close as possible to the restoration. 3. Layout: Place the selected shade of restorative material onto the unetched tooth. Work with the material to model the thickness and shape of the restoration. Polymerize. Examine shade matching under different light sources. Using a probe, remove the restorative material from the unetched tooth. Repeat the process until an acceptable color harmony is achieved. C. ISOLATION: The preferred method of insulation is a rubber dam. However, you can also use cotton swabs in conjunction with a saliva ejector. II. Direct restorations A. CAVITY PREPARATION: 1. Anterior restorations: use conventional cavity preparation techniques for classes III, IV and V. 2. Posterior tooth restorations: create a cavity. Walls and corners should be rounded. There should be no amalgam or other cushioning material left inside the cavity that could interfere with the passage of light and thus the curing of the restorative material. B. PULP PROTECTION: If pulp exposure has occurred or the situation requires direct pulp capping, apply a small amount of calcium hydroxide to the exposed pulp followed by 3M Vitrebond light-curing glass ionomer liner. The gasket material can be used as a gasket in deep cavities. Refer to 3M Vitrebond gasket instructions for details. C. MATRIX PLACEMENT: 1. Anterior restorations: Plastic strip or molded matrices can be used to reduce the amount of material used. 2. Posterior restorations: place a thin flat metal, contoured metal or contoured plastic matrix and secure tightly with wedges. Curve the matrix to create the proximal contour and contact point. Adapt the matrix to achieve sealing of the subgingival area to avoid ledge formation. ATTENTION: if desired, the matrix can be placed after etching the enamel and applying the adhesive. D. ADHESIVE SYSTEM: Follow manufacturer's instructions for etching, priming, adhesive application and curing. E. EXTRACTION OF COMPOSITE: Follow the instructions corresponding to the selected extraction system: 1. Syringe: a) slowly turn the handle clockwise, remove the required amount of filling material from the syringe onto the mixing plate. To prevent overextraction of material after extraction is complete, turn the handle counterclockwise half a turn until the paste stops flowing. Immediately place the cap on the syringe. If the material is not to be used immediately, the extracted composite must be protected from light. b) introduce the restoration material into the cavity using a non-metallic filling instrument. 2. Disposable capsules: Place the capsule in the 3M dispenser. Refer to the dispenser manual for recommendations and warnings. Remove the restorative material by placing it directly into the cavity. F. APPLICATION: 1. Place and cure the restorative material in layers as directed in Section G. 2. Fill the cavity with slight excess, allowing the composite to spread beyond the edges of the cavity. Shape and contour using appropriate composite tools. 3. Avoid intense light entering the working area. 4. Tips for application in posterior teeth: a) to improve the fit, a first layer of 1mm thickness can be applied and adapted in the proximal zone. b) A plugger (or similar condensation tool) can be used to distribute the material throughout the interior of the cavity. G. LIGHT CURING: 3M Filtek Z250 Restorative Material is light cured only. Light cure each layer by treating its entire outer surface with a high intensity light cure device such as 3M Curing Light. During light curing, keep the light guide as close to the restorative material as possible. Recommended exposure time and maximum layer thickness for each shade are shown below.
Hue Thickness Exposure time A1, A2, A3, A3.5, A4, B1, B2, B3, C2, C3, D3, I 2.5 mm 20 sec B0.5, C4, UD 2.0 mm 30 sec
H. FINISHING: Shape the surface of the restoration with fine-grained diamond finishers, burs or carorundum stones. On proximal surfaces, use 3M Finishing Strips for contouring. I. CONSTRUCTION CHECK: Check the occlusion using thin articulating transfer paper. It is necessary to align all contacts in the central and lateral occlusions. Correct the occlusion carefully by removing material with a fine-grit diamond polisher or carborundum. J. POLISHING: Polish with 3M Sof-Lex discs and strips or white carborundum and rubber bands where discs cannot be used. III. INDIRECT TECHNOLOGY FOR USING 3M FILTEK Z250 FOR INLAYS, OVERLAYS OR FACETS A. MEDICAL MANIPULATIONS 1. Color Selection: Select the appropriate 3M Filtek Z250 color prior to insulation. If the restoration is very deep, it is recommended to use an opaque shade. Applying an incisal shade to the chewing surface will help achieve an aesthetic appearance. 2. Preparation: Prepare the tooth. 3. Taking an impression: Once the tooth is prepared, make an impression of the prepared tooth according to the manufacturer's instructions for the selected impression material. Any 3M impression system can be used. B. IN THE LABORATORY: 1. Cast a plaster model from the impression. At this point, if using a triple tray impression, place the pins in the location of the prepared area. 2. Separate the model from the cast after 45-60 minutes. Place the pins in the stump and cast the base of the model using the same technique as for crowns and bridges. Place the model together with the model of the opposite jaw in a suitable articulator. 3. If there is no second cast, cast a second model using the same cast. It will be used as a working model. 4. Cut the prepared model tooth with a lab saw and trim off any excess or expose the edges so that it can be easily worked with. If necessary, mark the edges with a red pencil. At this point, add a spacer if one will be used. 5. Immerse the stump in water, then use a brush to apply a very thin layer of release agent to the prepared area, allow it to dry slightly, then add another thin layer. 6. Apply the first third of the composite to the bottom of the cavity, slightly short of the edges, and light cure for 20 seconds. 7. Add the second third of the composite. Allow the final (incisal) third portion of the composite to cover the contact areas and light cure for 20 seconds. 8. Place the stump back into the cast in the articulator and add the last third of the composite to the occlusal surface. Fill the cavity on the mesial, distal and occlusal surfaces with a slight excess. This will restore the mesiodistal contacts and correct occlusal relationship if the opposite jaw is closed in occlusion with the uncured incisal layer. Light cure for 10 seconds only, then remove the stump to prevent sticking to contacting surfaces. Complete the polymerization process. 9. When creating occlusal contacts, begin removing excess composite around the contact points. Create planes and edges while maintaining the anatomy of the chewing surface. 10. Be careful when removing the prosthesis from the stump. Break off small sections of the model around the prepared area; all plaster of the core must be completely removed from the polymerized restoration. 11. Using the master model, check the restoration for defects, microgaps, and compliance with the prepared cavity. If necessary, adjust when polishing. C. MEDICAL MANIPULATIONS 1. Roughen the inner surface of the indirect restoration. 2. Clean the denture in a soapy solution in an ultrasonic bath. Rinse thoroughly. 3. Cementing: Cement the prosthetic structure using the 3M cement system according to the manufacturer's instructions.
RELEASE FORM Introductory set of 8 syringes (4 g each): A1, A2, A3, A3.5, B3, C2, D3, UD, 1 bottle of Adper™ Single Bond 2 adhesive (6 ml), 1 syringe of Scotchbond etchant gel ™ (3 ml), 25 tips, 1 sample Sof-Lex™ discs/spray, 1 mixing pad, 2 brush holders, 25 brushes, 48 dispensing slots, 1 shade guide
Refills: Syringe A1 (4g) Syringe A2 (4g) Syringe A3 (4g) Syringe A3.5 (4g) Syringe A4 (4g) Syringe B1 (4g) Syringe B2 (4g) Syringe B3 (4g) Syringe C2 (4g) Syringe D3 (4g) Syringe I (4g) Syringe UD (4g)
STORAGE CONDITIONS A. Do not expose the restoration material to high temperatures or intense light. C. To increase shelf life, unopened kits should be refrigerated (40°F or 4°C). When using, it is allowed to go to room temperature. C. Do not store materials near products containing eugenol. D. Composite pastes are intended for use at average room temperatures of 21-24°C or 70-75°F. Shelf life at room temperature is 3 years.
Indirect restoration
Indirect restoration includes the following stages of work:
- Preparatory work as described above. Selecting the shade and cleaning the surface.
- The tooth is processed for the chosen type of structure.
- The impression is taken.
- A plaster model is made in the laboratory.
- A layer of separator is applied to it so that it can be easily removed.
- As with direct restorations, the composite is applied in layers.
- The design is polished and tried on the model.
- The prosthesis is installed in the patient’s oral cavity and fixed. If revision is necessary, it is returned to the laboratory.
- It is necessary to create a non-smooth surface on the inner surface.
- The prosthesis must be cleaned in soapy water using ultrasound.
- Rinse under running water and dry thoroughly.
- Then the prosthesis is fixed with composite cement.
Some tips for working with Filtek Z250 material:
- Each layer is applied layer by layer.
- For the shade “Filtek Z250” UD, the layer should be no thicker than 2.0 mm.
- Curing time is 20 seconds for shades A1, A2, A3, A3.5, A4, B1, B2, B3, C3, D3, I.
- Each layer should be polymerized.
- Curing time is 30 seconds for shades B0.5, C4, UD.
- Do not create layers thicker than 2.5 mm.
When dealing with modern restoration materials, there are certain rules. This also applies to Filtek Z250. We will consider a description of the subtleties that need to be taken into account when working.
special instructions
Syringes should be stored at room temperature with the lid tightly closed. Shelf life – 3 years. It is necessary to completely exclude exposure to light, as the material may lose its properties. Also, the composite should be kept away from products containing eugenol.
Due to the content of polymer resins, there is a possibility of developing allergies upon direct contact with the material. To reduce the risk of allergic reactions, the composite must be used with protective gloves, completely eliminating any contact.
In case of contact with skin, wash it immediately under running water. If the material ends up on the gloves, they are removed and the hands are treated with soap. Then new gloves are put on.
Rules for working with material
It is worth considering that Filtek Z250 contains methacrylates. There is a category of citizens who have a tendency to develop an allergic reaction to acrylic resins. It is necessary to adhere to the following recommendations when working with the material:
- Reduce exposure to the drug to reduce the risk of allergic reactions.
- Be especially careful when exposed to uncured resins.
- When working with the material, be sure to use protective gloves and non-contact equipment.
- If the filling composite gets on an unprotected area of the body, immediately wash it with running water and soap.
- Attention! Acrylates can penetrate gloves.
- If restoration material gets on the glove, it must be removed and thrown into the trash. Wash your hands thoroughly with soap. To continue working, you must wear new gloves.
- If the material gets into the eyes or other parts of the body, immediately rinse the area under running water.
- If there is prolonged contact of the material with soft tissues in the oral cavity, the area should also be rinsed generously with water.
- The time spent working with restoration material should be reduced to a minimum.
- Syringes with the composite should be stored at room temperature in tightly closed boxes, away from light.
Recommendations and warnings
The presence of polymer resins in the Filtek composite requires careful handling of the material. It is necessary to ensure that the substance does not come into contact with the skin , so manufacturers recommend carrying out the filling procedure with gloves and carefully isolating the soft tissues of the patient’s oral cavity.
If the composite comes into accidental contact with your skin, you should immediately wash your hands with plenty of water. Contact of a substance with a glove requires removal of the glove, washing of hands with soap and use of a new pair of gloves.
Filtek filling material must be stored in tightly closed syringes for 3 years from the date of manufacture.
To ensure that the quality characteristics of the drug are preserved, exposure to direct sunlight should be avoided.
Analogs of material
There are composites that can be considered an analogue of Filtek Z250, but they have some differences in their composition. This is FiltekUltimate, a nanohybrid "Filtek Z550".
The FiltekUltimate series is distinguished by the fact that it contains additional polymer resins:
- Bis-GMA.
- Bis-EMA.
- UDMA.
- TEGDMA.
- PEGDMA.
This is an improved formula that has positive qualities:
- Lower shrinkage.
- It is characterized by high strength.
- Excellent polishing.
- The "chameleon" effect.
- The shine remains for a long time after tooth restoration.
- Higher quality restoration.
A modification of the Z250 series is the Filtek Z550 series. Nanoparticles were added to the composition, which improved the properties of the material:
- Work has become even easier and simpler.
- Strength is higher.
- Plasticity has increased.
- The material lends itself easily to modeling.
- It has become more convenient to apply to the surface.
But some qualities remained at the same level:
- Polishability.
- Shrinkage.
Precautionary measures with these materials are the same as with Filtek Z250.
Bottom line
Now it has become clear to you that Filtek is a nanocomposite of versatile use, which can be used not only for teeth intended for chewing, but with its help you can also restore the front teeth.
Now you have become aware of all the advantages of this composite, and it will not be difficult for you to choose the material that suits you, both for the restoration of chewing teeth and for the aesthetic restoration of the front teeth.
Sources:
- https://www.vash-dentist.ru/lechenie/zubyi/plombyi/vozmozhnosti-materiala-filtek.html
- https://dentazone.ru/preparaty-oborudovanie/materialy/filtek.html
- https://zubovv.ru/lechenie/zubyi/plombyi/svoystva-materiala-filtek.html
- https://FB.ru/article/420332/filtek-z-obschaya-informatsiya-forma-vyipuska-sostav-naznachenie-tehnologiya-provedeniya-rabotyi-pokazanie-i-protivopokazaniya-k-primeneniyu
- https://El-dent.ru/id/filtek-ultimate-kompozit-enamel-b2e-3920b2e-3m.html
- https://medicina-top.ru/%D1%81%D0%B2%D0%B5%D1%82%D0%BE%D0%B2%D0%B0%D1%8F-%D0%BF%D0% BB%D0%BE%D0%BC%D0%B1%D0%B0-%D1%84%D0%B8%D0%BB%D1%82%D0%B5%D0%BA/
This is interesting: MTA Pro Root paste (ProRut): composition and instructions for use
Cost and purchase of material
The price of the Filtek Z250 kit depends on its configuration. There are kits from the SingleShade and DualShade trial series. Their cost is within 10,000 rubles.
The Filtek Ultimate set costs 22,000-25,000 rubles.
You can purchase one syringe with the composite. Cost from 2300 to 2500 rubles.
For the patient, the cost of a filling made from Filtek material depends on the volume of restoration work. So, the price of one tooth is in the range of 1500-1650 rubles.
You can purchase the Filtek Z250 set through official companies that are distributors of the ZM ESPE company. This way there is a guarantee to avoid counterfeits. The product is ordered directly from the manufacturer. The corresponding contacts can be found on the Internet on the official website of the company.
There are also various promotional offers that will allow you to purchase Filtek Z250 products in bulk at lower prices.
ZM ESPE has representatives in many countries. So, you can order “Filtek Z250” in Belarus in bulk through a distributor company, directly from the manufacturer’s factory. Or purchase it in stores that distribute the company's products.
Preparation for using the composite
Initially, teeth are cleaned using a brush and toothpaste, then sanitation and professional cleaning are done.
Then you need to choose the color of the future filling. For these purposes, the standard VITA scale is used. To choose the right shade, you need to follow the following recommendations:
- Since the color of the tooth is not uniform, it is divided into 3 parts, each of which has an individual shade. Restoration in the cervical area should be made of a material that has a yellow tint. The middle part is restored from grey, yellow or brown colors. The cutting edge should be made of gray or blue shades.
- The color saturation of the resulting restoration depends on the amount of material used. The smaller it is, the more transparent the filling will be. Depending on the volume of tissue that needs to be restored, the shade is selected. You can select it in that part of the scale that matches the thickness of the future filling.
- After this, part of the material is taken and applied to the place where the dental procedure will be performed. The composite is polymerized, and its shade is assessed under different light sources. You can repeat this step until an acceptable color match is achieved.
The final stage is to isolate the working area with a rubber dam or cotton rollers.
These steps must be followed regardless of the type of restoration.
Reviews about the material
Reviews from dentists about the Filtek Z250 material are mostly positive. It is easy to work with, it is very flexible and durable. Allows you to achieve a good aesthetic result. It can be used for the restoration of teeth, both frontal and lateral.
Filling material is very popular among dentists. It is used in almost every clinic.
Patients who chose Filtek Z250 fillings for restoration give only positive feedback. They note the durability and aesthetics of the material, as well as good resistance to abrasive substances. The restored teeth are practically indistinguishable from your own. The turnaround time is much shorter than before.
Once a year it is necessary to conduct a preventive examination and professional oral hygiene. This also includes polishing installed fillings or other structures. Patients need to maintain oral hygiene and pay attention to dental care. The service life of the Filtek Z250 material is 3-4 years, but with proper care, such fillings last much longer.
Regular and thorough dental care will keep your teeth healthy for many years. But if problems arise, it is better to immediately contact a specialist, this way you can avoid serious complications and save on getting a filling. When choosing a filling material, it is better to focus on its quality rather than cost.