From this article you will learn:
- How is prosthetics performed on implants?
- terms of prosthetics,
- options for fixed and removable prosthetics.
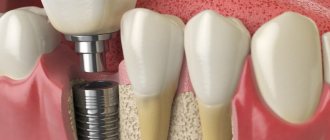
Prosthetics on implants is the final stage of the dental implantation procedure, but nevertheless, mistakes made at this stage can easily undo the success achieved during the surgical stage of implantation. As a result, already 1-2 years after installing a crown on a dental implant, inflammation may develop around it, accompanied by pathological resorption of bone tissue. As a result, the patient may end up with an unsatisfactory appearance of the gums around the implant neck, exposure of the metal neck of the implant due to gum recession, etc.
And if you contact your dentist with such problems, of course, no dentist will connect all this with poor-quality prosthetics. The dentist will tell you about the characteristics of your body, and that nothing can be guaranteed. But none of this is true. If, at the time of starting prosthetics, you had achieved excellent integration of the implant into the bone tissue, then the causes of all subsequent complications (subject to good oral hygiene) should be sought precisely in poorly performed prosthetics.
Options for prosthetics on dental implants –
There are special devices that allow you to check the quality of implant integration/stability of the implant in bone tissue (for example, Periotest M). The measurement is carried out before the start of prosthetics, and we will clearly evaluate the quality of the surgical stage in numbers. In the future, this will make it possible to determine who is ultimately to blame for the complications that arise after prosthetics (the implant surgeon or the prosthetist and dental technician). If we are talking about immediate prosthetics immediately after installing the implant, then we will see whether its primary stability is sufficient for us to immediately put an immediate load on the implant.
Testing the stability of the implant before starting prosthetics will help avoid many complications. After all, when a crown is installed on an implant, it immediately begins to experience chewing load. If the osseointegration of the implant is weak, then the chewing load can lead to pathological bone resorption around the implant and gum problems. If the device shows poor integration of the implant, this will be a signal to the doctor that it is necessary to delay the start of prosthetics for another few weeks or a month.
Duration of prosthetics on implants –
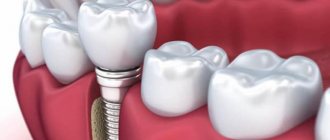
Prosthetics on implants in case of partial absence of teeth is carried out only with fixed structures - crowns and bridges. But in the case of complete absence of teeth, implants not only allow you to obtain a completely fixed bridge prosthesis, but there is also the option of conditionally removable prosthetics (i.e., when implants are installed under a removable prosthesis - solely to improve its fixation on the toothless jaw).
The timing of prosthetics depends on a number of factors - 1) on the implantation technique, 2) on the density and volume of bone tissue in the implantation area, 3) on the choice of dental implant, 4) on the characteristics of the surgical preparation of the bone bed, 5) on the presence of concomitant diseases. Implantologists use the special term “load on the implant” to indicate the moment of fixation of crowns or prostheses on implants. The load can be immediate, early or late.
Types of load and timing of prosthetics –
- immediate loading (prosthetics immediately after surgery or in the first 72 hours),
- early exercise (interval from 2 to 6 weeks),
- late load (between 3-6 months).
In case of partial absence of teeth, one-stage or two-stage implantation techniques are more often used - specifically with late loading on the implant. This type of load assumes that the crowns will be fixed within 3 to 6 months after the operation, but this is only if we do not need to do bone grafting. In such a situation, implant healing on the lower jaw will take about 3 months, and on the upper jaw – about 5-6 months. This difference in timing depends on the fact that the lower and upper jaws have different bone densities.
However, if bone volume was increased simultaneously with the installation of implants, the timing is shifted by several more months. But there are situations when increasing bone volume at the implantation site cannot be carried out simultaneously with the installation of implants. In this case, bone grafting is carried out in the first stage, in the second stage, after 5-7 months, implants are installed and, thus, the patient can receive crowns only after 1.5 years.
Below we will analyze in detail all the main options for prosthetics on dental implants (under conditions of immediate, early and late loading) - both with partial and complete absence of teeth.
How to decide on the choice of implant and prosthesis.
It is never a bad idea to gain insight and understanding about implantation techniques, types of implantation systems, and prosthetic options. But trying to determine all these subtleties for yourself will not work. The patient discusses all details and options for prosthetics on implants with two attending physicians: an orthopedic dentist and an implant surgeon. After a detailed examination, discussion of possible options and drawing up a treatment plan, the optimal method of dental implantation, type of implant, and one or another type of orthopedic prosthesis supported by implants are selected.
Implantation with immediate loading –
Immediate-load implantation involves crowns or bridges being secured to implants either immediately after surgery or within the first 72 hours after surgery. Thus, it turns out that the process of implant integration (their fusion with the bone) will take place in full under conditions of chewing load. Accordingly, this increases the risks, thereby increasing the requirements of the implantologist for the selection of implants, as well as the requirements for the density and volume of bone tissue in the implantation zone.
1) Immediate load in case of partial absence of teeth –
Most often, this technique is used in the absence of 1 tooth in the aesthetic zone (most often in the area of the lower incisors). In this case, immediate loading assumes that a temporary crown made of plastic or composite material will be made and fixed to the implant within the first 2-3 hours after the operation. It should be noted that the temporary crown in this case is slightly removed from the bite so that the implant does not experience a pronounced chewing load.
The best option for a temporary crown would be a plastic crown made by milling (CAD/CAM technology). Such a crown will be as precise as possible, this will make it possible to form an ideal gum contour around the implant neck, and also reduce the risk of developing peri-implantitis. But temporary plastic crowns made from an impression or from a composite material have a lot of disadvantages in this regard.
Immediate load prosthetics are more often used for single missing teeth in the lower jaw due to the fact that the lower jaw has denser bone (types D1 or D2), which allows for good primary stability of the implant immediately after its installation. The upper jaw has softer bone types D3 or D4, and therefore a newly installed single implant will not have sufficient primary stability (24stoma.ru). Therefore, in the area of the front teeth of the upper jaw, this method is used - when it is necessary to install several implants in a row + a temporary bridge is made.
Clinical case No. 1 –
Stage 1 – installation of the implant with immediate fixation of the temporary crown.
The second stage is permanent prosthetics (after 8 weeks).
Important: this method allows you to obtain acceptable aesthetics immediately after surgery, as well as create a beautiful gingival contour around the implant. But! You must understand that in this case, the risk of developing inflammation and bone resorption around the neck of the implant, and even complete rejection of the implant, will be much higher. Consent to this technique is a matter of your trust in the doctor + your confidence in his experience and professionalism. In addition, with immediate loading, you should not skimp on the quality of implants. Here you need implants with an ultra-hydrophilic surface, for example, Straumann (Switzerland) or Nobel Biocare (Switzerland).
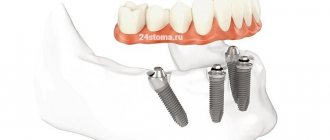
2) Immediate load in case of complete absence of teeth -
There are 2 implantation methods for complete absence of teeth in the jaw, allowing the patient to receive a completely permanent bridge prosthesis – within 72 hours after surgery (on days 2-3). Here you just need to clarify that in most cases, at first it will be possible to make only a temporary bridge from metal-plastic, but after six months to a year you can replace it with a permanent bridge, for example, from metal-ceramic. But nevertheless, even with a temporary bridge, you can immediately chew, and it will have quite acceptable aesthetics.
- Basal implantation technique - in patients with complete absence of teeth, the bone tissue of the jaws is significantly atrophied, and its volume is not enough to install classical implants. In this case, so-called “basal implants” are used, which are installed in the deeper basal layer of the bone, which in 90% of cases makes it possible to do without bone grafting. The cost of installing 8-12 basal implants + a temporary bridge made of metal-plastic will be from 230,000 rubles for 1 jaw (turnkey, for 2022).
How basal implantation is performed: video
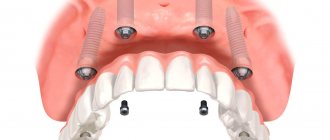
- Implantation according to the All-on-4 or All-on-6 protocols - the All-on implantation concept was developed by the implant manufacturer Nobel-Biocare (Switzerland), and it implies that a fixed bridge prosthesis will be fixed, respectively, only on 4- x or 6 implants. The Nobel-Biocare company has developed special implant models for this - “Nobel-Parallel CC”, “Nobel-Speedy Groovy”, as well as “Nobel-Zygoma”.
The cost of the All-on-4 technique (with the installation of 4 Nobel implants of the indicated types) and a temporary bridge made of metal-plastic will cost you from 370,000 rubles. A temporary bridge is also installed 2-3 days after surgery, but in this case, after 4-5 months it can be replaced with a permanent one, for example, made of metal ceramics. It should also be noted that when using Nobel implants, in some cases it is possible to immediately install a permanent metal-ceramic bridge, bypassing a temporary structure.Implantation using the All-on-4 protocol –
To make this technique more accessible, a number of implantologists suggest installing not Nobel implants specially designed for this, but budget implant models - MIS, AlphaBio, Osstem, etc. In this case, the cost becomes significantly lower, but it should be noted that such implants were developed for completely different purposes and, as a rule, pronounced bone resorption is observed around them + not very good long-term results. Read more about the methodology at the link above.
Important: it’s probably worth saying that the use of All-on-4 or All-on-6 is less justified in smokers and older patients (due to the more traumatic operation of the operation) - compared to the basal implantation technique. In addition, it should be noted that in both cases, the turnkey cost is always calculated taking into account the temporary bridge. When you decide in six months or a year to replace the temporary bridge with a permanent one, then such a replacement with a permanent metal-ceramic bridge will cost you about another 180,000 rubles.
Advantages of the method
- Comfort Perceived as natural teeth, the absence of artificial gums eliminates psychological discomfort and makes care easier
- Aesthetics A dental bridge imitates the naturalness of natural teeth as naturally as possible, recreating the aesthetic gingival contour
- Durability A sufficient number of implants prevents the risk of overload at individual points, reduces the likelihood of prosthesis and prosthetic failures
- Functionality Uniform distribution of chewing load is favorably accepted by the jaw bone, preventing the risk of its atrophy
Implantation with early loading (from 2 to 6 weeks) –
Implantation with early loading of the implant means that the fixation of the crown or bridge will be carried out within 2 to 6 weeks. Before the advent of modern models of implants with ultra-hydrophilic surfaces, early loading was applied within a period of 4 to 6 weeks, but increasingly advanced implant surfaces make it possible to shift these periods.
Not every type of dental implant is suitable for the early loading technique. And here it is not only the specific nature of the thread that is important, due to which good primary stability of the implant can be obtained. But despite the fact that the implant may have good primary stability immediately after installation, after 2-3 days the process of traumatic bone tissue resorption will begin around the implant. This process (depending on the nature of the thread and the method of preparing the bone bed for the implant) can take up to 2-3 weeks.
Such traumatic resorption worsens the stability of the implant during this period (let's call it secondary stability). The ultra-hydrophilic surface of the implants, as well as the treatment of the surface of the implants with surfactants (fluorine ions, phosphates), allows to reduce traumatic resorption, and therefore the secondary stability of the implant will be sufficient to begin prosthetics. The best implants for early loading, in our opinion, are Straumann (Switzerland), and in second place is Nobel Biocare (Switzerland).
Important: the indication for early loading is usually a single missing front tooth, when the patient needs to quickly restore aesthetics. In this case, a temporary plastic crown is first made, preferably using the milling method (CAD/CAM). Over time, it will be replaced, for example, by metal-free ceramics made of zirconium dioxide.
Abutment selection.
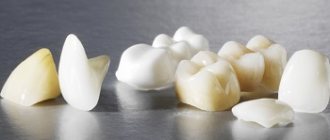
They vary in type of manufacture and in the materials from which they are made. If you decide on the choice of a metal-ceramic crown, then a titanium abutment is quite suitable. If the crown is made without metal, from zirconium dioxide, then there are no options, only a zirconium abutment.
Regarding the question: standard or custom? Their cost varies, but not critically (individual is a little more expensive). BUT, the individual abutment is made with the utmost precision for the crown to fit to it, microgaps are eliminated, and pathogenic microbes will not enter the implant area. In the case of a standard one, there is a high probability that cement will get into the implant area already at the stage of fixing the crown, and subsequently microbes and bacteria will enter the implant area.
Implantation with late loading (3-6 months) –
Prosthetics on implants after 3-6 months are called late or delayed loading. Such terms are the safest for the patient due to the fact that the risk of implant failure is minimal. You need to understand that as soon as the crown is fixed on the implant, chewing pressure immediately begins to be exerted on it. And despite the fact that it is believed that an adequate level of early chewing load can contribute to the speed of fusion of the implant with the bone, nevertheless, when prosthetics are performed before the completion of the period of osseointegration, there is still a greater risk of implant failure.
There are 2 implantation methods, in which prosthetics are performed within 3-6 months. These include the classic two-stage technique, as well as the one-stage implantation technique. It is important to consider that the indicated dates are correct only if implantation is carried out without simultaneous bone grafting. If, when installing implants, bone augmentation is also carried out, the time period increases by several more months.
1) Two-stage implantation technique –
The term “two-stage” means that the surgery will be performed in 2 stages. At the first stage, the implant is installed in the bone, after which the mucous membrane above it is sutured tightly. During the second stage, i.e. after 3-6 months, the mucous membrane above the implant is cut, and a healing abutment (gum former) is screwed into the implant for 10-14 days, which is necessary to form a beautiful gum contour around the neck of the implant. And only after this the prosthetics are performed.
Clinical case No. 2 –
The first stage of surgery (implant installation).
The second stage of surgical intervention (after 3 months) involves opening the mucosa above the implant and installing a gum former into it. And after another 2 weeks, a ceramic abutment and a zirconium dioxide crown are installed.
Important: this is the safest technique, the use of which allows you to minimize the risk of inflammation around the implants and their rejection. This occurs due to the fact that implant healing occurs under a tightly sutured mucous membrane; accordingly, in this case there is no contact of the osseointegration zone with the microbial environment of the oral cavity.
2) One-stage implantation technique –
The difference from the previous technique is that the gum former is screwed into the implant immediately after it is installed in the bone, and not after several months. The only advantage of this technique is that it saves several weeks on shaping the gum contour. There are more disadvantages, for example, a higher risk of developing peri-implantitis (inflammation around the implant).
This technique should be preferred only when we are planning early loading of the implant. But using it in smokers, patients with osteoporosis, diabetes, chronic periodontitis or a number of other diseases is certainly undesirable. See below how the one-stage implantation technique is carried out.
Clinical case No. 3 –
The first stage is the installation of the implant immediately along with the gum former.
The second stage is prosthetics 4 months after the operation (a titanium abutment and a metal-ceramic crown are installed in place of the gum former).
How to choose between implants from different manufacturers -
To learn how implants from different manufacturers differ from each other, how to choose between them, and what characteristics you should pay special attention to, read the article:
→ How to choose the right type of dental implant
Covering denture: price 2022
How much does a covering prosthesis cost? The prices below are indicated on a turnkey basis for 2021 (in economy-class and mid-price clinics). The price of the prosthesis will primarily depend on the type of fixation, as well as the number of implants installed.
- Prosthesis on 4 mini-implants Osstem (Korea) with fixation on spherical abutments - the price will be from 100,000 rubles.
- Prosthesis on 2 MIS implants (Israel) with fixation on ball-shaped abutments - price from 110,000 rubles.
- Prosthesis on 2 AstraTech implants (Sweden) with fixation system Locator® – from 140,000 rubles.
- Prosthesis on 2 Straumann implants (Switzerland) with Locator® system fixation – price from 160,000 rubles.
- Beam-type prosthesis on 4 Roott-Form implants (Switzerland) – price from 280,000 rubles.
Important points about implant prosthetics:
There is often a situation where the required time has passed and it’s time to start prosthetics, but when the doctor starts to unscrew the plug screw or gum former from the implant – the implant is gone! and turns. This means that a thin layer of connective fibrous tissue has grown between the implant and the bone (this corresponds to the concept of “fibrous osteogenesis”) and indicates that contact fusion of the implant and bone has not occurred.
Most doctors immediately tell such patients that the reason is in their body, which “did not accept” the implant. It's a lie. In 99% of cases, the reason for this is the mistakes of the implant surgeon when installing the implant. For example, saliva could get into the bone bed formed under the implant, or overheating of the bone tissue occurred during the preparation of the bone bed, or the doctor, when inserting the implant, could first touch the mucous membrane of the lip or oral cavity, which led to bacterial contamination of the surface of the implant, etc. .
Problems with the osseointegration of the implant that arose BEFORE the start of prosthetics (i.e., before the implant receives a load) are solely the fault of the implantologist. That is why many clinics have a guarantee for implantation, which includes the condition that the clinic will perform a second operation for free or return the money if the implant fails before the start of prosthetics. Therefore, choose your implantologist carefully.
Other important points -
There are many important points where doctors can cheat or reduce costs - to the detriment of the quality of work. Below are some of these moments...
- Taking impressions – the accuracy of making crowns depends on the quality of taking impressions, and there are often situations when the manufactured crowns/bridges “do not fit” on the implants, and the doctor begins to sharpen them. There can be many reasons for this - cheap impression material, the doctor simply may have taken the impression poorly, or after taking the impression too much time passed before plaster models were made from it (i.e. the impressions had time to shrink).
Cheap impression compounds (for example, C-silicone) are usually used to reduce manufacturing costs. Therefore, you should be wary of promotional offers for implantation or too low a price. A good impression compound is A-silicone, or even better, polyester compound (the latter gives super-accurate reproduction of the smallest details).There are also 2 methods of taking impressions: the “closed tray method” and the “open tray method.” The second method allows for much higher impression accuracy, but requires more effort from the doctor. The open tray method cannot be used in only one situation – if implants are installed in distant areas of the dentition and the patient’s mouth opening is too small.
- Choice of abutments - if you are having a metal-ceramic crown made, then it is optimal to choose an individual titanium abutment (you should not settle for standard titanium abutments or individual abutments made of a cobalt-chrome alloy).
For crowns made of zirconium dioxide, the abutments should optimally also be made of zirconium dioxide, but it is also possible to make them from titanium. In the latter case, in order to achieve more satisfactory aesthetics, titanium abutments are anodized. Anodizing is necessary to apply a thin layer of titanium nitride to the abutment, which will give it a golden color (in this case, the gray color of the titanium abutment will not show through the ceramic crown or gum). You can find out about a comparison of all the options for standard and individual abutments, as well as their costs, at the link above.
- The choice of crowns and type of fixation – ceramic crowns made of zirconium dioxide with zirconium abutments are the best option if the crown on the implant will fall into the smile line.
The absence of metal will not only give the crown a natural look, but also, thanks to the ceramic abutment, it will be possible to preserve the natural color of the gums around the implant. Fixation of crowns on implants can be screw or cement. I sincerely recommend that you choose only the first option (since screw fixation is a guarantee of your safety from the doctor’s hackwork). Moreover, this issue must be discussed with the doctor before concluding the contract, and demand that a clause be included in the contract stating that the fixation will be screw. Otherwise, you may end up with a hack that will then be impossible to fix.
- Temporary crowns – if you are planning immediate or early loading implantation, then in this case you will have temporary crowns made first. Most often they are made from a plastic impression or from a composite filling material. But, if the issue of quality is important to you, it is best for temporary plastic crowns to be made using the milling method (CAD/CAM technology).
Prosthetics on implants: reviews
You will be surprised, but most of the patients dissatisfied with implantation are not dissatisfied with the shape or color of the crowns, or the implant rejection that has occurred.
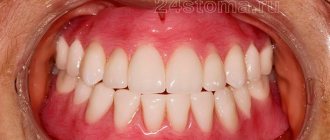
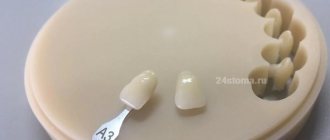
Almost 95% of all complaints relate to the unsatisfactory appearance of the gums around the neck of the implant (if we are talking about implantation in the area of teeth falling into the smile line). This is especially true for patients with a gummy type of smile. Of course, complaints about the poor aesthetics of the crowns themselves are also common (if the crown does not match the color and transparency of the surrounding teeth, standing out against their background). However, most often patients are dissatisfied with the appearance of the gums around the implant - the bluish color of the gums, the absence of gingival papillae, the occurrence of gum recession (i.e., a lowering of its level, resulting in exposure of the implant neck).
Most implantologists will try to screw in implants for you as quickly as possible so that you won’t run away anywhere. But only some implantologists know how to work with gum aesthetics. Therefore, if you are planning to implant your front teeth and have a gummy type of smile, it will be very difficult for you to find a suitable implantologist. Below we will give a couple of reasons that will inevitably cause gum problems after dentures.
- Thin gum biotype - to achieve good gum aesthetics, its thickness should ideally be at least 5 mm.
If your gum thickness is less (for example, 2-3 mm), then this means a 100% risk of poor aesthetics and the absence of gingival papillae around the implant. Even when planning implantation, the doctor must assess the thickness of the gums and plan an intervention that will forcefully increase its thickness. Such an intervention is, for example, transplanting a flap from the palate. It is most often carried out simultaneously with the installation of the implant, less often - after the end of the period of osseointegration of the implant. The meaning of the operation is that a small section of gum is taken from the palate (donor area) and sutured on the crest of the alveolar process - in the area of the installed implant. Unfortunately, such an operation quite seriously increases the cost of implantation.
- Lack of attached gums – gums around the teeth can be of 2 types: attached gums and mobile gums.
The attached gum is tightly fused to the periosteum and therefore does not move when the lips/cheeks move. The width of the attached gum around the implant should be at least 3-4 mm. If it is less, then over time the gums will detach from the implant - with the formation of a “gum pocket” and the development of peri-implantitis. As a result, there will be bluish, inflamed gum around the implant, and the inflammation will gradually lead to lowering of the gum level and exposure of the metal neck of the implant. Therefore, even when planning implantation, the doctor must assess the width of the attached gum and, if it is insufficient, perform a minor surgical intervention to increase it.
Functional diagnostics for occlusion restoration
Determination of the closure horizon and jaw relationship using a facebow and articulator SAM3, Protar or Amann Girrbach.
- Allows you to find and measure the parameters of future teeth, their relationship with the opposite row
- The data obtained is used to create a model of the prosthesis, select the number and position of implants
Removable prosthetics on implants –
Patients with complete absence of teeth know very well that the fixation of dentures on a toothless jaw leaves much to be desired, and every year it gets worse (due to the gradual atrophy of the bone tissue under the denture). And removable prosthetics on dental implants solves this problem.
In this case, implants are installed under the prosthesis to ensure its excellent fixation. This happens thanks to special locking fasteners, which consist of two parts. The first half of the locks is screwed into the implants, the second is installed in the plastic base of the removable denture (in the projection of the implants). When putting on the denture, the locks snap into place, and the denture is securely fixed in the oral cavity.
There are 2 types of fixation of removable dentures to implants -
- “Push-button” fixation, which can be achieved using either ball-shaped abutments or equatorial abutments of the Locator® system (Fig. 14),
- beam type fixation (Fig. 15).
1) Fixation on spherical and equatorial abutments –
First, 2-4 implants are installed in a toothless jaw: it is optimal to install 4 implants on the upper jaw, 2 or 3 are acceptable on the lower jaw. Next, abutments are screwed into the implants, which will protrude above the surface of the mucous membrane and will be part of the removable denture fixation system. At the moment, two types of abutments can be used - spherical or equatorial abutments of the Locator® system.
Next, in the body of the removable denture (in the projection of the installed implants), recesses are made into which silicone matrices are inserted. When putting on the prosthesis, the silicone matrices tightly grip the abutments and thus securely hold the prosthesis. After this, the latter can be removed only by applying sufficient force. The cost of such a prosthesis starts from 90,000 rubles (for 2021).
Fixation of the prosthesis on equatorial abutments (Locator®) –
This article is for informational purposes only, and you can learn as much as possible about the options for this type of prosthesis (using spherical abutments, Locator® system abutments), and find out the advantages and disadvantages of each fixation option in the article: → “Conditionally removable prosthetics on implants”
2) Beam type fixation –
Fixing a removable denture on a metal beam is a very effective, but very expensive fixation option (it will cost about 2-3 times more than the previous option). The high cost is explained by the complexity of manufacturing such a fixation system, however, chewing efficiency and chewing comfort will be maximum in this case.
Fixation of the prosthesis on a metal beam –
The metal beam can be fixed on 2-4 implants. Normally, there should be exactly 4 of them, but in order to save money, the beam is often made with support from 2-3 implants. The latter leads to the fact that the prosthesis will be well fixed only in the area of the front teeth, and in the area of the back teeth it will be balanced. In the projection of the metal beam in the body of the prosthesis, a recess is made into which several silicone matrices are inserted (Fig. 18). For more information about this type of prosthesis, see the link above.
Sources:
1. Add. professional
, 2. Personal experience of a dental surgeon (implantologist), 3. National Library of Medicine (USA), 4. “Prosthetics supported by implants” (Wohlfart Sh.), 5. “Dental prosthetics on implants” (Surov O.N. . ), 6. Mayo Clinic, USA.
Free consultation
Our specialists will conduct a free consultation and select the best treatment option for you.
Sign up now! Online registration
+7 (495) 649-41-19
Content
1 Fixed dentures: main characteristics 1.1 In what cases are fixed dentures installed in Moscow?
1.2 Pros and cons
2 Types of fixed dentures 2.1 Features of the use of veneers
2.2 When is the best time to use tabs?
2.3 Crowns per tooth
2.4 Features of installation of bridge structures
2.5 Fixed denture on implants
3 How to care for fixed dentures? 3.1 What hygiene procedures must be observed?
3.2 What special means must be used?