Types of drills
The variety of devices offered on the market comes down to three main types:
- drills for technical purposes;
- micromotors, or engravers for wood carving;
- mini-drills, or compact drills with a flexible drive.
They differ in purpose, size, power, and performance.
The design of both a powerful woodcarving drill and a micromotor is based on two main components: a high-speed electric motor and a replaceable tool mounted in a chuck.
Drills for technical purposes
Devices of this type are equipped with a fairly powerful engine and allow you to solve a wide range of problems. Structurally, they are divided into two blocks:
- Actually a drill. An electric motor is housed in a cylindrical housing. A collet or quick-release chuck is attached to its shaft.
- A power supply unit that houses a mains voltage converter of a transformer or pulse type.
- Power pedal. Allows you to free your hands for more precise holding of the device.
- Connecting cables.
Wood drill for technical purposes
The advantage of such carving drills is the ability to perform various operations on wood:
- drilling;
- boring;
- grinding.
As a disadvantage, it should be noted that the speed is relatively low compared to a Dremel for wood carving.
The market offers models from both domestic and foreign manufacturers. Domestic ones are affordable, but they lack the ability to operate for a long time without overheating, especially under high loads. They are well suited for hobbies; for professional use with significant volumes of work, it is better to opt for imported equipment.
Micromotors
Wood carving drills or micromotors are particularly compact, low power and high speed (up to 30,000 rpm). The attachments are also fixed to the working shaft of the electric motor.
Micromotors
Limited power does not allow the devices to achieve high productivity, but the low weight and size do not tire the hand, and high speeds allow you to perform the most delicate and filigree carving details.
Mini drills or compact drills with flexible drive
This class of devices are the battleships of the world of drills. Structurally, they differ in that they allow the installation of an attachment with a flexible drive shaft in place of the cartridge. Thus, the heavy drive device with the motor remains lying on the table (or suspended), and in the hand of the master there remains only a collet (or quick-release) clamp with the tool installed in it.
Such systems have high power (up to 200 watts) and develop high speeds (up to 30 thousand rpm). They are equipped with a large number of different cutters and abrasive attachments and allow you to perform a wide range of operations.
Hammer mini drill
The kit may also include a telescopic rod for attaching the device in a place convenient for the master.
General information
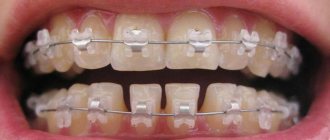
A dental drill is a multifunctional device whose operating principle is based on a rotation mechanism.
With its help, certain attachments are set in motion, used for preparation and treatment of the tooth surface.
In various models of drills, the rotation speed of components can reach from 1000 to 60,000 rpm. This allows the device to be used for various manipulations related to the treatment of the patient’s dental surface or the manufacture of dental structures.
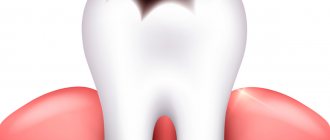
What it is?
A drill is a device that provides movement of the instrument with which dental procedures are performed . The device is rotary - this means that the movements performed are rotational.
The rotation speed of the instruments is high enough to perform many operations performed at dentists of various specializations.
The operating speed of these devices can reach 40 thousand revolutions per minute . Due to this, the sensations experienced by the patient are minimal. He does not feel pain, but many people develop a persistent dislike for the drill.
The fact is that during operation, the drive parts interact with each other, and their interaction generates a sound - whistling and quite high-pitched.
Photo: dental drill
Its tone affects the patient. At the same time, doctors do not experience such sensations, since they hear it constantly, get used to it and stop reacting.
An additional disadvantage and a negative factor influencing the attitude of patients is the vibration that will inevitably arise when working at such a speed, especially since the instrument comes into contact with hard tissues in the oral cavity, which enhances the perception.
Another feature of the operation of this dental apparatus is the rather unpleasant odor that occurs during the preparation of hard tissues . The tool seems to cut off parts of the tissue with fine dust, which is highly volatile.
Due to the high speed of movement, these particles heat up and, when they hit the corresponding receptors in the nose, cause associations with burnt bone. Water is used to cool the working tool, but it cannot completely prevent the spread of tissue particles removed from the tooth.
The best thing a patient who experiences extremely negative sensations just at the sight of a dental drill can do when entering the office is to relax as much as possible.
It must be remembered that all the unpleasant nuances of its operation are just technical features that should be treated like the engine of a running car.
To increase functionality, dental drills can be equipped with additional tools that are used to perform a wide range of operations with the highest precision.
Features of the dental unit
The installation includes a set of dental equipment (instruments, devices), which allows you to provide all types of dental services, namely:
- preparation and filling of hard dental tissues;
- endodontic and orthodontic treatment;
- restoration work;
- prosthetics;
- surgical treatment and tooth extraction;
- aesthetic procedures, etc.
Modern dental units are connected to the utility system (water supply and sewerage), have electric and air drives for operating handpieces, a compressor, are equipped with an air and water cooling system, an aspiration system and other equipment.
Where is it used?
Thanks to the huge range of rotational movements, the drill can be used in various fields of dental science:
- For therapeutic purposes, the device is used for cleaning carious cavities, preparing and polishing the tooth surface, and processing filling material.
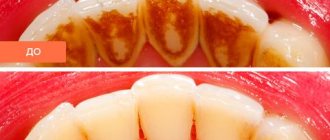
- In the periodontal field, the use of a drill allows you to quickly and effectively remove mineralized deposits from the tooth surface.
- The orthopedic field requires the use of a device for performing dissections of bone tissue, processing the dental bed when installing various prostheses, and preparing hard tissues of elements of the jaw row. In addition, the drill allows you to adjust, if necessary, manufactured crowns, bridges and other types of orthopedic products.
This is interesting: Is it possible to put a tooth knocked out in a fight back?
How to choose the right drill
The main criteria to consider when choosing a wood carving drill are as follows:
- engine power;
- revolutions;
- torque;
- weight;
- ergonomics.
Sadly, none of the devices on the market can simultaneously operate for a long time at high speeds and withstand high loads. Therefore, the best choice would be to purchase two drills:
- high-speed, low-power Dremel for making fine thread parts;
- powerful mini-drill for rough processing and sampling of large volumes of image background.
Many craftsmen also note that 30 thousand revolutions is a large reserve, and most operations are performed perfectly well at 10-20 thousand rpm.
When choosing, you should also pay attention to the set of attachments that will be offered in the kit.
How to use a hand drill
Every home master wants to get a high-quality and clear image. To do this, you need to follow simple recommendations:
- Make a stencil from thick paper or thin cardboard.
- Using carbon paper, transfer the outline of the design onto the workpiece.
- Draw the contours of the design using needle cutters or small drills.
- Select background areas using large cutters.
- Apply the base, rubbing in the paint or stain.
- Sprinkle the product with bronze powder. Excess powder should be blown off or wiped off with a soft cloth.
Using a stencil can significantly simplify the engraving operation, especially in the case of a repeating pattern. You need to carefully work with the tool near the stencil so as not to damage it and be able to reuse it on other areas of the part.
Wood carving with a flexible shaft drill
For beginner engravers, it is better to use devices with a flexible shaft. A true professional who has gained considerable experience can successfully handle any tool.
Engraving pen
Manual engraving at home requires: - A graver - A metal workpiece - Something solid to hold the metal workpiece, possibly a vice
For beginners, we recommend using a softer metal, such as copper or aluminum, as a workpiece.
A shtikhel is a rod, usually 120 -130 millimeters in size. The tip of the gravel is cut at a certain angle and sharpened. The second tip is inserted into the handle, usually wooden. Engraving pens come in various shapes and differ in the width of the working surface. If you don’t have this tool, you can easily make it yourself if you have the right materials. To make a graver you need tool steel. The metal used in ball bearings and springs is excellent here. To make a cutting surface, you need to use a cutter, a needle file, a file, cutting it into thin strips. The best material to make an engraving pen is P18 steel. You can also make a graver from circular saw blades. Then we sharpen the workpiece at an angle, which will allow us to make a notch of the required width. If we talk about the handle of a wooden pen, then it must be made of hardwood, with a width convenient for the master to hold in his hand. The mushroom shape is, in our opinion, the best option.
Read also: How to bend a muffler pipe with your own hands
Carving Tips
As a material for carving wood with a drill, it is better to choose wood species with a dense, uniform structure, such as:
- Linden;
- beech;
- alder;
- pear.
Species such as oak, spruce, pine and ash are less suitable; they reflect the texture of the design much worse.
The first step is to transfer the outlines of the drawing to the board and cover the background to be removed with shading. The contour of the selected area is outlined with a small round drill with a star-shaped cross section. Next, the entire background area is selected. If it has a large area, you can take a larger drill to speed up the process.
Be sure to use a cutting depth limiter. The cutting depth should be adjusted and practiced on a rough piece of wood. After cutting through the background, it needs to be sanded with sandpaper. Next, you can start cutting out the details of the image itself.
Wood carving
Upon completion of the entire drawing, it is sanded and covered with stain. After drying, you need to go over it with sandpaper so as to wipe off the stained layer from the protruding areas and leave it on the background.
Types and purpose of cutters and attachments
Drill attachments come in the following types:
- Abrasive attachments: cutting discs, cones, reverse cones and other rotating bodies. Designed for grinding thread parts.
- Wire brushes for roughing material.
- Steel cutters of different shapes. To perform basic operations - cutting out contours and sampling the background.
- Serrated blades. For processing thin relief details.
- Drill. For drilling through or blind holes.
- Balls for polishing and grinding thread parts.
- Felt circles. Serve for final polishing.
The cutters are made of high-strength and wear-resistant tool steel. Abrasive attachments are made mainly based on corundum. Abrasive attachments coated with diamond chips are particularly wear-resistant and precise.
Wood carving cutters
The collet clamp allows you to accurately secure and center the replacement tool. However, with strong lateral loads, its tightening must be checked periodically. The quick-release clamp does not have this drawback, but only tool shanks specially designed for it are suitable for it.
Components ↑
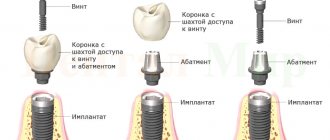
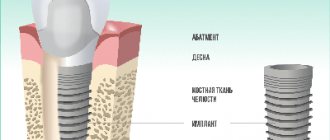
The main components of a dental drill are:
- Bur
used to remove parts of the hard tissues of the tooth and create microholes in it. Instead of boron, various cutting discs and grinding attachments can also be used. The latter are widely used to give the installed and hardened filling material a shape similar to the natural row of the patient’s teeth. - Tip
, the task of which is to fix the working tool (bur, discs, grinding attachments). The tips are bent and straight. In modern dental units, they can be equipped with a device for cooling the instrument and irrigating the dental treatment area with water. They often also have a built-in LED backlight or a fiber-optic system to display an image of the prepared area on a monitor. - Drive
that imparts rotational motion to a working tool (turbine or micromotor). The frequency of its rotation largely depends on the type of drive built into the drill. - Connection
connection to the dental unit or control unit.
Photo: Dental burs
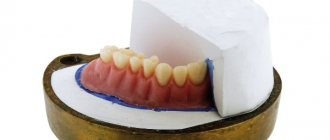
Final finishing of products
To finish the wood surface, felt and felt circles are used. They are fixed in a drill and lubricated with polishing paste, which makes it possible to achieve an almost mirror-like state of the wood surface. After completing all stages of mechanical processing, soft wood varieties are coated with transparent varnishes in one or several layers. This coating will protect the product from moisture and significantly increase its durability.
After the varnish has dried, the surface is polished again to achieve perfect smoothness and a mirror shine. Hard types of wood are not varnished, emphasizing the original texture of the material. Sometimes they are slightly tinted.