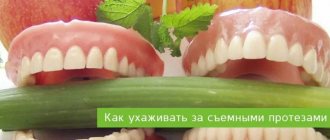
Features of the denture base
The denture base is attached to the human anatomical structures:
- on the upper jaw with the alveolar process and palate;
- on the lower jaw only with the alveolar process.
In addition to the function of attaching to the patient’s jaws, the elements perform a number of additional functions:
- basis for attaching the structural elements of a denture (guide plates, artificial teeth, frame, fastening);
- transfer of sensitivity during chewing to living human tissue;
- replacement of damaged gingival tissue, which forms a static function;
- support for tissues in case of operations on the face and mucous membranes.
The base is a frame for a denture, without which it is impossible to install them.
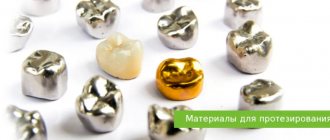
What materials are they made from?
Acrylic plastic. The base is a natural color that imitates gums. The prosthesis is made quickly, the dentition can be restored in just a few days. Plastic structures are budget-friendly, but they have a number of disadvantages. They are not firmly fixed (closing valves and special gels are usually used); they may be displaced, especially on the lower jaw. It takes more time to adapt; in the first weeks, taste sensations and diction change. Such structures are quite large in size and can get in the way in the mouth in the first days. The structure of acrylic is porous, which is why it can become dirty. The base is hard; if the prosthesis is made incorrectly, it will injure the mucous membranes.
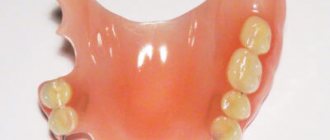
Nylon. Hypoallergenic material, elastic, the base imitates gums well. Non-porous - does not provoke the growth of bacteria. More often, structures made from it are used for partial prosthetics. Flexible clasps are used for fastening. Adaptation takes place quickly, nylon does not injure the mucous membranes. Due to its elasticity, dentures require frequent adjustments and may sag. The material is relatively soft and does not transfer the entire chewing load to the bone tissue, which is why after prosthetics its atrophy hardly slows down.
Acry Free. A polymer material that does not contain acrylic. It is strong but elastic, looks like gums, fits tightly to the mucous membranes, and adheres well to them (usually a fixing gel is not used). Akri Free does not cause allergies. Prostheses made from it do not take a long time to get used to, they do not injure the mucous membranes and do not interfere with diction.
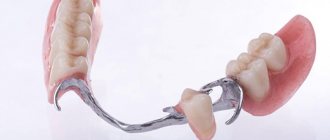
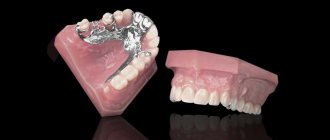
Metal. These are clasp structures that are used for partial edentia. Compared to plastic dentures, they are more rigid, durable, better restore chewing function, and slow down bone tissue atrophy. The metal base is covered with nylon or plastic to imitate gum. The palatal part remains open; when installed on the lower jaw, the base does not interfere with the tongue. This simplifies adaptation to the prosthesis and makes it more comfortable to wear: there are no problems with diction, changes in taste sensations, or nausea.
Indications for use
Indications for the use of prostheses with a metal base can be twofold: general medical (biological) and special. General medical indications include: allergies, bruxism, occupational characteristics, intolerance to plastic prostheses. Special ones include:
frequent breakdowns of plastic bases, multiple, small included defects in the dentition;
- replacement of central or lateral incisors;
- narrowing of the jaws;
- negative attitude towards continuous clasp;
- lack of even one distal support on the upper jaw;
- high attachment of the frenulum of the tongue;
- low clinical dental crowns.
Doctors suggest using removable dentures with a metal base in the treatment of patients with deep bites and maxillofacial patients (after resection of areas of the alveolar processes or jaws).
Features of patient examination. From the anamnesis, it is necessary to find out whether the patient has an allergic background, intolerance to acrylic plastics, whether the patient is undergoing prosthetics for the first time or repeatedly. The patient's feedback on old dentures and their general attitude towards removable plastic dentures are also taken into account.
Complete removable prosthetics. Average anatomical setting of teeth mas
Complete tooth loss directly affects a person's quality of life. And we are talking not only about the loss of a vital function of the body - chewing food - and restrictions in its choice, but also no less serious consequences for a person’s social status:
- poorly chewed food leads to various diseases of the gastrointestinal tract;
- impaired articulation and diction affects communication abilities;
- a change in appearance occurs: the chin moves forward, the lips lose their natural color, become pale pink and fall inward, thereby forming large wrinkles, the face takes on an unpleasant appearance;
- a person’s self-esteem decreases;
- the nervous system suffers.
Clinical and laboratory stages of manufacturing complete removable dentures
The mission of complete removable prosthetics can be defined not just as the production of prosthetics, but as the return to a person of his own “I”. The most effective achievement of the goal is possible only in the case of close cooperation between the dentist and the dental technician. Only by making maximum joint efforts and efforts can we return the patient to a full life and help him regain self-confidence.
Pre-forming The initial or preliminary impression is made with a standard tray.
Individual tray In order for the tray to have enough mass for an individual (functional) impression, the comb is filled with wax approximately one to two millimeters thick. This creates a place for the impression mass (Fig. 1 a, b).
Place for impression material (Fig. 1a)
Place for impression material (Fig. 1b)
Functional molding A prerequisite for a well-functioning, complete removable denture is the formation of the functional edges of the denture, the so-called valve zone. The transitional fold between the hard and soft mucosa, as well as all adjacent muscles, folds must be clearly imprinted on the functional cast (impression) (Fig. 2).
Functional molding (Fig. 2)
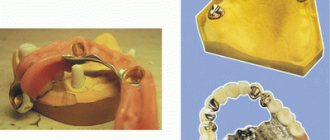
Individual model An individual model is cast from supergypsum (Fig. 3 a, b). In this case, you need to pay attention to the fact that the edges, cusps of the upper jaw and retromolar triangles are completely cast, otherwise the models are considered unsuitable for the manufacture of complete removable dentures. To prevent this from happening, you need to once again mark the border with a marker - approximately five millimeters from the edge of the spoon (Fig. 4).
Individual model made of supergypsum (Fig. 3a)
Individual model made of supergypsum (Fig. 3b)
Functional molding (Fig. 4)
Functional molding (Fig. 5)
The impression mass is cut along the drawn border and a strip of plasticine or wax is attached. Then an individual model is cast (Fig. 4).
Individual model (Fig. 4)
When processing the model, the transition between the hard and soft mucosa should be clearly visible on the model and should not have any damage. Making bite ridges (Fig. 7 a, b).
Making bite ridges (Fig. 7a)
Making bite ridges (Fig. 7b)
Determination of the bite Determination of the bite and markings on the bite ridges are performed by a dentist without the participation of a dental technician (Fig. 8).
- middle line.
- smile line
- line of the occlusal plane, or line of closure.
- fang location lines.
Determination of bite (Fig. 
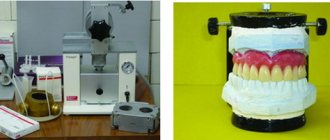
Average anatomical articulation of models with ARH The articulator (Fig. 9) sets the average anatomical parameters, Bennett angle and articular path inclination. The articulator stop pin is set to zero. The ARH is then inserted into the articulator (Fig. 10). The marks on the model showing the occlusal plane are transferred to the occlusal ridges in the area of the retromolar cusps (Fig. 11). The occlusal ridges are inserted into the ARH as follows: from the vestibular side, we focus on the point of the incisors, which is pointed at by the incisal needle (Fig. 12). The incisor point is the intersection point of two lines: the line of mouth closure - the occlusal line and the midline of the face. On the buccal side, the occlusal plane passes through the point of the incisors and the upper quarter of the retromolar cusps (Fig. 13). Plastering of models begins with the top model. The upper model is placed in the installed device with occlusal ridges and plastered (Fig. 14). The ARH is removed from the articulator, the articulator is turned over, the mandibular model is placed and then cast (Fig. 15). ARH allows you to quickly and accurately plaster models into the articulator, ensuring compliance with all the rules of average anatomical articulation of the model (Fig. 16).
rice. 9
Figure 10
rice. eleven
rice. 12
rice. 13
rice. 14
rice. 15
rice. 16
Analysis of models and selection of teeth The correct selection of teeth for the patient is of no small importance. Photographs of the patient taken earlier in his life can help. If there are no photographs, the dentist can make the right choice based on the shape of the patient’s face, the width of the nose, and the shape of the patient’s mouth. It is also very important to determine the optimal enamel color for the patient. If this data is not available, it will be more difficult for the dental technician to make a choice. In this case, correct analysis of the models and knowledge of the average anatomical ratio of the models can help.
Analysis of models The models mark points and places that remain unchanged during atrophy. The dental technician should focus on these points. There are several types of model analysis. Each author of one or another method of setting teeth adds something of his own, but they all rely on a common basis for analyzing the model, and this knowledge is quite enough to perform the work in a high-quality manner. At the same time, analysis of the model of the lower and upper jaws is equally useful for the dental technician. When setting teeth, the technician himself chooses which model to start with. In this case, the setting of teeth begins with the lower jaw.
Analysis of the lower jaw model (Fig. 17)
Analysis of the lower jaw model (Fig. 17):
- transitional fold.
- alveolar ridge.
- positions of the lower canines.
- retromolar cusps.
- middle of retromolar cusps.
- occlusal plane marks.
- guide line for setting lateral teeth.
- guide line for setting the anterior teeth.
- line of transitional fold in the vestibular part.
Application The transitional fold indicates the border of the future prosthesis. The alveolar ridge indicates where the teeth should be placed. The central fissures of the lateral teeth of the lower jaw should pass exactly in the middle of the alveolar ridge. The positions of the lower canines help in choosing the width of the dental set and determine the placement of the lower canines. The shape of the dentition of the anterior teeth of the lower jaw is measured by the Bonvel circle, and the lower canines influence the size of this circle. The medial edge of the canines and the lingual edge of the retromolar cusps form one line (Poundsche Lineia). This line serves as the boundary for the lingual cusps of the lateral teeth of the lower jaw. Violation of this boundary leads to the fact that the patient will constantly bite his tongue when opening and closing his mouth. Retromolar cusps. The upper quarter of the retromolar cusps indicates where the occlusal plane lies. These marks lie at the same level as the occlusal plane marks on the articulator and at the level of the incisal needle. The distal border of the retromolar cusps is the border of the prosthesis. Midpoint of the retromolar cusps from these points: The midpoint of the model is measured if desired by the technician and this helps with identifying the upper quarter of the retromolar cusps. Occlusal plane marks help in articulating and positioning teeth. This is the contact point of the distolingual cusp of the seventh molar. The first and second frontal teeth are placed on the orientation line for setting the frontal teeth. The line of the transitional fold in the vestibular part determines the boundary of the vestibular surface of the anterior teeth. For subsequent orientation when setting teeth, the marks of the occlusal plane, the orientation line for setting the lateral teeth, the line for setting the anterior teeth and the line of the transitional fold in the vestibular part are transferred to the edge of the model.
Analysis of the upper jaw model (Fig. 18)
Analysis of the upper jaw model (Fig. 18):
- transitional fold.
- alveolar ridge.
- tubercles of the upper jaw.
- A-line.
- first large palatal folds.
- incisive papilla.
Analysis of the upper jaw model differs from the analysis of the lower jaw in that here it is necessary to calculate the positions for setting the teeth. If the setting of the teeth begins with the lower jaw, then the setting of the upper jaw is adjusted to the lower jaw. If the setting of teeth begins with the upper jaw, it must be taken into account that with atrophy, the upper jaw becomes smaller and atrophies inward, and the lower jaw atrophies outward and becomes larger and wider, thereby making the setting of teeth more complicated. Selecting the shape and size of teeth Classic selection of teeth remains the best and most reliable method. This method uses models made before the teeth were removed, as well as photographs of the patient smiling.
Selecting the size of teeth using the marks on the occlusal ridges The length and width of the teeth can be calculated from the marks on the occlusal ridges (Fig. 19). The length of the teeth is determined by the distance from the line of mouth closure to the smile line, by the width from the middle of the face to the line of the canine or from canine to canine. The size information is on the teeth bars.
Markings on the occlusal ridges (Fig. 19)
When the dimensions of the front teeth, for example, the lower jaw, are known, it is very easy to correctly select the front and lateral teeth of the upper jaw using the table. For example, for the lower anterior teeth I3, the suitable front teeth would be the upper jaw teeth 33 and the lateral teeth T2 or T3 (Table No. 1).
Selection table for anterior and posterior teeth
With the sizes selected from the table, it is very easy to correctly position the teeth, since they are specially made for each other. The example table is from Primodent.
Teeth alignment according to the mas system; average anatomical teeth alignment
The MAS system includes average anatomical parameters of jaw relationship and tooth alignment. The system consists of two parts:
- ARH (Fig. 20). With the help of ARH, models are articulated into the articulator according to the average anatomical parameters of the jaw relationship in such a way that it remains possible to use the second part of the AFH for setting teeth.
- AFH. With its help, teeth are positioned (Fig. 21).
ARH (Fig. 20)
AFH (Fig. 21)
Teeth setting Teeth setting according to the MAS system begins with the lower jaw. The AFH is installed in the articulator (Fig. 22).
rice. 22
Then the mandibular model is installed in the articulator and the AFH is set based on the analysis of the model. Horizontal guides, pointing to the occlusal plane in the vestibular part, are installed on the canine points (Fig. 23).
rice. 23
In the dorsal part, they are aligned along the marks indicating the middle of the alveolar ridge, touching the retromolar triangles. The lower part of the vestibular plate should face the transitional fold (Fig. 24).
rice. 24
Placement of anterior teeth The first and second anterior teeth of the lower jaw are installed exactly in the middle of the alveolar ridge, without extending the labial plane beyond the middle of the transitional fold. When viewed from the vestibular side, they stand straight and the incisal edge is flush with the occlusal plane; on the incisal side, they are slightly rounded, thereby forming the beginning of the Bonvel circle. The third tooth or canine is placed half a millimeter above the incisal edge of the first and second teeth, the neck of the three is pulled outward and forms an inclination of the tooth. The distal edge should face the buccal border of the retromolar triangle. On the vestibular side, the triplets are slightly inclined inward; on the incisal side, they continue the Bonvel circle and from the distal edge to the buccal border of the retromolar triangle they form a guideline along which the buccal cusps of the chewing teeth are aligned. From the medial edge to the lingual border of the retromolar triangles there is a Pounchet line indicating the border of the lingual cusps of the posterior teeth.
Positioning Teeth with AFH Once the AFH has been placed in the articulator, it is opened and the anterior teeth are positioned from the incisal point (middle) to the right and left. The first and second ones are placed with the cutting edge on the vestibular plate, and the threes are placed with the tip in the angle formed between the vestibular plate and the horizontal guide. The teeth are then lightly secured with wax (Fig. 25).
rice. 25
The articulator is closed and the teeth are molded with wax to the model (Fig. 26 a, b).
rice. 26a
rice. 26b
The articulator opens, and the placement of the anterior teeth is obtained according to all average anatomical rules (Fig. 27 a, b).
rice. 27a
rice. 27b
Positioning of chewing teeth The first premolar is installed with the buccal cusp at the level of the horizontal guides, and the central fissures pass exactly under them (Fig. 28 a, b). Second premolar (Fig. 29 a, b). First molar (Fig. 30 a, b). Second molar (Fig. 31 a, b).
rice. 28a
rice. 28b
rice. 29a
rice. 29b
rice. 30a
rice. 30b
rice. 31a
rice. 31b
All teeth are positioned correctly, in compliance with all the necessary rules of average anatomical setting (Fig. 32 a, b).
rice. 32a
rice. 32b
The MAS system allows the dental technician to perform tooth alignment very easily, quickly and accurately. Another huge advantage of this system is that once the placement is completed, a silicone key is made on the posterior teeth (Fig. 33).
rice. 33
The silicone key makes it possible to make the next placement with the same teeth sizes even faster. The teeth are simply inserted into the silicone key (Fig. 34).
rice. 34
The silicone key is placed on the horizontal guides, and the teeth are molded to the model with wax. Thus, all subsequent work will take even less time (Fig. 35 a - c).
rice. 35a
rice. 35b
rice. 35v
Installation of ARH in the articulator The articulator is set according to the average anatomical parameters. An incisal needle is inserted into the thrust pin, the ARH is secured with rubber bands, aligned to the marks in the articulator in the center of Bonvel's equilateral triangle and plastered (Fig. 36 a - c).
rice. 36a
rice. 36b
rice. 36v
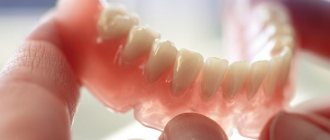
Finished dentures (Fig. 37 a - c).
rice. 37a
rice. 37b
rice. 37v
Advantages
The metal base is more durable, and the structure can serve its owner for many years without losing its performance properties. This prosthesis has other advantages:
- Reasonable price;
- Prevention of gum diseases;
- The ability to combine prosthetics with dental treatment;
- Easy maintenance of the structure;
- Possibility to leave the denture in the mouth overnight.
The prosthesis is fixed in the mouth using clasps or attachments. Clasps are hooks attached to the very base of the supporting teeth.
Device structure
The base is made of acrylic plastic used for medical purposes. Often a metal alloy is included in the base or reinforcement is made, this allows improving the technical properties of the material:
- the strength of the apparatus increases;
- characterized by high thermal conductivity;
- has increased hypoallergenicity.
The element must have a certain structure that will guarantee long-term operation of the device and make its use more comfortable for the patient:
- for correct, uniform distribution of pressure when chewing;
- the material should minimally adsorb elements of saliva and food residues;
- a base that is convenient for easy and quick cleaning of the material with specialized means;
- strength characteristics must be high;
- the elasticity must also be sufficient, since the material is modeled under the alveolar process of the jaw arch;
- the plasticity of the apparatus should be minimal;
- an increased level of biocompatibility of the material is necessary to eliminate unwanted reactions of the body.
Nylon and polypropylene prostheses
Continuing the topic of removable dentures using injection molding, I would like to dwell on dentures made of nylon and polypropylene.
First, let's compare the advantages and disadvantages of nylon and acetal prostheses (Table No. 1).
Table No. 1. Advantages and disadvantages of nylon and acetal prostheses
Nylon dentures | Acetal dentures | |
| Advantages | 1. They don't break. 2. Do not cause allergies (except for cases of individual intolerance to nylon). 3. Do not require treatment of supporting teeth. 4. They do not damage the enamel of the supporting tooth. 5. Good cosmetics (not noticeable in the oral cavity). | 1. They do not break (fracture is possible when deformed at an angle of 90° or more). 2. Do not cause allergies (except for cases of individual intolerance to acetal). 3. Do not require treatment of supporting teeth. 4. They do not damage the enamel of the supporting tooth. 5. Good cosmetics (not noticeable in the oral cavity). |
| Flaws | 1. Plastic teeth do not chemically bond with nylon, frequent loss of plastic teeth, formation of dental plaque between the teeth and the nylon base. 2. Relining, repairing and welding of the tooth is impossible (in case of loss of one’s own teeth and changes in the alveolar process, which shortens the life of such a prosthesis to six months). 3. The chewing load is not distributed between the teeth and the alveolar process (jaw); as a result, atrophy of the alveolar process of the jaw. 4. Poor fixation with short teeth and an unpronounced equator. 5. It is poorly polished, and hence the next disadvantage: after about six months, the prosthesis changes color and becomes rough. Also, as a result of constant loads, the structural and optical properties of the material change. Thus, the main advantage of flexible nylon prostheses - excellent aesthetics - disappears very quickly. And the cost of a nylon prosthesis, mind you, is several times higher than that of a proven acrylic removable prosthesis. | 1. Insufficient transparency of the material, resulting in less aesthetics compared to nylon. 2. It cannot be used for the manufacture of denture bases, only for the clasp frame. 3. The need to use acrylic plastic as a base material. Possibility of fracture if deformed at an angle of 90° or more. 4. Poor fixation with short teeth and an unpronounced equator. These are disadvantages: they, of course, do not outweigh the advantages, but at the same time they exist. |
Next, as usual, I will start with indications and contraindications, as well as possible designs.
Removable dentures made of nylon and polypropylene have one significant drawback: their relocation is practically impossible due to the complexity and high cost of its implementation. Relining a nylon or polypropylene prosthesis is comparable in cost to making a new prosthesis, and the quality of the prosthesis after relining leaves much to be desired. That is why I would exclude the concept of relining nylon and polypropylene prostheses from the description of such prostheses altogether.
Taking into account the impossibility of simple relining of nylon and polypropylene prostheses, we will consider the indications and contraindications. Nylon prostheses have historically been intended for patients in dangerous professions, such as the US military and police, and these prostheses have also been successfully used for prosthetics for patients with epilepsy. This application was due to the fact that nylon prostheses cannot be broken and injured by fragments of the prosthesis, as is the case with acrylic prostheses.
The main properties: flexibility, strength, lack of allergies and transparency - determine the indications for the use of nylon prostheses.
But, oddly enough, these indications are quite narrow. First of all, these are patients with dangerous professions and conditions: military personnel, firefighters, police officers, and so on - and patients who cannot control their condition, such as epileptics. Secondly, patients with allergies to acrylic.
In other cases, the best result can be obtained by using other materials.
The main disadvantage of nylon prostheses is the difficulty of polishing and low abrasive resistance. What does this mean? It is difficult to polish a denture, and after a short period of wear, a polished denture loses its shine. The flexibility of the prosthesis and the lack of a chemical bond with artificial teeth lead to the formation of black microbial plaque between the artificial teeth and the base. However, despite the shortcomings, prostheses were and are in great demand among patients.
The demand is primarily due to the fact that nylon prostheses are flexible and, unlike acetal (which I wrote about in a previous article), transparent and, accordingly, more aesthetic. Patients are attracted primarily by the absence of metal support clasps, as well as the absence of the need for support crowns, as in clasp prosthetics with attachments and locks.
Although many dentists and patients believe that the flexibility of a removable denture is a benefit, this is actually not the case, especially when it comes to complete dentures. The fact is that the flexibility of nylon is needed in the manufacture of supporting elements (clasps and pelots), but a complete removable denture does not have them by definition. In addition, significant replacement of lost alveolar processes with the base of the prosthesis negates all the flexibility of the material. Well, the low abrasive resistance of the material and the unsightly appearance of such prostheses after a short time of wear make one think about the advisability of using nylon in each specific clinical case.
Most likely, it was the disadvantages of nylon that forced manufacturers of dental materials to intensify research in the search for a material that would combine the advantages of acrylic, acetal and nylon as much as possible. There are many varieties of nylon with varying degrees of hardness and abrasion resistance. Although they all leave much to be desired.
So far, the closest to this ideal is polypropylene. Although, like nylon, it cannot be relined as easily as acrylic.
Polypropylene has several distinctive features from nylon. Polypropylene is better polished and less likely to scratch during use. Due to greater rigidity than nylon, in polypropylene prostheses there are practically no gaps formed between artificial teeth and the base and no microbial plaque is formed in them, although, like nylon, polypropylene does not chemically bind to artificial teeth. In addition, the greater rigidity of polypropylene makes it possible to make retaining elements (clasps and pelots) of a smaller size than from nylon.
Let's look at what kind of prostheses can be made from nylon and polypropylene. The worst option for these materials is a complete denture.
But, fortunately, there are very few patients who need complete removable dentures made of nylon or polypropylene.
Partial dentures
Polypropylene is well suited for small removable dentures for one to three teeth with dentoalveolar pads. Such microprostheses are practically invisible in the mouth and adhere perfectly to the supporting teeth, of course, if these teeth have an equator. When making larger partial dentures, there are a number of rules that must be followed.
As with acetone dentures, polypropylene dentures can be used to treat any defect in the dentition that can be replaced with partial removable dentures. A complete contraindication is the absence of an equator on the supporting teeth, which can most often be observed on stamped crowns and quite often on fangs.
A relative contraindication is a deep palate, since the prosthesis may not fit tightly to the mucous membrane in the palate.
When making dentures from polypropylene, you should not use reversible clasps.
Prints and models
In my opinion, the best materials for taking impressions for polypropylene dentures are silicone impression compounds for removable dentures.
Models, including those for casting prostheses, must be made of class 4 supergypsum with a Brinell hardness of at least 250 N/mm2.
Stages of manufacturing polypropylene prostheses
We cast two models using a silicone impression. One is working, and the second is for casting the prosthesis. We remove from the model all the sagging and balls formed as a result of filling the print defects with plaster. We plaster the working model with the antagonist model into the articulator. We perform occlusal grinding of the working model and antagonists. We mark the model and draw the outline of the future prosthesis using a water-soluble pencil (Fig. 1, 2).
Rice. 1. We mark the model and draw a drawing of the outline of the future prosthesis using a water-soluble pencil.
Rice. 2. We mark the model and draw the outline of the future prosthesis using a water-soluble pencil.
Base wax with a thickness of 1.25 mm is excellent for modeling the arches of the upper and lower dentures. The modeling of the prosthesis itself does not differ from the modeling of a conventional removable denture, with the exception of the places where the clasp exits from the base of the denture. It is important to remember that when installing an artificial tooth next to an abutment tooth, you need to leave enough space for the clasp body, so we first model the full profile of the clasp, and then install the artificial tooth.
If in the process of making dentures it is necessary to try on the arrangement of teeth on wax, then first we make a wax composition that is absolutely similar to a standard removable denture, and then we reduce the wax composition and model the clasps or pelots (Fig. 3-12).
Rice. 3. We make a wax composition that is absolutely similar to a standard removable denture. Rice. 4. We make a wax composition that is absolutely similar to a standard removable denture. Rice. 5. We make a wax composition that is absolutely similar to a standard removable denture. Rice. 6. We make a wax composition that is absolutely similar to a standard removable denture. Rice. 7. We make a wax composition that is absolutely similar to a standard removable denture. Rice. 8. We make a wax composition that is absolutely similar to a standard removable denture. Rice. 9. We make a wax composition that is absolutely similar to a standard removable denture. Rice. 10. We make a wax composition that is absolutely similar to a standard removable denture. Rice. 11. We make a wax composition that is absolutely similar to a standard removable denture. Rice. 12. We make a wax composition that is absolutely similar to a standard removable denture.
The final modeling is carried out on the second model, intended for casting the prosthesis. To do this, we transfer the wax composition with teeth from the model, plastered in the articulator, to the second model and very carefully bring the shape of the wax composition to the final form of the prosthesis (Fig. 13-14).
Rice. 13. Final modeling on the second model, intended for casting the prosthesis.
Rice. 14. Final modeling on the second model intended for casting the prosthesis.
The edges of the wax composition should be well adhered to the model, there should be no excess wax on the artificial teeth, and the wax should be polished (Fig. 15-16).
Rice. 15. The edges of the wax composition must be well molded to the model.
Rice. 16. The wax must be polished.
Before plaster casting the model into the casting ditch, we file down the plaster teeth so as to eliminate undercuts (Fig. 17-18).
Rice. 17. Before plaster casting the model, we file down the plaster teeth into the casting cuvette.
Rice. 18. Before plaster casting the model, we file down the plaster teeth into the casting cuvette.
Lubricate the inner surface of the casting cuvette with petroleum jelly and mix 300 grams of third-class gypsum and 90 ml of distilled water in a vacuum mixer. While mixing the plaster, place the model in water. After filling the lower part of the cuvette with plaster, we immerse the model with the base down to the beginning of the base of the prosthesis, as close as possible to the casting entrance. If necessary, we cover some parts of the plaster model with plaster to eliminate undercuts (Fig. 19-20).
Rice. 19. After filling the lower part of the cuvette with plaster, immerse the model.
Rice. 20. After filling the lower part of the cuvette with plaster, immerse the model.
After approximately 40 minutes, you can begin installing the gating system and pouring the second part of the cuvette (Fig. 21).
Rice. 21. Installation of the gating system.
To maintain uniform coloring of the prosthesis, it is advisable to use a wide flat sprue that smoothly converges to the hole of the cuvette, which is intended for injection of plastic (Fig. 22-24).
Rice. 22. To maintain uniform staining of the prosthesis, it is advisable to use a wide, flat sprue.
Rice. 23. To maintain uniform staining of the prosthesis, it is advisable to use a wide, flat sprue.
Rice. 24. To maintain uniform staining of the prosthesis, it is advisable to use a wide, flat sprue.
Mix the gypsum mixture in a vacuum mixer.
Before filling the cuvette, it is lubricated with Vaseline and collected. Water is poured into the cuvette for a few minutes, and before pouring the gypsum mixture, the water is poured out and the residue is thoroughly shaken off. After filling the second half of the flask with plaster, I recommend placing the cuvette in a vessel under pressure of 1 atmosphere. This is necessary so that air does not escape from the first plaster half and from the model, which can lead to the formation of pores in the plaster of the second half of the cuvette.
After 40 minutes, the cuvette, without disassembling, must be placed in boiling water.
After waiting until the wax begins to flow out of the hole in the cuvette, remove it from the water, disassemble it and rinse with boiling water.
After the cuvette has cooled, an insulating varnish can be applied.
For this article, I decided to use two methods of isolating plaster from plastic.
The lower jaw was insulated with a standard insulating agent from thermomolding polypropylene, and the upper jaw with a non-standard agent suggested to me by C. He suggested covering the plaster with photopolymer varnish (Fig. 25-28).
Rice. 25. Isolation of the lower jaw.
Rice. 26. Isolation of the lower jaw.
Rice. 27. Isolation of the upper jaw.
Rice. 28. Isolation of the upper jaw.
After isolating the gypsum, we assemble the cuvettes and proceed directly to casting.
For better casting results, the cuvette can be heated to 130 degrees, but even without heating it turns out quite well.
Polypropylene casting
Polypropylene is sensitive to heat: if you heat the polypropylene just 5 degrees higher than necessary, the color of the prosthesis will not be pink, but orange. And at the same time, it is worth underheating by 5 degrees to the optimal temperature, and we will end up with underfilling of the thin parts of the prosthesis. For each casting machine, it is necessary to experimentally select the casting temperature by casting several plates and assessing their color and the quality of the thin parts (Fig. 29).
Rice. 29. For each casting machine, it is necessary to experimentally select the casting temperature by casting several plates.
My J-100 is set to 265 degrees final temperature and 7 minutes of preheat. Press pressure 7.5 atmospheres.
Please note that diotic holes must be made in the teeth for fixation in the prosthesis (Fig. 30).
Rice. 30. Diotary holes must be made in the teeth for fixation in the prosthesis.
After casting and cooling the cuvette and removing the prostheses from the plaster, we can see the result of casting. The upper denture shines like a Christmas tree decoration, and the lower denture is matte. However, both prostheses have virtually no plaster residues. Both methods of isolation are clearly effective, but the method of Grigory Alekseevich Shalik is certainly more effective, and the prosthesis practically does not need to be polished (Fig. 31-34).
Rice. 31. The denture practically does not need to be polished.
Rice. 32. The denture practically does not need to be polished.
Rice. 33. The denture practically does not need to be polished.
Rice. 34. The denture practically does not need to be polished.
After fitting on models plastered in the articulator and polishing, the finished dentures can be sent to the clinic.
Polishing polypropylene requires some skill and patience from the dental technician. It is important to carry out processing and polishing at low speeds of the abrasive tool. After sanding, use a sharp scalpel to remove any fibrous material from the edge of the denture. For polishing, use water- or oil-based pastes designed for polishing plastics with a fine filler.
To add shine, use thread brushes.