Home \ Dental materials, instruments and equipment \ Gradia Direct / Gradia Direct
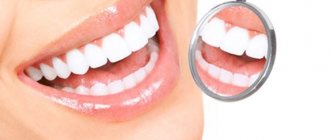
Gradia Direct is a light-curing restorative hybrid composite. The new hybrid composite Gradia Direct will satisfy the most sophisticated aesthetic needs. It guarantees the creation of naturally flawless and reliable restorations using both multi-layer and single-layer application techniques. Thanks to its unique color adaptation to the shades of the hard tissues of the teeth being restored, Gradia Direct sets a new standard for aesthetic “invisibility” and ease of use. The combination of different shades - a maximum of three for the anterior group of teeth and two for the chewing teeth - provides excellent aesthetic results.
Features and Benefits
- Microphilic hybrid composite
- One complete restorative system for all indications
- The unique system consists of Standard, External Special and Internal Special shades to create “invisible” restorations
- Extended operating time due to low sensitivity to external light source
- Balanced viscosity ensures excellent performance properties
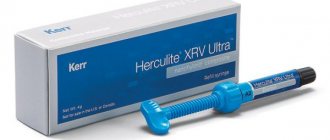
Gradia Direct Posterior - GC - gradia direct, shade PA2
LIGHT CURING COMPOSITE RESTORATIVE MATERIAL
For use by dentists only and only as directed. GRADIA DIRECT is a visible light cured microfilled hybrid composite. It is available in two versions: GRADIA DIRECT ANTERIOR and GRADIA DIRECT POSTERIOR.
GRADIA DIRECT was created to reproduce the natural appearance of teeth; it is available in various shades and degrees of transparency and imitates the natural opalescence and fluorescence of tooth tissue. GRADIA DIRECT is available in Unitip cannulas and syringes. GRADIA DIRECT POSTERIOR is a radiopaque material.
INDICATIONS A. GRADIA DIRECT ANTERIOR 1. Direct restorations of cavities of classes III, IV and V. 2. Direct restorations of wedge-shaped defects and carious lesions on the root surface. 3. Making veneers using the direct method and closing diastemas. B. GRADIA DIRECT POSTERIOR 1. Direct restorations of cavities of classes I and II.
CONTRAINDICATIONS 1. Direct pulp capping. 2. In rare cases, the material may cause hypersensitivity in some individuals. If such reactions occur, stop using the material and consult a qualified physician.
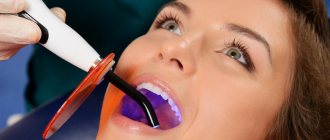
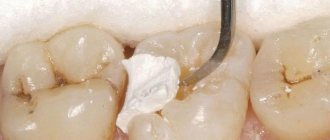
DIRECTIONS FOR USE A. RESTORATION TECHNIQUE 1. Selection of shade Clean the tooth with pumice and water. The honey mushroom must be selected before isolating the tooth using a rubber dam. Choose the right material shades using the GRADIA DIRECT colorway. 2. Preparing the cavity Prepare the cavity in the usual way. Note: Use calcium hydroxide for pulp capping. 3. Bonding To bond GRADIA DIRECT to enamel and/or dentin, use a light-curing adhesive system such as GC Fuji Bond LC or UniFil Bond. Follow the manufacturer's instructions. 4. Application of GRADIA DIRECT 1) Using material in cannulas Insert the GRADIA DIRECT cannula into a Unitip applicator or similar. Remove the cap and squeeze the material directly into the cavity. Squeeze out the material evenly, removing the applicator with the cannula from the mouth, lightly pressing on its handle. This will prevent the cannula from falling out of it. 2) Using the material in the syringes, remove the cap and squeeze the material onto the mixing paper. Introduce it into the cavity using a suitable tool. After extruding the material, turn the syringe handle counterclockwise half a turn or one full turn so that the material at the syringe tip is slightly retracted, and immediately replace the cap. Note: 1. In general, esthetic restorations can be achieved using one of the Standard Shades. A more detailed description is available in the Practical Tips section. 2. When squeezing out material that has just been removed from the refrigerator, difficulties may arise. Let it sit at room temperature for a few minutes before using. 3. After extruding the material, do not hold it in the light for too long. Natural lighting can reduce working time.
PRACTICAL TIPS 1. Cavities in the anterior teeth a. Small cavities. Restore using one shade of material and a layering technique. In most cases, one standard assessment will be enough. In cases where higher transparency is required, one of the special external shades can be used. See also Examples of Clinical Applications. b. Large cavities In most cases, the best results will be achieved using a layering technique using multiple shades. To prevent show-through of the oral cavity or to camouflage discolored dentin, use a suitable Inner Shade and continue restoring using Standard Shade. To add vitality to the restoration, for example to convey age-related changes, the last layer should consist of a special external veneer. See also Examples of Practical Applications and/or refer to the shade combination table. 2. Cavities in the lateral teeth a. Small cavities Restore using one layer of material and layer-by-layer technique. In most cases, one Standard shade will be enough. In cases where higher transparency is required, one of the special External Openings can be used. See also Examples of Clinical Applications. b. Large cavities Apply a flowable composite such as GC UniFil Flow* to the bottom of the cavity. Then apply the Standard Shade material. To achieve optimal aesthetics, use a special external coating material as the last layer. See also Examples of Clinical Applications. * GC Fuji LINING PASTE RAC, GC Fuji LINING LC or GC Fuji IX GP can also be used as a lining or base for the restoration. Refer to the manufacturer's instructions for the appropriate materials.
G RADIA DIRECT ANTERIOR. TIME AND EFFECTIVE DEPTH OF POLYMERIZATION Curing time Shade Plasma arc* Halogen polymerizer** LED polymerizer*** (3 sec) (20 sec) (24 sec) (6 sec) (40 sec) (40 sec) CT,NT,WT, GT,CVT 3.0 mm 3.5 mm A1,A2,B2,BW,DT 2.5 mm 3.0 mm AZ,VZ 2.0 mm 3.0 mm A3.5,A4,SZ,A02,AZ,A04, CV,CVD 1.5mm 2.5 mm GRADIA DIRECT POSTERIOR. TIME AND EFFECTIVE DEPTH OF POLYMERIZATION Curing time Shade Plasma arc* Halogen polymerizer** LED polymerizer*** (3 sec) (20 sec) (24 sec) (6 sec) (40 sec) (40 sec) P-A1,P- A2,P-WT,P-NT 2.5 mm 3.0 mm R-AZ, R-A3.5 2.0 mm 3.0 mm * Plasma arc: GC Flipo ** Halogen polymerizer: Coe Luna TA *** LED polymerizer: GC e-Light (fast cure mode) Note: The material must be applied and cured in layers. The maximum permissible layer thickness is given in the tables.
7. Finishing and polishing Contouring and polishing as usual. Cleaning and Sterilizing the Cannula Applicator 1. Clean the applicator with an alcohol swab. 2. The applicator should be autoclaved at 121-135°C for 10 to 30 minutes or disinfected with alcohol. Note: 1) Do not attempt to sterilize at temperatures above 135°C during the dry phase of the autoclaving process. Otherwise, the applicator may be damaged. 2) Using various chemicals for disinfection/sterilization may damage the applicator and is therefore not recommended.
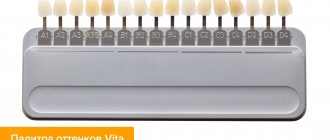
SHADES 1. 20 shades for restoration of anterior teeth Standard shades: BW (Whitening White), A1, A2, A3, A3.5, A4, B2, VZ, NW, O/ (Cervical), CVD (Cervical Dark) Special Internal shades : A02, AAZ, A04 Special External shades: WT (White Transparent), DT (Dark Transparent), CT (Colorless Transparent), NT (Natural Transparent), GT (Grey Transparent), CVT (Cervical Transparent) 2.6 shades for restorations lateral teeth Standard shades: R-A1, R-A2, R-AZ, R-A3.5, Special External shades: P-WT (White Transparent), P-NT (Natural Transparent). Note: Shades A, B, C, AO are based on Vita* shades. * Vita is a registered trademark of Vita Zahnfabrik, Bad Sackingen, Germany.
STORAGE Store the material in a cool, dark place at 4-2 5°C away from heat sources and direct sunlight. Expiration date: 2 years from the date of issue.
ATTENTION 1. If the material gets on the oral mucosa or skin, immediately remove it with a sponge or cotton wool soaked in alcohol. Rinse with water. 2. If material gets into your eyes, rinse them immediately with water and consult a doctor. 3. Do not allow the patient to swallow the material. 4. To avoid possible sensitivity due to direct contact with the oxygen-inhibited layer of the composite, wear gloves when working with GRADIA DIRECT. 5. To prevent cross-infections, use each cannula for one patient only. 6. Wear safety glasses when performing light curing. 7. When polishing polymerized material, be sure to use a dust collector and wear a protective mask. 8. Do not mix GRADIA DIRECT material with other materials.
Gradia Direct Anterior - for restorations in the area of the anterior teeth (4 g syringe)
Light-curing microphilic hybrid composite Gradia Direct Anterior , for restoration of the anterior group of teeth. Individual shades. Syringes (Anterior version - 2.7 ml/4 g).
Anterior shades:
- Standard: A1, A2, A3, A3.5, A4, B1, B2, B3, C3, CV, CVD, BW, XBW.
- Domestic Special: AO2, AO3, AO4.
- External Special: NT, CT, DT, WT, GT, CVT.
Gradia Direct Anterior will satisfy your most sophisticated aesthetic needs. This material guarantees the creation of natural, flawless and reliable restorations using both multi-layer and single-layer application techniques. Thanks to the unique shade adaptation to the shades of the hard tissues of the teeth being restored, you can achieve unsurpassed naturalness of restorations with just one shade. The combination of different shades - a maximum of three for the anterior group of teeth and two for the chewing group - provides excellent aesthetic results.
Properties and benefits:
- Microphilic hybrid composite
- One complete restorative system for all indications
- The unique system consists of Standard, External Special and Internal Special shades to create “invisible” restorations
- Extended operating time due to low sensitivity to external light source
- Balanced viscosity ensures excellent performance properties
- Impeccable color matching and adaptation to the natural shade of tooth tissue
- Smooth and shiny surface, easy and quick to polish
Application:
Standard Shades: exceptional “chameleon effect” when making restorations in the area of the anterior and posterior teeth.
External Special: Translucent shades for characterizing restorations in the anterior and posterior teeth.
Internal Special: Opaque shades for characterizing restorations in the anterior and posterior teeth.
Price: RUB 2,927.00
Gradia Direct (GC Gradia Direct) individual syringes
VAT 10%
Country of manufacture : Japan
Manufacturer : GC Healthcare
LIGHT CURING COMPOSITE RESTORATIVE MATERIAL For use by dentists only and only as indicated. GRADIA DIRECT is a visible light cured microfilled hybrid composite. It is available in two versions: GRADIA DIRECT ANTERIOR and GRADIA DIRECT POSTERIOR.
GRADIA DIRECT was created to reproduce the natural appearance of teeth; it is available in various shades and degrees of transparency and imitates the natural opalescence and fluorescence of tooth tissue. GRADIA DIRECT is available in Unitip cannulas and syringes. GRADIA DIRECT POSTERIOR is a radiopaque material.
INDICATIONS A. GRADIA DIRECT ANTERIOR 1. Direct restorations of cavities of classes III, IV and V. 2. Direct restorations of wedge-shaped defects and carious lesions on the root surface. 3. Making veneers using the direct method and closing diastemas. B. GRADIA DIRECT POSTERIOR 1. Direct restorations of cavities of classes I and II.
CONTRAINDICATIONS 1. Direct pulp capping. 2. In rare cases, the material may cause hypersensitivity in some individuals. If such reactions occur, stop using the material and consult a qualified physician.
DIRECTIONS FOR USE A. RESTORATION TECHNIQUE 1. Selection of shade Clean the tooth with pumice and water. The honey mushroom must be selected before isolating the tooth using a rubber dam. Choose the right material shades using the GRADIA DIRECT colorway. 2. Preparing the cavity Prepare the cavity in the usual way. Note: Use calcium hydroxide for pulp capping. 3. Bonding To bond GRADIA DIRECT to enamel and/or dentin, use a light-curing adhesive system such as GC Fuji Bond LC or UniFil Bond. Follow the manufacturer's instructions. 4. Application of GRADIA DIRECT 1) Using material in cannulas Insert the GRADIA DIRECT cannula into a Unitip applicator or similar. Remove the cap and squeeze the material directly into the cavity. Squeeze out the material evenly, removing the applicator with the cannula from the mouth, lightly pressing on its handle. This will prevent the cannula from falling out of it. 2) Using the material in the syringes, remove the cap and squeeze the material onto the mixing paper. Introduce it into the cavity using a suitable tool. After extruding the material, turn the syringe handle counterclockwise half a turn or one full turn so that the material at the syringe tip is slightly retracted, and immediately replace the cap. Note: 1. In general, esthetic restorations can be achieved using one of the Standard Shades. A more detailed description is available in the Practical Tips section. 2. When squeezing out material that has just been removed from the refrigerator, difficulties may arise. Let it sit at room temperature for a few minutes before using. 3. After extruding the material, do not hold it in the light for too long. Natural lighting can reduce working time.
PRACTICAL TIPS 1. Cavities in the anterior teeth a. Small cavities. Restore using one shade of material and a layering technique. In most cases, one standard assessment will be enough. In cases where higher transparency is required, one of the special external shades can be used. See also Examples of Clinical Applications. b. Large cavities In most cases, the best results will be achieved using a layering technique using multiple shades. To prevent show-through of the oral cavity or to camouflage discolored dentin, use a suitable Inner Shade and continue restoring using Standard Shade. To add vitality to the restoration, for example to convey age-related changes, the last layer should consist of a special external veneer. See also Examples of Practical Applications and/or refer to the shade combination table. 2. Cavities in the lateral teeth a. Small cavities Restore using one layer of material and layer-by-layer technique. In most cases, one Standard shade will be enough. In cases where higher transparency is required, one of the special External Openings can be used. See also Examples of Clinical Applications. b. Large cavities Apply a flowable composite such as GC UniFil Flow* to the bottom of the cavity. Then apply the Standard Shade material. To achieve optimal aesthetics, use a special external coating material as the last layer. See also Examples of Clinical Applications. * GC Fuji LINING PASTE RAC, GC Fuji LINING LC or GC Fuji IX GP can also be used as a lining or base for the restoration. Refer to the manufacturer's instructions for the appropriate materials. G RADIA DIRECT ANTERIOR. TIME AND EFFECTIVE DEPTH OF POLYMERIZATION Curing time Shade Plasma arc* Halogen polymerizer** LED polymerizer*** (3 sec) (20 sec) (24 sec) (6 sec) (40 sec) (40 sec) CT,NT,WT, GT,CVT 3.0 mm 3.5 mm A1,A2,B2,BW,DT 2.5 mm 3.0 mm AZ,VZ 2.0 mm 3.0 mm A3.5,A4,SZ,A02,AZ,A04, CV,CVD 1.5mm 2.5 mm GRADIA DIRECT POSTERIOR. TIME AND EFFECTIVE DEPTH OF POLYMERIZATION Curing time Shade Plasma arc* Halogen polymerizer** LED polymerizer*** (3 sec) (20 sec) (24 sec) (6 sec) (40 sec) (40 sec) P-A1,P- A2,P-WT,P-NT 2.5 mm 3.0 mm R-AZ, R-A3.5 2.0 mm 3.0 mm * Plasma arc: GC Flipo ** Halogen polymerizer: Coe Luna TA *** LED polymerizer: GC e-Light (fast cure mode) Note: The material must be applied and cured in layers. The maximum permissible layer thickness is given in the tables. 7. Finishing and polishing Contouring and polishing as usual. Cleaning and Sterilizing the Cannula Applicator 1. Clean the applicator with an alcohol swab. 2. The applicator should be autoclaved at 121-135°C for 10 to 30 minutes or disinfected with alcohol. Note: 1) Do not attempt to sterilize at temperatures above 135°C during the dry phase of the autoclaving process. Otherwise, the applicator may be damaged. 2) Using various chemicals for disinfection/sterilization may damage the applicator and is therefore not recommended.
SHADES 1. 20 shades for restoration of anterior teeth Standard shades: BW (Whitening White), A1, A2, A3, A3.5, A4, B2, VZ, NW, O/ (Cervical), CVD (Cervical Dark) Special Internal shades : A02, AAZ, A04 Special External shades: WT (White Transparent), DT (Dark Transparent), CT (Colorless Transparent), NT (Natural Transparent), GT (Grey Transparent), CVT (Cervical Transparent) 2.6 shades for restorations lateral teeth Standard shades: R-A1, R-A2, R-AZ, R-A3.5, Special External shades: P-WT (White Transparent), P-NT (Natural Transparent). Note: Shades A, B, C, AO are based on Vita* shades. * Vita is a registered trademark of Vita Zahnfabrik, Bad Sackingen, Germany.
STORAGE Store the material in a cool, dark place at 4-2 5°C away from heat sources and direct sunlight. Expiration date: 2 years from the date of issue.
ATTENTION 1. If the material gets on the oral mucosa or skin, immediately remove it with a sponge or cotton wool soaked in alcohol. Rinse with water. 2. If material gets into your eyes, rinse them immediately with water and consult a doctor. 3. Do not allow the patient to swallow the material. 4. To avoid possible sensitivity due to direct contact with the oxygen-inhibited layer of the composite, wear gloves when working with GRADIA DIRECT. 5. To prevent cross-infections, use each cannula for one patient only. 6. Wear safety glasses when performing light curing. 7. When polishing polymerized material, be sure to use a dust collector and wear a protective mask. 8. Do not mix GRADIA DIRECT material with other materials.