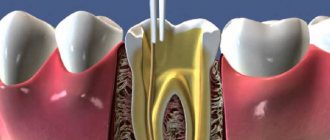
Filling using the lateral condensation method is a common dental procedure that allows you to quickly and cost-effectively eliminate root canal pathologies. Its essence lies in the use of gutta-percha pins and endosealant, which fills the empty space between the tooth tissues and the pins, which creates high-quality, uniform protection of the root canal.
The lateral condensation method can provide complete coverage of the root canal in almost all cases, with the exception of highly curved and narrow canals with a pronounced violation of the anatomical shape. The method is used in more than 80% of dental restoration cases in Western European countries.
General overview
The lateral condensation method is the most common method of filling, as it is easy to perform and does not require large expenses. That is why it is used in almost 80% of dental restoration cases in Western countries.
The method is used to fill large cavities. With its help, a high level of seal stability is achieved with minimal consumption of filling material.
The essence of the method is to fill the cavities with gutta-percha pins, which are fixed with endosealant. The products do not form a uniform mass, but simply solidify in a paste that fills all the voids of the cavities.
Materials popular among dentists are:
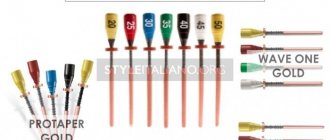
- Gutta-percha pins , which are main and auxiliary. The first type is wider and fills most of the canal, the second type is thinner and shorter, it is introduced after setting the main model;
- Endo-sealant or filling material , which fills the free space;
- A temporary seal is installed to control the quality of work performed;
- Composites for permanent fillings.
Gutta-percha was widely used in dental treatment more than a century ago. It is extracted by drying the sap of certain varieties of trees native to Brazil and Malaysia.
The procedure does not require the use of specialized dental equipment or instruments. The doctor can get by with a few standard devices.
Tools for performing the work:
- The spreader (side compactor) has the shape of a cone and comes in different sizes and lengths;
- K-file or K-reamer are universal endodontic instruments for expanding and cleaning canals;
- Channel filler can be used manually or by machine.
Contents of the Gradia Direct filling kit, composition and properties of the material.
Come here if you are interested in how root canal obturation is performed.
At this address https://www.vash-dentist.ru/lechenie/zubyi/plombyi/tsvetnyie-twinky-star.html we will talk about the features of the Twinky Star filling material.
When is root canal filling recommended with gutta-percha?
Lateral canal condensation is a universal method of restoring dental function in the treatment of a wide range of dental pathologies. It allows you to stop the penetration of pathogens of infectious diseases into the dental canals, preventing severe complications, including tooth loss and death (in the absence of high-quality diagnostics and timely assistance).
Filling must be performed only after comprehensive preparation of the tooth and its canal: the affected tissue is removed and the nerve is “killed.” Gutta-percha in dentistry has established itself as a good, proven filling material with high elasticity and filling ability.
Indications and contraindications
The main indication for filling using this method is the presence of wide root canals.
But there are also cases when the use of this technique will be irrational.
Contraindications are:
- The presence of narrow root canals;
- Small branches of canals;
- Creation of an artificial excavation in the root cavity;
- Destruction of the apical structure of the root canal.
In some cases, this method of filling the root cavity can be used in combination with other methods.
Glossary of the video “Lateral condensation technique: 30 steps”
For those who want to improve their “dental English”.
| MAC (master apical cone) | master pin |
| accessory cone | additional, auxiliary pin |
| tug-back effect | checking the tightness of contact between the master shift and the canal walls at the apex (effect of resistance to pulling) |
| paper point | paper point (for drying root canals) |
| spreader | spreader, expander |
| apical pressure | pressure towards the apex |
| CEJ (cement-enamel junction) | CES, cement-enamel junction |
| pulp chamber | crown cavity, pulp chamber |
Advantages and disadvantages
All treatment methods, including endodontic manipulation, have their advantages and disadvantages. There is no absolutely ideal method that would be suitable for all clinical cases.
The advantages of this filling method include:
- Reliability in terms of closing the gap of the tooth root;
- The material is very plastic and flexible, which facilitates the process of tooth treatment;
- No complex tools required;
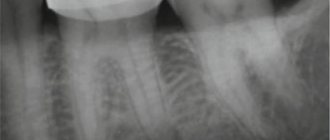
- The results can be clearly seen using X-ray;
- Does not cause periodontal irritation;
- Over time, such a filling does not dry out or shrink;
- Inertia.
The disadvantages include:
- Gutta-percha products are used to close only wide canal cavities. Small branches are covered with paste;
- During filling, there is strong pressure on the root system, which can cause discomfort and damage;
- The use of a large number of pins increases the risk of destruction of the filling due to the many layers of endosealant;
- Part of the root cavity at the very top can be filled with only one pin, which does not guarantee the reliability of its hermetically sealed filling.
Despite the existing shortcomings, this method is widely used in dentistry and gives good results.
Filling materials
A hermetic seal is created by a combination of modern materials:
• Gutta-percha in the form of a dense pin. The homogeneous structure and thermoplastic characteristics of the natural material make it possible to obtain a homogeneous filling that adapts to any root canal.
• Sealer, cement layer. The material increases the strength of the filling by sealing the space between the walls of the root canal and the gutta-percha.
Seals made from these materials meet the following requirements:
– seal the root and its branches;
– create a favorable environment for the regeneration of root tissues;
– correspond to the channel configuration;
– do not irritate surrounding tissues;
– protect against pathogens, prevent their penetration into the root canal.
Preparation and course of action
Before the filling procedure, it is necessary to perform the initial treatment of the tooth:
- removal of tissue damaged by caries;
- rinsing with a stream of water and drying;
- treatment of the cavity with medicinal aseptic preparations;
- giving the anatomical crown the required shape for further restoration.
After this, you can proceed to direct lateral condensation, which consists of several stages.
Master pin selection
This stage is similar to the single-pin method. A gutta-percha pin is taken of the same size as the last endodontic instrument used to process the equine canal (it has the name of the master file). It must be adjusted to the length of the channel.
The main difference of the method is that the pin should not reach the upper edge of the canal by 1 mm. This makes it possible to prevent the product from going beyond the periapical tissues during the filling process.
There are three methods for fitting gutta-percha into the canal:
- The visual method consists of selecting the length of the pin by trial and error.
Gutta-percha of working length is taken, shortened by 1 mm and inserted into the root cavity to the mark. If the model can be inserted deeper, it means that the original length and width were incorrectly determined. A new product is taken or an already taken one is adjusted. Fitting occurs until the desired length and width are selected; - Tactile method – take a pin the length of the master file and insert it so that there is 1 mm left to the root apex.
With the correct size of the pin, pushing to a depth of 3-4 mm will require a small force for further advancement.And when you remove it, there should be a slight jamming. In this case, the product is selected correctly. If the model moves smoothly inside the channel, then a larger size or reduction in the length of the existing sample will be required;
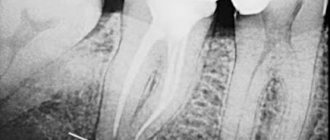
- The selection method using x-rays is carried out only after applying the first two methods. When the main pins are selected, an X-ray of the tooth is taken. This is the most accurate and reliable way to check the correctness of the selection.
After the final fitting of the pin has been made, marks are made on it for the length of its insertion into the root cavity.
Selection of side seal
The side compactor or spreader should be the same size as the master file or 1-2 sizes larger. This will prevent you from going beyond the top hole.
The working length of the spreader should be selected so that it is 1-2 mm less than the working length of the channel.
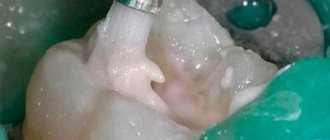
Filling with paste
The next step is to fill the root canal with endosealant. This can be done using a K-file, K-reamer or channel filler. The paste should be injected up to the apical foramen and distributed evenly over the walls.
It is important not to overdo the amount of material and not fill the channel completely. It is enough to fill one portion with channel filler, and 2-3 portions with hand tools.
What is Estelite filling material and instructions for its use.
This material is devoted to the method of retrograde filling.
Here https://www.vash-dentist.ru/lechenie/zubyi/plombyi/vozmozhnosti-materiala-filtek.html we will discuss whether the price of the Filtek filling material corresponds to its quality content.
Introduction of the main pin
Next, you need to insert the pre-selected main pin. To do this, it is covered with filling material and placed in the root cavity.
At this stage it is important to take everything slowly. To eliminate possible air bubbles, the doctor uses rotational movements when inserting the pin.
Side seal
At this stage, the previously selected spreader is used. It is inserted into the hole with rotational movements to a depth of 1-2 mm less than the working length. At this point, the pin is firmly attached to the canal wall.
The spreader must be fixed in this position for a minute so that it has time to take the desired shape. Excessive force and excessive spreader pressure on the pin may cause a crack in the bore.
After this, the spreader is removed, and if necessary, a second and subsequent pin is inserted, which are sealed in the same way.
The action is repeated until the canal cavity is completely filled. In some cases, up to 5 pins may be required.
Removal of excess and control
After filling the channel, it is necessary to trim the ends of the pins that protrude above the top edge of the hole. This is usually done using a heated instrument - a probe or a smoother.
The remaining filling paste is removed with cotton balls. To check the filling density of the canal, an X-ray of the tooth is taken.
Applying a temporary filling
It is advisable to carry out this stage to check the condition of the canal during the first days after the procedure. A temporary filling is much lighter and easier to remove if any complications arise.
The final stage
If there are no complications or problems with the filled root canal, a permanent filling can be placed. Here, various polymer or composite materials can already be used at the patient’s choice.
The video introduces the lateral condensation technique.
Temperature control
Despite significant advantages, the method is difficult to use in the presence of curved root canals. In this case, only the use of pluggers made of nickel and titanium alloys can help.
Initially, the basis of the method was the use of a hot instrument to apply temperature to gutta-percha. To properly control the temperature of a tool heated by a burner flame, certain skills are required.
Therefore, a major development in dentistry was the introduction of electronic “Touch-n Heat” devices, which were later modified and improved. “System-B”, “Obturation Unit” and other devices quickly gained fame.
The devices create a gradual gradation of temperature and bring it to a stable temperature. This greatly simplifies the work and prevents errors associated with problems with the temperature control of the plugger during filling.
Instruments can be used not only to close canals using this method; they can also be used for other filling options.
Reviews
Looking at reviews from real consumers has become an integral part of choosing a product or service for many people.
Those interested can share their experience or leave feedback in the comments to this article about filling teeth using the lateral condensation method.
If you find an error, please select a piece of text and press Ctrl+Enter.
Tags: filling
Did you like the article? stay tuned
Previous article
The pros and cons of chemical teeth whitening
Next article
How does Atatsamit cement work and in what cases is it used?
Continuous wave option
The technique was created by Stefan Buchan in 1987. The main difference from other methods lies in the continuous wave of condensation from the hot plugger.
It is inserted into a suitable cone-shaped pin. Then a heat carrier is inserted into the pin up to 3-5 mm to the working length.
As a result, an apical compaction of the material occurs by 3-5 mm, after which compaction is performed with a hand plugger in order to firmly and efficiently seal the apex.
The advantage of this technique is that it is comparatively simpler than other options. This method also allows you to reliably seal the channel.
The disadvantages include the likelihood of thermal injury to the periodontium and bone tissue, but such a situation is unlikely if all instructions are properly followed.
Applied systems
When using the Obtura, BeeFill, and E&Q Plus systems, gutta-percha sticks, previously placed in the gun chamber, are heated.
Plastic gutta-percha is applied with a cannula, if necessary. Each system uses different types and sizes of cannulas. The gutta-percha material is heated to 65°C and remains in a plastic state for approximately 3 minutes.
The BeeFill and Obturation Unit systems contain material in cannula cartridges. When gutta-percha is introduced into the root canal, back pressure appears, which pushes the cannula upward.
Injection method
The injection method was put forward in 1977 by Yee. The difference between the injection method is that gutta-percha is softened and administered by injection.
To perform this technique, you need to use a special gun along with gutta-percha sticks and cartridges. The material becomes plastic when using a gun, after which it is introduced into the root canal without pressure with a flexible needle.
The needle enters with a remainder of 3–4 mm to the apical foramen. The introduced material is compacted vertically in the classical way.
An undoubted advantage is that the injection method is the most suitable option for obstructing wide canals, with destruction of bone tissue and with an unformed root.
Filling of tortuous and anatomically complex paths is also done using this method.
The obvious downside is that although the method seems simple, it takes time and experience to apply this technique well.
Expected Result
The long-term use of this technology suggests its high efficiency. With proper attitude towards the oral cavity, good hygiene and regular visits to the dentist, an organ filled in this way will serve a person for many years.
Today doctors are talking about 10 years of its operation, if the load on it does not exceed permissible limits , and all dental problems and diseases are eliminated in a timely manner.