Alexander Grigoriev.
active member of the American Dental Academy
In practice, we often encounter the need for functional rehabilitation after endodontic treatment. Unfortunately, the procedure for treating a tooth's root canal involves significant excision of the tooth's dentin. At the same time, we excise the interaxial dentin and dentin of the pulp cap.
These two areas of tooth tissue are the most important in determining the strength characteristics of the treated tooth. Our task is to restore these elements. This is a stump root tab.
Content
- Indications for stump restoration
- Formation of a tooth stump
- Dental prosthetics
- Care after crown installation
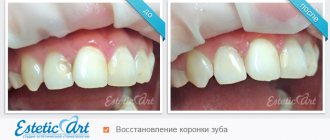
A tooth stump is a smaller version of a tooth onto which a crown is subsequently fixed. If there is enough natural tooth tissue, the stump can be easily formed using the preparation method. If there is not enough natural material, it is necessary to restore the stump under a prosthesis. There are several ways to do this.
PROMOTION
Installation of crowns, dental bridge
RUB 3,450
Restoring a tooth stump with a fiberglass pin or a cast inlay?
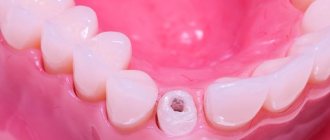
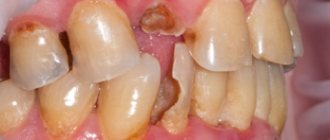
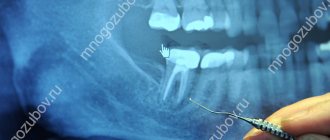
An important element in the restoration of severely damaged teeth (“destroyed to the ground”), i.e.
at the gum level - this is the presence of a section of tooth tissue above the gum level of at least 1.5 mm (an element called a ferrule), precise fitting of the intra-root pin, and fixation with adhesive cements. Individual cast metal stump inlays have extensive historical experience in use. However, as noted in the literature: “Cast cores also exhibit a high rate of root fracture due to rigidity, taper, and precise adaptation to the dentin walls.” Pathways of the pulp; 8th Edition,2002 (Fig. 1)
The stress that develops due to the high-energy potential of the molecular structure of the metal is higher than the rate of irreversible deformation of the dentin of the tooth root.
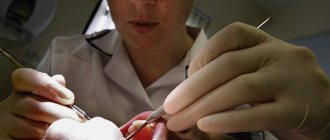
How is the treatment performed?
Treatment is carried out in stages.
- Diagnosis of tooth condition. The length of the root must exceed the height of the crown, the walls must have a thickness of at least 1 mm. Inflammation, cysts and other pathologies are excluded. This is very important, since the stump can only be removed with the tooth.
- Preparation of tissue under the inlay to a height of 1-2 mm above the gum edge.
- Taking an impression and sending it to the laboratory.
- Installation. First, additional pins are cut off, which are located on top of the insert. They are broken off after installation, the surface is polished. Then the channels are filled with a cementitious composition, the material is applied to the pins, and the inlay is fixed.
- Preparing the tooth for fixation of the crown and then installing the crown in stages.
Polymer tab
With a polymer inlay, these stress and deformation indicators are as close as possible and, as a result, the percentage of vertical tooth root fractures when using fiber pins is virtually reduced to zero.
But there is another problem here. When producing metal cast core inlays, we achieved precise adaptation to the lumen of the root canal. When fixing the fiber post using the adhesive technique, we compensated for this discrepancy with composite cement.
It would seem that everything is fine, BUT the root canal has one of the highest C-factor indicators (the ratio of bonded to free surfaces). The higher this indicator, the higher the stress at the ligament boundary. And the shorter the service life of the adhesive bond.
There is a solution - making an individual
Restoration methods
In the case of restoring a tooth stump, the dentist can use two main methods of restoration:
- In case of minor damage to the tooth structure, with little damage to the anatomical shape, inlays are used for restoration, which help restore the tooth’s strength and shape, as well as functionality. In addition, dentists often use veneers for restoration.
- The direct restoration method is used to restore a badly damaged tooth or its complete absence. The technique involves modeling and restoration of the tooth by introducing an anchor pin into the gum, which creates the necessary support for further restoration. The material used is a composite, which has strength and the necessary shade. Most often used to restore chewing teeth.
If a tooth is completely destroyed, the dentist, in addition to the composite, can use glass ionomer, which helps enhance the effect of the composite. In addition, the material has many advantages, such as lack of toxicity, good aesthetic effect, and durability.
Fixing fiberglass pins
I want to offer you a technique for creating, individualizing and fixing fiberglass pins (stump inlay) directly at the workplace in a direct way.
This will make it possible to obtain a mechanically fitted polymer pin, reduce and actually level out the adhesive-composite stress of the ligament. Obtain a reliable adhesive connection.
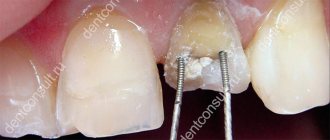
Transluma pins (manufactured by Bisco) are excellent for these purposes (Fig. 3). This is an export version of radiopaque fiber pins specially developed by the company for the European and world markets. These pins are made from a homogeneous solid prestressed fiberglass (long-lasting cyclic loading), they are classified as light transmitting, they have a simple tapered design, and they come in 3 sizes (this is a very old advert).
From metal to composite
What is a core inlay for a crown, if not a pin structure? Yes, indeed, the root part of this device resembles a pin, but they have radical differences. The pin is placed exclusively under the filling. The stump inlay for the crown is inserted into the tooth root, may have several pins and should not be covered with a filling.
The orthopedic design imitates the missing canal space; it is made according to individual measurements. Its upper part copies a tooth ground for a crown. Thus, the load during chewing food is distributed evenly.
There are the following types of tabs:
- Metal - made of silver, gold, cobalt or chrome. Very reliable, but not aesthetically pleasing.
- Metal-ceramic ones are the least strong of all the inlays, which is due to the difference in thermal expansion of the two materials.
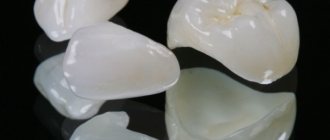
- Ceramic - an aesthetic option, they copy natural tooth enamel.
- Zirconium inlays are highly durable and look as natural as possible.
- Composite - they adhere to the tooth tissue better than others, but are not very durable.
Interesting fact! Dentists call zirconium “white gold.” Thanks to its color and structure, it imitates tooth enamel better than other materials.
Considering the question of how tooth inlays are made under a crown, it should be noted that core inlays made of zirconium dioxide and ceramics are made using computer modeling.
The remaining tabs are made in 2 ways:
- Indirect: after taking an impression of the canals, a dental laboratory first makes a plaster, then a wax, and finally a metal model.
- Direct: the sanitized tooth is filled with heated plastic using a syringe, an inlay is formed, which is sent to the laboratory to create a microprosthesis.
Tabs are used not only to act as a support. They also correct incorrect position and shape of teeth, and eliminate defects in the supragingival area.
Method of placing a fiberglass pin:
The root canal is opened.
From root cement and gutta-percha at a distance of minus 5 mm from the apex or, if we are dealing with a curved shape of the root canal, then 6 mm from the mouth is sufficient for the adhesive fixation technique.
The prepared lumen is thoroughly cleaned with ultrasonic instruments or Sonic-Air. The canal lumen must be clean.
We introduce a water-soluble gel into the lumen of the root canal
(Fig. 4).
Glycerin may be suitable for these purposes, but the best consistency is a water-soluble lubricant (you can buy it in the personal care section of the pharmacy).
It is applied into the root canal quite generously using a root needle or microbrush.
Preparing the fiberglass pin.
The Transluma pin (it is advisable to take a smaller size in order to minimize the removal of root dentin with a drill when preparing the bed for the pin) is degreased in alcohol or anhydrine, dried, and then the One-Step adhesive system (Bisco) is applied to the pin in one or two layers.
We evaporate the solvent of the adhesive system for 5 seconds and carry out polymerization (Fig. 5).
We take a composite hybrid material of light shades,
You can use A2 or Clear shades and cover the prepared fiber pin with the material.
WE DO NOT POLYMERIZE!
We obtain a fiber pin with a composite coating made of durable material (Fig. 6).
We insert our fiberglass pin into the root canal,
we remove obvious excess material or form the supra-root part of the tab and carry out trans-pin polymerization for no more than 10 seconds.
This will allow you to easily remove the resulting polymer insert, even if there are retention elements in the lumen of the root canal (Fig. 7).
We remove the pin-composite structure.
After that, within 40 seconds. At a lamp power of 500 mW/cm2, we carry out additional polymerization of the resulting core inlay.
Then we try it on again in the lumen of the root canal and, if necessary, adjust it to an exact fit (Fig. 8).
Root canal thoroughly for 1 minute. rinse with distilled water.
It is very convenient to use Sonic-Air for this. The file is set to the usual amplitude as during endodontic work, with the only difference being that it does not touch the walls, a plentiful flow of water is supplied and the canal is washed for 1 minute.
Add acid and etch the root canal
and dentin - the enamel of the crown part of the tooth for 20 seconds. We wash off the acid from the surface of the tooth and wash the lumen of the root canal for one minute.
Use Sonic-Air for these purposes.
We remove excess moisture from the root canal until the paper pin is dry.
Mix A and B of the All-Bond 3 adhesive system (Bisco)
and using a root needle with cotton wool, apply it generously into the root canal and saturate the dentin of the tooth tissue.
Immediately evaporate the solvent and thin the adhesive layer. Using paper pins, we remove excess adhesive system in the lumen of the root canal and carry out polymerization for 10 seconds.
The use of the All-Bond 3 adhesive system at this stage is an extremely important aspect:
- This system has a self-curing polymerization phase without a light source, which occurs after 90 seconds. after mixing. And bringing light to the terminal point of the root canal is the most critical!
- the components of this adhesive system are the most hydrophobic, which ensures longer hydrolytic stability of the adhesive bond.
- All-Bond 3 is a universal adhesive system that provides excellent adhesion to all composite materials, both light and chemical curing, not to mention dual curing systems.
The individual fiberglass pin itself is degreased
and the choice of adhesive system OneStep or One-Step plus or All-Bond 3 is applied to it.
I prefer to use One-Step plus for this purpose. It's convenient, fast and this adhesive system is versatile.
1-2 layers of adhesive are applied, the solvent evaporates, the adhesive becomes thinner and polymerization is carried out for 10 seconds. onto the surface of the individual pin.
That's it - the channel and the pin are ready.
Dual-curing composite cement is injected into the canal on the canal filler,
such as Duo-Link (Bisco) or chemically cured Bisfill 2B (Bisco).
Installation of fiberglass pin. An individual fiber post is passively inserted into the root canal and polymerization of the composite cement is carried out. Next, we use the resulting stump core for prosthetics or direct restoration techniques.
Stages of restoration
The restoration is being carried out in stages. At the same time, the dentist strictly observes the required frequency, since a violation can lead to destruction or lack of effect from the procedure.
- The preparatory stage includes anesthesia, grinding of the crown surface and expansion of the canal using filling material. The dentist also cleans the canals. The final step is thread cutting.
- Fixation of the pin using cement materials.
- Formation of the stump structure.
Dentists usually come to complete cleaning of all canals, since if the root is left, it will be subject to a large load after restoration, which causes pain.
The final stage of manipulation is grinding and polishing the structure. Therefore, the dentist evaluates the work. So, the result should be a formed stump without corrosion elements, sealed, without chips or cracks.
Installation of a tooth crown. Types of crowns and fixation methods
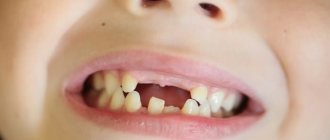
Dental crowns help restore the chewing function of the tooth and ensure full load. The method has a large number of indications for use:
- A strong tooth root, but a significant absence of the crown part. A pin is installed in the root, and an individual crown is fixed onto it.
- Strong enamel pigmentation that cannot be bleached. The indication may apply to several teeth at the same time.
- The presence of progressive non-carious dentin diseases.
- Abrasion of tooth enamel; destruction of enamel under the influence of exogenous or endogenous factors.
Pros and cons of pins
The main advantages of pins are:
- Their installation requires a small amount of dental tissue preparation.
- You can restore a tooth in just one visit to the dentist.
- Installing a pin is relatively inexpensive.
- Reliable fixation in the dental canal.
If you have a problem similar to that described in this article, be sure to contact our specialists. Don't diagnose yourself!
Why you should call us now:
- We will answer all your questions in 3 minutes
- Free consultation
- The average work experience of doctors is 12 years
- Convenient location of clinics
Single contact phone number: +7
Make an appointment
Flaws:
- The fragility of the structure - on average, a tooth with a pin restoration is destroyed in 3-4 years.
- There is insufficient adhesion between the pin rod and the crown - under heavy load, the structure may separate.
- If the size of the structure is chosen incorrectly, dental tissue can be destroyed quite quickly.
What's better
It is quite difficult to say unequivocally which design to give preference to, since each of them has its own corresponding positive and negative sides. However, there are general requirements that apply to inlays and pins:
- Both products are installed only after the tooth has been depulped (the nerve is removed, the canals are filled).
- To ensure that the device is delivered to the highest possible quality, the canals are well healed.
- During the work process, the dentist uses the same techniques and tools.
Generally speaking, the tab has more advantages compared to the pin. Due to the fact that an indirect method is used to create an orthodontic element, it is more durable, which allows it to be used to restore dental units in the frontal and chewing zones.
The disadvantage of this design is that it takes more time to create than a pin, and installation is also considered difficult.
What exactly will be best is decided by the dentist individually for each patient. However, despite the high cost, the tabs are of higher quality, reliable and durable.
Filling on a pin in different types of teeth
The advantages of the method lie in the integrity of the structure. If there are no moving or multi-layered parts, the structure appears more durable.
When installing a filling on a pin, there is no deformation or impact on the adjacent teeth in the row. Their enamel is not destroyed, the patient does not experience discomfort after the procedure.
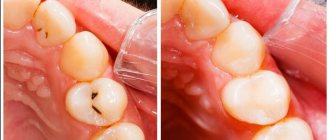
The main disadvantages of the method include the formation of secondary caries. If the specialist used low-quality materials or paid little attention to the examination, then caries will form under the surface of the filling. The tooth is pigmented black, but the filling does not change.
A poor-quality filling in a tooth is clearly visible