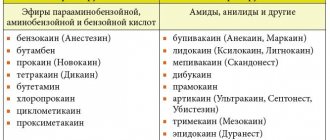
general characteristics
A pin is a supporting device for fixing dental prostheses. The duration of use of the artificial tooth depends on the strength and reliability of the rod.
The product is made from fiberglass. The material is widely used in various fields of medicine. Its popularity is due to its hypoallergenicity, elasticity and ability to reduce stress on soft tissues.
Fiberglass pins are lightweight, durable, flexible, and able to bend and return to their original position.
Transparent color makes the product invisible in the oral cavity.
Dentist advice
Osmanov Konstantin Gennadievich
Fiberglass pins can be a good alternative to metal or ceramic pins; in some cases, such pins will be the optimal solution. Teeth restored with their use “serve” for a long time (if the patient does not create factors that negatively affect the health of the teeth and the condition of the dental system as a whole) and look natural.
Indications and contraindications
Range of indications for the use of fiberglass pins:
- Dental restoration using fixed bridges.
- Restoration of damaged tooth surfaces through extensions.
- Installation of splinting systems to ensure stability of mobile teeth.
- When the use of pins made of other materials is not possible.
- For support during one-piece prosthetics with ceramic structures.
Restrictions on implantation of the structure:
- Dentin defects in the subgingival area.
- Granulomas, cysts.
- The root part of the tooth is used as a support.
- Reduced root thickness.
- Low blood clotting.
- Pathologies of the central nervous system, mental disorders.
- Caries.
Difference between fiberglass and titanium pins
The main advantage of fiberglass pins over titanium ones is the absence of any chemical reactions when interacting with saliva and teeth. If the tooth restoration procedure takes place without the use of a crown, then pins of this type are the best option, since, unlike titanium ones, they have a natural color and excellent adhesion of the pin to the filling material. A fiberglass pin is also safer , since its use does not allow the root of the treated tooth to be broken. Our dentists at the Zhemchug clinic recommend this type of pin.
Pros and cons
The positive qualities of fiberglass rods include:
- There is no significant destruction of the organ and composite.
- The elasticity of the pin corresponds to natural dentin.
- Uniform distribution of load across the dentition during chewing.
- The composition does not contain nickel, chromium or other substances that can provoke rejection.
- Light transmission.
- Matches the shade of natural enamel.
- Simplicity and painlessness of extraction.
The only drawback of the product is the likelihood of restoration chipping during prosthetics. The risk of complications increases if the dentist is insufficiently qualified.
Preparatory stage
Before you begin fixing the rod, you should prepare the dental element for manipulation. Algorithm of the dentist’s actions:
- X-ray diagnostics are performed to assess the condition of the tooth.
- An artificial expansion of the passages is performed if the natural width does not allow the implantation of the product.
The doctor must first evaluate the location of the root system, the presence of bends and branches.
Step-by-step installation
During the process of implanting the pin, the doctor performs a list of sequential actions:
- Depulpation and preparation of the cavity for fixation of the rod.
- Model fitting. The ratio of the rod to the channel is 1:4.
- The canal cavity is degreased with alcohol.
- The working surface is etched with 37% phosphoric acid. The substance is evenly distributed over the dentin and enamel coating. On the outer surface of the tooth it is maintained for up to 60 seconds, and on the inside – up to 15 seconds.
- Rinsing with distilled water.
- Drying the canals with a paper point. Purging is not recommended.
- Preparing the structure for implantation - disinfection, drying in natural conditions, sandblasting.
- Acid pickling. Polishing.
- Filling the canal with a thin layer of dental cement. Part of the composition is distributed over the pin. The product is implanted into the passage.
- Light polymerization.
- Fixation of the outer part of the unit.
The choice of crown is made by the patient.
How to choose a model
A low-quality device is fraught with the development of inflammatory processes in the jaw apparatus. Therefore, the choice of model should be approached responsibly.
The rods must have the correct shape, safe composition and quality characteristics. Popular models:
- Glassix. The product has a truncated cylindrical shape and is rounded at the end. Mechanical properties are close to those of dentin tissue and composite material.
- Ikadent. A model with a high level of aesthetics and increased elasticity. Used for restoration of the anterior zone.
- Relyx Fiber Post. Easy to process model. The extended tip ensures high-quality shrinkage of the cement and prevents the formation of porous fragments in the structure.
- EasyPost. Polymer matrix that does not change color under the influence of pigments. The possibility of translucency is excluded. Strong fixation.
- Fibrapost Lux. In-canal products of conical shape. The flexibility of the rod is almost identical to dentin tissue.
Clinical case
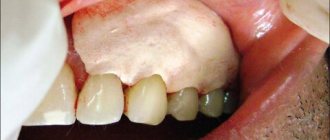
A 40-year-old female patient with severely damaged maxillary central incisors. There is a significant change in color. Both teeth had received inappropriate endodontic treatment. The left incisor has lost a significant part of its crown. The gum is hypertrophied and occupies the coronal cavity. (Fig. 1-3).
Rice. 1
Rice. 2
Rice. 3
The long-term joint work of the endodontist and orthopedist begins.
The hypertrophied gum was removed from the cavity using electrosurgery, and a rubber dam was then properly placed. The risk of bacterial infection due to the lack of a rubber dam increases with an additional root canal or insufficient apical obturation. (Goldfein J et al, 2013).
The existing endodontic filling was removed using a rotary system (Protaper Next, Dentsply Maillefer). The length of the root canal was checked using an apex locator (Proper II, Dentsply Maillefer) (Figures AB).
Immediately after removal of the root canal filling, automated root canal instrumentation was performed using the Protaper Next system (Dentsply Maillefer) (Figure C).
Washing was performed with 2.5% sodium hypochlorite solution. A suitable gutta-percha point was then selected for apical sealing (Figure D). (Fig. 4)
Rice. 4
A hybrid Tagger technique was used for root canal obturation.
Lateral condensation of gutta-percha points was enhanced using the Gutta Condensor device (Dentsply Maillefer). In this way, gutta-percha was thermally plasticized and compacted apically (Fig. 5).
AH 26 (Dentsply) was used as a root canal sealant.
Rice. 5
After trimming the gutta-percha points using hand instruments, vertical condensation of the endodontic filling was performed (Figures A and B).
Immediately thereafter, the root canal filling was partially removed to drill a hole for a post of the desired length using a Peeso No. 1 drill bit with a standard blue-rimmed pneumatic contra-angle (2000 rpm) (Figures C and D).
Simultaneous obturation and preparation of the bed for the pin reduces the likelihood of apical leaks and improves the quality of endodontic obturation. (Perdigao J, 2016) (Kim HR, 2017).
Removing the filling becomes easier if it is performed immediately after obturation of the root canal. No plasticizers are required for gutta-percha. Heating pluggers or an electronic thermal attachment can also be used for this purpose. (Perdigao J, 2016).
Because this is a collaborative workflow, there is no need to plan instrumentation of the pin site using X-ray or CT imaging. The orthopedist has all the information necessary for the job. Given the circumstances, the endodontist may be able to perform the entire procedure himself (Bertoldi Hepburn A, 2011).
Cleaning the dentinal walls of the post tray before inserting the post is also easier and faster if the post tray is prepared immediately after removing the filling from the canal. To ensure reliable apical sealing of the root canal, 6 mm of gutta-percha is left.
Rice. 6
The Macro-Lock Oval UPS system (RTD, France) was chosen.
After the Peeso drill No. 1, channel expanders were used. Four dilators corresponded to four pins of different sizes and with individual geometry modifications.
In this case, the drill bits used were No. 1 (yellow code), No. 2 (red code), and No. 3 (blue code). The #4 pin drills were green coded.
Canal expanders will ensure sufficient compatibility of the root canal with the shape of the post and, therefore, friction of the post and dentin, at least in the apical third of the root canal.
In many SWS systems, the shape and dimensions of the pin are not consistent with the channel expanders and holes for the pin. Differences in the shape and/or size of the post and its hole in the root canal can result in poor fit of the post and the appearance of gaps between the root canal filling material and the top of the post. (Portigliatti RP et al 2017).
To prevent the generation of heat due to friction with dentin, preparation of the post hole using channel expanders must be carried out in stages. Therefore, tooling must begin with the first drill.
However, in clinical cases similar to the one described, due to the need to treat the canal with rotating instruments during repeated endodontic treatment, which, in turn, increases the taper of the root canal, only drills No. 2 and 3 are used (the drill corresponded to the pin).
During root canal treatment, constant rinsing with a sterile water-based liquid (distilled water, saline solution, etc.) is recommended. (Bertoldi Hepburn A, 2011).
It is necessary to check whether the drills retain their cutting properties. The manufacturer indicates that these drills can be used 12-15 times.
One of the most important ways to prevent heat generation is to reduce the drill speed. To prevent heat generation, it is recommended to use a speed of 800-1200 rpm. Pneumatic micromotors are not suitable for use at these speeds as they lose torque. Electric micromotors are better because they can be precisely set to the appropriate speed and torque. In this clinical case, the x-Smart Plus endodontic motor (Dentsply, Maillefer) was used. It was applied at a speed of 1000 rpm and a torque of 3 Ncm.
After creating a hole for the post using channel expanders, it must be cleaned and sterilized.
Cleaning of the post bed was done with hand instruments, followed by the use of a conical interdental brush with distilled water/cleaning solution. For the final rinse, distilled water and alcohol were used to promote drying using sterile paper points. A microscope was used during cleaning. The microscope illuminates the pin bed and enlarges the operating space. Thus, the microscope helps control the cleaning process and contributes to a successful result.
Cleaning was easy and quick since the endodontic sealant had not yet cured. (Fig. 7).
Rice. 7
The selected SWS (Macro-Lock Oval No. 3) was pre-installed in the hole after disinfection in alcohol. The fit turned out to be very accurate. Friction between the tissues was evident and hence the post was stable and had high retention. There was no need to add any other materials to customize the pin and thus achieve reliable mechanical fixation. As can be seen in the photograph, the taper of the pin increases in the coronal part and gradually changes the round geometry to oval, thereby achieving friction and increasing the cross-section.
However, some clinical cases still require the use of additional materials (composite, fiber reinforcement, additional pins, etc.) to achieve proper mechanical fixation. In other clinical situations, good post fit may require adjustments to eliminate excess friction. To do this, you can use regular drills or diamond discs.
This SHS system uses Illusion technology (color coding), when the pins change color from yellow, red, blue and green depending on the pin number to the natural color of the tooth after installing the pin, and vice versa, if the surface is cooled to a temperature below 22 degrees using a cool water. This technology is designed to make it easier to locate a post in a composite core material in cases where the post needs to be removed to access the root canal.
An x-ray will be required to verify proper fit of the post.
At the end, the pin was cleaned with alcohol (35-40% phosphoric acid can also be used) and dried with dry and clean air. It is not necessary to apply any binders (silanes or composites) to the post if the fixation is with self-etching cement. With the standard protocol, resin is definitely needed. The pin is ready for cementing (Fig. 8).
Rice. 8
Self-adhesive (self-etching) cement (SmartCem 2, Dentsply) was used as a cementing material. Self-adhesive resin cements can be used without dentin adhesives, thereby facilitating cementation.
The effectiveness of simplified cementation of ultrasonic cement using self-adhesive polymer cements is described in several publications. (Hannau M et al, 2008) (Huber L et al, 2007) (Samah S & Özcan M, 2015). Although in reality there is no adhesion (mechanical fixation of the post will ensure its retention), self-adhesive polymer cements can create micromechanical and/or chemical bonding mechanisms between the post and dentin. (Hannau M et al, 2008).
Resin cement was injected into the pin hole from the apical end to the cervical approach using a fine injection tip. This procedure prevents the formation of air bubbles and ensures uniform distribution of the material inside the root canal. Lentulo channel fillers should not be used for this purpose.
Immediately after the injection of resin cement, a pin was inserted, which took its final position after three light pressures to squeeze out excess cement.
After removing the residue with a suitable brush, the material was photoactivated using a blue curing lamp for 1 minute on the buccal and lingual surfaces and directly above the post to illuminate the deepest parts of the post bed (Figure 9-11).
Rice. 9. A flowable opaque composite was used to fill the coronal part of the tooth. A clinical process similar to that described above was also performed for the adjacent central incisor during the second clinical session
Rice. 10. During the second clinical session, cores were formed and temporary crowns were made. The results of the procedure were monitored using x-rays.
Rice. eleven
The situations before and after surgery can be seen and compared on x-rays. SWS demonstrates proper integrity of the filling material in the root canal. There are no gaps between the endodontic filling and the post. The taper of the root canal that appeared after repeated treatment was almost completely preserved (Fig. 12).
Rice. 12
Temporary acrylic crowns are customized to enhance appearance.
A finely dispersed composite was applied to the buccal surface after grinding; the layering technique was performed using masses of varying chromaticity and brightness.
Then the final finishing and polishing was done. The crowns were cemented with temporary cement (Provicol, Voco GmbH) (Fig. 13).
Rice. 13
The aesthetic appearance of the temporary crowns turned out to be very natural, and the patient was satisfied with them.
During the second clinical session, restoration of the lateral incisors was also performed. The entire clinical process (both endodontic treatments, insertion of the CVS, core formation and creation of highly esthetic temporary crowns) was completed in two clinical sessions.