Every day, the dentist faces many clinical situations that require a conscious approach to diagnosis, accumulated knowledge and high quality treatment. Endodontics stands apart among all areas of dentistry, and in order to get closer to the point where you can call yourself an “endodontics guru”, a huge number of books must be read, seminars attended and experience gained.
In the era of all kinds of devices in dentistry, namely in endodontics, one should not forget the rules for preparing a tooth for endodontic treatment, the stages and the need for one or another treatment method.
Proper preparation contributes to the effective removal of pulp residues and bacteria, as well as their waste products. It is important not to weaken the root during instrumentation, but to create conditions for excellent obturation of the root canal.
This article will provide basic information about standard endodontic instruments and root canal preparation techniques.
Standardization of endodontic instruments
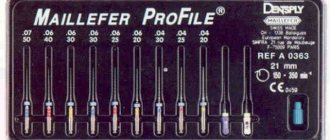
In endodontics, a huge number of different endodontic instruments are used.
They differ in type, color, purpose, taper, material, length, which determines the standardization of endodontic instruments.
Color – each tool number has its own color, which determines its size.
The sizes of instruments that are most often used in treatment are indicated in bold.
| Color code | ISO Tool Size Number |
| Pink | 06 |
| Grey | 08 |
| Violet | 10 |
| White | 15,45, 90 |
| Yellow | 20,50, 100 |
| Red | 25,55, 110 |
| Blue | 30,60, 120 |
| Green | 35,70, 130 |
| Black | 40,80, 140 |
The size of the tool is also determined by the number. If you take #35, that means it is 0.35mm in diameter.
The diameter of the tip is the projection of the cone of the working part onto a plane passing through the top of the tool and its median axis.
Geometric standardization involves designating each tool with a symbol.
The taper of the working part according to ISO is an increase in the diameter of the working part for each millimeter of length, most often by 0.02 mm. In this case the taper will be 2%. In addition to 02, there is a taper of 04, 06, 08, 10, 12.
The endodontic instrument has a handle of a characteristic color and a metal rod with a working part. If the total length of the rod can be 21, 25, 28, 31 mm, then the length of the working part is always 16 mm!
Endodontic instruments are classified according to their intended purpose:
- To expand the mouth of the root canal
- For root canal
- To determine the channel size
- To expand and level the canal walls
- To remove the contents of the root canal
- For root canal filling
Gates Glidden and Largo
To expand the root canal orifices, instruments with a non-aggressive tip are used, which give the orifice a funnel-shaped shape. The main widely used instruments include Gates Glidden and Peeso Reamer (Largo).
Gates Glidden, having a spear-shaped working part with a length of 15-19 mm and 6 sizes, is intended to expand the mouth and upper third of the root canal. The non-aggressive tip makes canal treatment atraumatic and prevents wall perforation.
Peeso Reamer comes in 6 sizes, identified by the rings on the shank. The working part is elongated with a non-aggressive tip. It is used for processing the mouth of the palatal canal in upper molars, distal lower molars and canals in single-rooted teeth, as well as for unfilling the root canal for orthopedic structures.
Tools for performing root canals
The main tool for performing root canals is the K-Reamer. The word "reamer" denotes a drilling movement, and the letter "K" is taken from the name of the Kerr company - the first company to produce tools using the screwing method. K-reamer has high cutting ability and increased flexibility. Has a BATT-tip (non-aggressive tip).
The K-Flexoreamer and K-Flexoreamer Golden Medium ranges are designed to fit curved and narrow canals due to their increased flexibility.
K-Flexoreamer Golden Medium, having intermediate sizes 12, 17, 22, 27, 32, 37, allows you to avoid difficulties in passing, jamming and breakage of the instrument in the canal.
Along with the previous tools, the Pathfinder tools have proven themselves to be excellent.
They have an elongated handle, minimal taper, an aggressive tip and a flexible working part, making them easy to use. They are used in obliterated and curved canals.
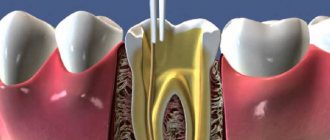
Opening of the tooth cavity.
One of the most important stages in endodontics. The quality of the opening of the tooth cavity, the absence of overhanging edges, and a good overview are the most important factors ensuring successful treatment. Americans say (and not only Americans) that access is everything.
The main set includes instruments used in restorative odontology, as well as a number of others adapted specifically for endodontics.
An endodontic probe differs from a conventional probe in its working part; it is much longer (approximately 15 mm), thinner, which helps to localize the canal orifices, and also helps to detect perforations in the bottom of the pulp chamber.
Excavators with long arms are used to remove contents and dentincles from the pulp chamber.
An endodontic mirror is different from a regular dental mirror, which is inconvenient for examining a deep tooth cavity due to image distortion. It has a flat surface that produces a clear image that provides a clear view of the topography of the root canal orifices without distortion.
Endodontic tweezers are ideal for holding paper points, gutta-percha points and root instruments.
Although there are other tools suitable for estimating the working length of root instruments, the endodontic millimeter ruler is still the best method.
An irrigation syringe is an important tool. The barrel-shaped tip prevents the needle from jamming and breaking, and the needle tip is notched to prevent fluid pressure on the periapical tissue. For the same purpose, sometimes the needle holes are placed on the side.
When manipulating in intradental cavities, it is better to use burs with smooth rounded tops, which prevents disruption of the anatomy of the bottom of the pulp chamber.
Tools for widening and leveling root canals
There are a variety of tools available for widening and leveling root canals. From various variations of hand-held K-files to machine tools, canal machining has now become much easier and of better quality.
K-file
The K-file itself is very similar to the K-reamer, differing from it only in the larger number of turns per unit length. Up to No. 25, tetrahedral wire is used in manufacturing, which prevents the tool from jamming in the channel. Starting from No. 30, the triangular section gives flexibility to the tool, and, accordingly, processing efficiency is even higher.
The K-file can be considered a universal tool, both for expanding the canal and for passing it. Working with it in the canal, they produce rotational movements, gradually going deeper in the canal.
K-Flexofile and K-Flexofile Golden Mediums have increased flexibility and a triangular cross-section, which reduces cross-sectional area.
H-file
Hedstroem File, or the well-known H-file, is made of round wire with spiral cutting edges. It is more aggressive than previous tools, so when working you should never use movements screwing into the walls of the canal.
GT files
GT files are specific in that they have a taper of 06, 08, 10, 12, are made of NiTi alloy, and also have an ergonomic handle. The movement of the curls on the working part is reversed, which prevents the instrument from jamming in the channel. The GT file is inserted into the canal, cut into the walls, scrolled 90-180 degrees, then scrolled clockwise again, cutting off the infected dentin. Thus, channel processing includes 4 instruments, rather than the classic number of 10-14.
Machine GT-Rotary files are made of NiTi alloy, and are divided into 3 groups.
- In the first group there are only 4 GT-Rotary file tools, they have 2 colored rings on the shank, and taper respectively 12, 10, 08, 06 with a diameter of 0.2 mm, length 21 and 25 mm. They work using the Crown Down technique, alternately changing the taper from a larger one - 12, to a smaller one - 06.
- The second group also has 4 tools with 1 colored ring on the shank, all with a 4% taper. They differ in size, corresponding to ISO No. 20, 25, 30, 35. The apical third of the root canal is prepared with instruments of this group.
- The third group includes instruments with a taper of 12%, which process the mouth of the canal, making it funnel-shaped.
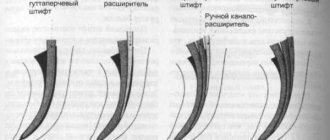
Tools for removing the soft contents of pulp decay - pulp extractors
This group includes pulp extractors and root rasps. The pulp extractor is a conical rod with teeth facing the handle. The handle itself is made of twisted wire for better grip.
The principle of operation is simple - the instrument is inserted into the root canal without effort, rotated 2-3 turns and removed along with the decay of the pulp.
Root rasps are not as fragile as pulp extractors and can be used in curved canals. They can remove not only pulp, but also dentine filings.
In the absence of a rasp, the choice falls on K- and N-files.
Possible problems and ways to solve them
File fragment
File breakage in a canal is probably the most common problem dentists encounter when working in canals. To avoid, Dr. Mann recommends
- carry out irrigation every time the file is changed,
- do not put pressure on the file, but click on it easily.
If the file still leaves the channel incomplete, you must:
- take a periapical photograph that will show where the fragment is located (there is a high probability that the file broke at the bend of the canal);
- begin the passage of the canal with the 6th or 8th C-file in order to bypass the fragment and reach the apex (the process may take from 30 to 40 minutes, irrigation is required in abundance);
- After passing the canal to its full depth (usually with a 15th C-file), irrigation should be carried out and the canal should be obturated.
Leaving the fragment in the canal and using it as part of a filling is a logical solution. At the same time, sometimes as a result of abundant irrigation, the fragment can come out.
Sodium hypochlorite damage
If sodium hypochlorite gets behind the apex, which may be the result of improper instrumentation, swelling will immediately appear on the patient's face. In this case, the procedure may be as follows.
1. Irrigate immediately with saline solution.
2. Make a cold compress and apply it to the swelling.
3. Prescribe pain medication and antibiotics to the patient, explaining the situation and emphasizing the fact that he will be fine.
In such cases, a good relationship with the patient is especially important.
Many patients ask many questions and strive to understand the dentist's actions. If you decorate the walls of your clinic with dental posters from Stomanet.ru, they will be able to obtain the required information without your participation.
https://lavka.stomanet.ru
What does it look like? Here is an example from Krasnodar:
And here are dental posters in beautiful frames that decorate the walls of clinics in Tobolsk:
(click on photos to enlarge them)
Delivery within Russia is free. We accept payments from legal entities.
Go to the store
Based on the material
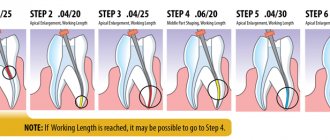
Step-by-step procedure to simplified and efficient root canal techniques
Instruments for filling root canals
We use the following tools for filling root canals:
Channel filler
The canal filler is indispensable when applying calcium-containing pastes into the root canal or is an option for applying endosealant. The tool is a spiral twisted counterclockwise, of different sizes. When the instrument rotates, the paste is pumped into the root canal. In addition to endodontic treatment, canal filler is used to add fixing material when cementing orthopedic intracanal structures.
Spreader
The spreader resembles a standard file and has a cone-shaped smooth rod with a sharp tip. It is used in the technique of lateral condensation of gutta-percha pins in the canal.
Plugger
A plugger is similar to a spreader, but unlike a spreader, it has a rounded top and is used for vertical condensation of gutta-percha.
Gutta-condensor
Gutta-condensor is designed for a contra-angle handpiece; the working part looks like an inverted H-file. It is used for thermomechanical condensation of gutta-percha due to the release of heat during rotation of the instrument, which allows it to easily condense in the apex area.
A separate article will be devoted to root canal filling techniques in more detail.
The article was written by O. Vishnyak specifically for the OHI-S.COM website. Please, when copying material, do not forget to provide a link to the current page.
Main manufacturers
Gates Glidden tools have a tail piece (inserted into a drill) and a rotating drill bit. The working area is made in the shape of a drop with 3 spiral cutting edges, its length is 2.5-3 mm. The drill is made of a stainless alloy containing chromium and nickel.
Gates Glidden used:
- For mechanical expansion of the first third (orifice) of the root canal. The blunt tip of the working part eliminates tooth perforation and provides high-quality access for further work.
- For unsealing and removing fragments of gutta-percha from a previously treated canal.
The Largo end drill has a similar structure, but the length of its working part is 7-8 mm. Has 2 cutting blades in the shape of a spiral.
Largo is used:
- At the initial stage of passage of the canals of the incisors and canines.
- During prosthetics with stump inlays to form an ostial bed.
All technologies of comfortable dentistry for adult patients
Complex dental cases requiring scrupulous diagnosis and high skill of an experienced dentist;
anxiety and fear of procedures; the need for an integrated approach to eliminating a dental problem - all these are our cases, our daily practice. Excellent equipment and modern materials allow our doctors to achieve impressive results, treat reliably, aesthetically and with a good prognosis.
Treatment under a microscope, restoration with light-curing materials, precise prosthetics using the best materials and the most modern techniques for correcting bites - we have it all at Belgravia Dental Studio.