Features of the anatomical structure of the dentofacial apparatus determine the value of each element of the dentition. All teeth are involved in food processing, daily exposed to mechanical stress, as well as the risk of developing pathologies provoked by harmful microorganisms accumulating in the oral cavity. Modern dental techniques provide protection of teeth in the early stages of caries development - the list of protocols used also includes the Step Back technique, which belongs to the category of apical-coronal methods.
General overview
The choice of treatment method, as a rule, depends on the indications of the clinical picture. Technologies used within the apical-coronal methodology provide for sequential treatment of dental canals, with gradual expansion from the apical foramen area towards the orifice. Within the framework of the referral, both the standard technique and the Step Back technique are used, which reduces the risk of side effects and facilitates the dentist’s work.
The treatment protocol involves the use of a set of steel files necessary both to determine the length of the root canal and to increase its diameter. At the same time, it must be taken into account that the standard technology is associated with the risk of infection during the process of immersing jagged needles inside the cavity, as well as with the formation of dentinal chips that can clog the canal. Removing side elements is associated with certain difficulties due to the cone-shaped shape and small diameter. Practice shows that the use of the Step Beck technique reduces the likelihood of infection by 15-20%.
Apical-coronal methods
Apical-coronal methods involve the preparation and expansion of the root canal, after determining the working length, in the direction from the apical foramen to the orifice, using instruments from smaller to larger sizes.
These methods are the easiest to learn, the risk of complications when using them is minimal, so we recommend that you begin mastering the technique of endodontic manipulation by studying these techniques.
STANDARD TECHNOLOGY
This technique involves expanding the canal with K-files and includes several stages:
The first stage is the passage of the root canal and determination of the working length.
The root canal is passed to the physiological apical foramen with a thin K-reamer or pathfinder (Fig. 452, a). To determine the working length, various methods are used, which we will discuss below. The working length is fixed on all instruments with locking discs.
The second stage is the expansion of the root canal to the working length.
First, the canal is processed to working length with a K-file of the same size as the instrument with which the root canal was passed (in our case, ISO No. 10). The K-file is inserted into the root canal with rotational movements (“winding a wristwatch”), and then the canal is expanded with sawing movements (Fig. 452, b).
After this, the K-file is removed from the canal and the K-file of the next size (No. 15) is inserted (Fig. 452, c). Then the canal is processed to working length with K-files of increasing sizes: No. 20 (Fig. 452, d), No. 25 (Fig. 452, e), etc. (Fig. 452, f, g, h).
In this way, the channel is expanded to a predetermined size (in our case, to ISO No. 40), but no less than to No. 25.
The use of this technique is indicated when treating narrow root canals with a round cross-section, if they are not planned to be expanded to a large size. It is also used when treating canals in thin roots, when excessive expansion of the canals can lead to perforation or root crack (for example, the anterior roots of lower molars). This method is of little use for instrumental processing of highly curved channels and channels of complex configuration.
Another version of the “standard technique” - “K-reamer + H-file” (see Fig. 453) - involves the combined use of K-reamers and Hedstrom files. With this technique, the root canals are first passed through the working length with a K-reamer using rotational movements reminiscent of “winding a watch” (see Fig. 453, a). Then the canal is processed with a Hedstrom file one size smaller, the movements are sawing, reciprocating. For example, after K-reamer No. 15, use H-file No. 10 (see Fig. 453, b). Then use a K-reamer of the next size (No. 20) (see Fig. 453, c), a HeadstrSM file - one size smaller (No. 15) (see Fig. 453, d), etc. in compliance with the basic principles of the standard canal expansion technique discussed above (see Fig. 453, e, f, g, h, i, j).
Differences between the “K-reamer + N-file” technique and the technique that involves the use of K-reamers alone:
— faster channel processing;
— a more aggressive technique (greater risk of step formation, uneven expansion of the canal, lateral perforation).
Processing stages
The Step Back technique involves performing five successive stages, each of which is significant in terms of achieving the desired result.
Preparing tools
The choice of available means used in the treatment process depends on the specifics of the diagnosed anomaly. Each instrument is treated with antiseptics and autoclaving, after which it is placed on the work table in a certain sequence corresponding to the intended treatment plan.
Determination of channel length
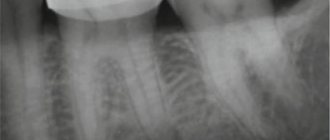
The working distance of the canal located in the tooth root is determined using K-reamers or pathfinders. The instrument is placed into the formed cavity of the crown, after which the doctor takes pictures using an X-ray machine, determining the depth of the caries. The indicator is calculated based on the position of the upper point of the apical entrance, as well as the location of the upper part of the instrument relative to the root apex. The X-ray image helps to accurately determine the values, which greatly facilitates further work.
Cleaning and widening of the apical area
The second stage is the formation of a ledge used as a support for placing tools. At the initial stage, K-files with a cross-section identical to the diagnostic equipment are used. Gradual rotation and subsequent processing by reciprocating movements performed in a vertical plane ensure the creation of a base channel and removal of chips.
Having treated the cavity with a disinfectant composition, the doctor proceeds to use a wider instrument, successively increasing the diameter of the canal. The formed stroke is characterized by a conical shape, which simplifies cleaning and sealing.
Expansion of the mouth and middle part
Using instruments with an enlarged cross-section, the dentist gives the cone the necessary structure, creating a funnel and regularly using an antiseptic to prevent infection. GatesGlidden bur models are used for expansion and deepening, thanks to which a comfortable platform is created that eliminates the presence of damaged areas and preserves the tooth structure. To process tortuous canals, flexible instruments with increased strength are used.
Final alignment
The final stage is the final smoothing of unevenness along the entire perimeter of the inner walls. After disinfection and restoration of patency, the doctor proceeds to the use of reinforcing materials necessary for the restoration of the dental crown. The recommended option is to install a pin covered with a photopolymer layer, which, after hardening, provides not only strength, but also an aesthetic appearance.
Step Back technology is deservedly popular among specialists, since it allows us to relatively solve problems arising as a result of carious destruction of elements of the dentition. The only drawback of the technique can be considered restrictions that exclude the use of the technique in complex cases.
Endodontics / 08 Root canal treatment / 09 Step-back technique
“ Step - back ”
The abandonment of the use of silver points and their replacement with inert gutta-percha led to a change in the concept of root canal treatment. The channel shape with relatively parallel walls and minimal taper was replaced by a more tapered shape. The “step-back” canal treatment technique involves the formation of an apical stop, which makes it possible to avoid irritation of the periapical tissues with drugs -
mi and filling material. Minimal expansion of the canal at the apex reduces the risk of perforation.
Goldman et al. (1988) studied the quality of root canal cleaning, their shape and direction after treatment with K-files, H-files and Unifiles. The apical stop, the almost circular cross-section of the canal, the conical shape from the apex to the mouth and good processing of the apical part of the canal with uniform expansion were achieved only with the help of a K-file used according to the “step-back” technique. However, in 46% of cases, a change in the course of the curved canals in the apical region was observed (Cinnisetal., 1988).
Using the “step-back” technique, the apical part of the canal is first treated, and then the coronal part. After creating access to the canal, its length is determined using an x-ray. The first file that “gets stuck” in the canal after passing its working length is considered the initial apical file. The root canal is sequentially expanded by four sizes. At this initial stage, no tool should be skipped. Otherwise, the file will be blocked in the channel.
The last file passing to working length should remove white dentin chips. It is called the apical master file. Its size determines the size of the gutta-percha master pin. Then the coronal part of the canal is expanded using the “step-back” method by four sizes. Each subsequent K-file is inserted 1 mm shorter than the previous one to give the canal a cone shape with an apical stop. In this case, an apical master file is periodically inserted over the entire length to ensure the patency of the canal.
Rice. 305. Treatment of the apical part of the canal.
Left:
First, the length of the canal and the size of the initial apical file are determined on the radiograph.
Note the periapical defect and the file extending beyond the apex. Right:
The canal is widened to the apex by four instruments, starting with the initial apical file.
Rice. 306. Step-back technique.
After the canal has been expanded to the apex to the size of the apical master file (here up to size 35), the next file size is inserted I mm shorter than the previous one. Thus, K-file No. 40 is inserted 1 mm shorter, No. 45 - 2 mm, No. 50 - 3 mm, and No. 55 - 4 mm shorter than the working length. The figure shows the channel taper that is formed as a result of such processing. Periodically, the canal is passed through its entire length with an apical master file, which smoothes the walls of the canal, prevents its blockage by dentin chips and ensures the passage of the canal to the apical foramen. This technique involves using only K-files.
R
is. 307. First stage.
Left:
the canal is processed to the apex with an apical master file.
The radiograph shows the corrected working length of the canal. In the center:
the instrument next to the apical master file processes a canal 1 mm shorter.
The length is indicated by a rubber ring (stopper) on the tool. Right:
X-ray shows a decrease in the size of the peri-apical defect after 3 months, during which a temporary therapeutic dressing was placed in the canal. The file is inserted to the correct working length.
Rice. 308. Last file.
Left:
A 50-gauge K-file is inserted into the canal 3 mm shorter than the apical master file.
Center:
The last file expands the canal at a depth 4 mm shorter than the working length.
Right:
after finishing the canal treatment, a gutta-percha pin is fitted, the size of which corresponds to the size of the apical master file.
R
is. 309. Canal filling.
Left:
the conical shape of the channel allows for lateral condensation of gutta-percha near the apex.
In the center:
condensation of gutta-percha pins is carried out until the canal is completely obstructed.
Right:
biologically neutral obturation of the canal is obtained. The control radiograph shows homogeneous filling of the canal. The channel has a slightly conical shape. The apical stop is clearly defined.
Hand instrument techniques in endodontics
Author: Bobby Patel
Translation: Alexandra Solopova
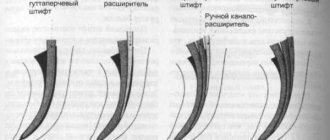
Step-back technique (see Fig. 1)
- The working length is determined before apical treatment of the canal to a minimum size of #25.
- Stainless steel files should be pre-curved at the apical 2–3 mm and inserted in the same direction as the canal curvature.
- Recapitulation using a smaller working length file with generous irrigation is recommended to prevent loss of working length.
- The use of a patency file is possible to ensure that apical dentin debris does not block access at the apical constriction. A small #06 or 08 K file can be advanced 1 mm past the apical constriction to ensure patency is maintained.
- Once apical expansion has been achieved, sequential step-back preparation can be performed using sequentially larger files with 1 or 0.5 mm increments. The latter allows for greater apical taper if desired.
- Recapitulation must be performed with the apical master file (the last file used at working length before preparing the step back).
- The canal walls can be circumferentially machined using a #25 H-file to smooth and eliminate the created steps to help achieve a consistent taper.
- Once preparation is complete, an apical master radiograph can be taken to confirm the working length.
Figure 1. Clinical diagrams representing the step-back technique. (a - e) Once access has been achieved and the size of the apical master file (the original file, which is slightly related to the corrected working length) has been determined, (f - h) subsequent large files are shortened in increments of 0.5 or 1.0 m from the previous one length. The step back creates an extended, tapered shape while reducing procedural errors. The step-back method is superior to standardized sequential preparation methods in preparing and maintaining the shape of the canal.
Watch-winding technique
- It is recommended to use K-files.
- A 10# K-file can be inserted into the canal until resistance is achieved. The file is rotated 30–60° clockwise, which moves it further into the canal as it interacts with the dentin.
- The file is rotated 30–60° counterclockwise to partially cut away the trapped dentin.
- Each clockwise and counterclockwise movement of the file further opens the canal space and allows the instrument to advance deeper (see Figure 2).
Figure 2 (a - d) Schematic representation of the “watch winding” technique. The tool rotates back and forth (clockwise/counterclockwise) around a circle of 20°. This is useful for identifying the channel and moving the file to the top. Light apical pressure is applied to push the file deeper.
Balanced Force Technique
- Flex-R files or Flexofiles with a modified non-cutting tip should be used.
- The coronal two-thirds of the canal should be prepared using the crown-down technique before apical instrumentation.
- The file is placed in the canal (not curved) and rotated clockwise from 90° to 180° with light apical pressure to engage the dentin. If the apical force is excessive, the file may lock prematurely, predisposing it to counterclockwise failure.
- The file is rotated by at least