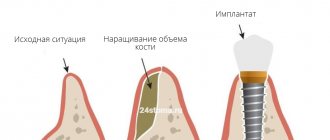
Ridge splitting is a type of bone grafting - a procedure that increases the volume of bone tissue. This operation is often required before implantation if there is a lack of bone tissue. There are various bone grafting techniques, but we will look at one very common one – bone splitting.
Indications for bone splitting surgery
- Narrow ridge of the jaw, this often happens on the lower jaw;
- Long absence of a tooth in the jaw - during this time the bone decreases and it becomes insufficient for installing an implant;
- Anatomical features in which a person initially has little bone tissue.
There are implantation methods when bone grafting is not required, but they are not classical and should be considered individually with the dentist.
In order for the splitting of the bone crest during implantation to proceed as it should, two basic conditions must be met:
- Its minimum height should be 8 millimeters;
- The width of the bone should be at least 3 millimeters at its narrowest point.
The essence
Let me remind you about the box. We can imagine any bone defect as a box that is missing one or more walls.
Something like this:
The osteoplasty operation, no matter how we perform it, consists of three points:
1. Restore the box. That is, to recreate all the walls of the defect.
2. Hold these walls for a time sufficient for bone tissue regeneration.
3. “Start” the regeneration process.
The first point can be implemented in different ways: using barrier membranes, meshes, awning screws, plates, etc. In addition, we can use autologous bone fragments - plates, blocks, etc.
The second point is somewhat more difficult to accomplish. After all, the regeneration of bone tissue takes time, and all this time our entire constructed structure must not only be motionless, but also not interfere with cell migration, vascular growth and other physiological processes that accompany regeneration.
The third point in comparison with the two looks even more confusing. How to start bone tissue regeneration? What is its trigger? And here we have to remember the university course on histology and physiology. Briefly, I reminded you about it here>>, I recommend re-reading it.
In general terms, the process of bone regeneration after osteoplastic surgery resembles that after a fracture. In the damaged area, macrophage cells, osteoclasts, etc. are activated, which begin to devour bone cells damaged during a fracture (osteocytes and osteoblasts) and the intercellular bone matrix. Having gorged themselves, macrophages disintegrate, releasing the so-called. bone morphogenesis proteins (BMPs, in the bourgeois and foppish literature the English name BMPs, bone morthogenetic proteins is accepted), hormone-like substances that control cell migration and differentiation. It is BCM, and this is a whole group of substances, that controls not only the transformation of precursor cells into osteoblasts, but also “shows them the path” and the mechanism of restructuring. If caricatured, this process looks like this.
In other words, to start regeneration, we need a certain amount of sacrificed bone cells and intercellular bone matrix. With a traumatic fracture this happens naturally, but what about osteoplasty? And here, in most cases, comes to our aid... the same auto-bone shavings (pictured on the right)!
I admit, I was a horse person.
For a long time, I naively believed that the autologous bone chips added to the graft itself served as a source of bone cells for regeneration? But then how to explain its wild, up to 70% resorption? In fact, everything is explained simply - most of the autologous bone chips are “eaten” by macrophages, BCM are released, which subsequently direct bone regeneration in the right direction. That’s why we need autologous bone chips for NCC - without it (more precisely, without its disintegration), the progenitor cells will not understand where to migrate and what to transform into. Well, we’ll discuss this issue some other time when we start talking about guided bone regeneration. Interesting fact: Remember how they scare us all about bisphosphonates?
Like, I took a bisphosphonate - and implantation is screwed, not to mention osteoplasty. Why is this happening? The fact is that bisphosphonates suppress the activity of osteoclasts - “old” bone tissue cells are not consumed, bone growth factors are not formed, bone tissue is not renewed and stops regenerating - so we can get extensive osteonecrosis even due to simple tooth extraction. What about osteotomies or, as people say, “splitting?” Let's look at it from the point of view of these three points:
1. With an osteotomy, we actually get a box, the walls of which are relatively easy to hold in place:
2. To prevent the space formed inside our “box” from becoming overgrown with fibrous tissue, we isolate it from the external environment using a barrier membrane. Sometimes it is also filled with a graft to retain the membrane and the resulting volume.
3. This point, oddly enough, can be solved even easier. In fact, after an osteotomy we get a “fracture” and a very large wound surface. Most often, this turns out to be enough to start the regeneration process without autologous bone chips and any additional BCM.
Well, it would seem, why is this not an ideal method?
Carrying out bone grafting
Bone grafting using the method of splitting the alveolar ridge is carried out in several stages:
- The surgical area is numbed through an injection using local anesthetics. This guarantees complete loss of sensitivity in the intervention area;
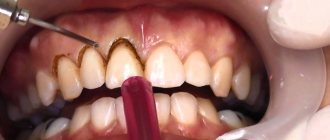
- The gum is cut and peeled off using a scalpel, the dentist gains access to the bone;
- A horizontal incision is made in the bone itself with a scalpel or laser;
- The edges of the alveolar ridge are moved apart, creating an empty space between them;
- The surgeon introduces the selected material into the space to form bone tissue;
- If necessary, the surgeon can place a protective membrane on top;
- The implant is installed;
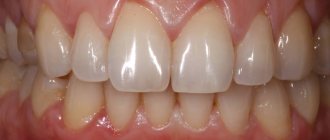
- The gum is returned to its place and stitched with special surgical sutures.
All this is done quite quickly - the operation, even in complex cases, does not last more than an hour. During the procedure, the patient feels absolutely nothing.
Classification
There is some confusion in this seemingly simple question. Often, doctors confuse the direction of osteotomy with the direction of augmentation. Therefore, I will clarify.
Osteotomy is the direction of movement of the cutting instrument. In other words, if we want to move a bone fragment upward, then we make a horizontal incision - and this will be a vertical augmentation and a horizontal osteotomy. Conversely, a vertical osteotomy involves expanding the alveolar ridge in width - and we will call this horizontal augmentation.
Yes, there are other options - oblique osteotomy, mesialization or distalization of a bone fragment, but they are rarely used, so we will not discuss them.
Types of bone grafting
Depending on what material will be used for transplantation, there are three types of bone grafting: • Autoplasty – using the patient’s own bone. Bone material for this purpose is taken during a separate operation, for example, from the jaw in the area of the eighth teeth, or from the thigh. This option is quite traumatic, but at the same time guarantees better survival rate; • Xenoplasty – the use of carefully processed animal bones, mainly cattle. This method is now almost never used; • Alloplasty is the use of special synthetic materials that not only replace human bone tissue, but also stimulate its growth by creating a frame. The method is convenient and non-traumatic, widely used and loved by many dentists and patients. It is facilitated by a wide selection of modern osteoplastic materials with good properties and a high percentage of engraftment. These methods do not have any fundamental differences, and the choice of bone material does not affect the course of the operation. But in certain clinical cases it has a significant impact on the result of bone grafting.
The essence of technology
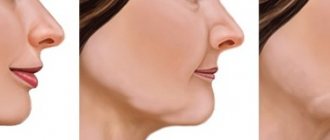
Implantation of an implant without replenishing the lack of bone mass has become possible thanks to developments involving splitting the alveolar. At the same time, bone volume increases significantly. This is due to a longitudinal incision and spreading of the gums to the sides.
If such an incision is not enough to implant an artificial rod, the dentist places synthetic shavings into the voids and stitches the edges of the wound. To reduce the risk of rejection, an autoimplant can be installed instead of artificial bone.
This technique allows you to reduce the time from the start of treatment to installation of a permanent prosthesis by 3 times.
Patient reviews
In general, on the Internet on forums, patients speak positively about this operation, especially if it is performed on the upper jaw. After it, recovery is faster, especially when compared with grafting a bone block. A problem such as shifting of the installed bone material is much less common, that is, complications arise less often. Swelling and pain also go away very quickly. Patients are especially pleased that implants can be placed immediately during surgery, and not some time after bone grafting.
Use of metal structures
And yet, yes, sometimes you can do without any metal. Provided that the displaced bone fragment is normally retained by the rigidity of the mucous membrane or graft:
But, unfortunately, this is not always possible.
Therefore, to implement osteotomy we need:
– screws. Different sizes. For fixing the plates, the smallest ones are suitable - 3-4 mm. To fix the bone fragments themselves or the “jack”, longer screws will be required - 10-12 mm.
– miniplates. A huge number of them are produced. We mainly use X- and H-shaped miniplates of the smallest sizes - they are easier to work with, they are easily adaptable, but there is also a disadvantage - sometimes they bend under load.
We don’t particularly worry about metal, preferring rhythm and blues or jazz, but if we have to, then we are quite happy with the domestic producer “Metal Corrosion” CONMET:
First of all, it's inexpensive. Secondly, the quality, I would say, is up to par.
With rare exceptions, miniplates and screws must be removed before implantation.
Possible complications
Of course, after the intervention, swelling and pain appear, but they quickly pass and are easily relieved with pharmaceutical painkillers. Also, if too much stress is placed on the surgical area, the stitches may come apart, but the dentist can quickly fix this problem. But still, we do not recommend putting too much stress on the operated area for several months. It’s better to give up food that needs to be chewed hard and for a long time, don’t crack seeds and don’t try to use your teeth as a bottle opener - then there won’t be any problems. Well, be sure to maintain oral hygiene to prevent infection and inflammation.
Stages
1. Anesthesia.
In 99.9991% of cases, such an operation can (and should) be performed under local anesthesia. On average, it takes 40-60 minutes, for which time conventional infiltration and/or conduction anesthesia with Articaine is sufficient.
2. Cut.
To begin with, we should remember that a cut is always a compromise . On the one hand, we must have minimal wounding. On the other hand, there is freedom of action and a good overview.
You should also remember that the incision made will then have to be sutured. Therefore, preference should be given to simple linear cuts without any show off.
For horizontal osteotomy (vertical augmentation), a vestibular incision along the transitional fold or just below is very convenient:
With a vertical osteotomy (horizontal augmentation), on the contrary, an incision is made along the top of the alveolar ridge. In this case, additional “relaxing” incisions are not needed.
3. Skeletonization of the alveolar ridge.
Unlike other types of osteoplasty, it is not performed. Let me remind you that for a moving fragment, the periosteum is the only source of nutrition, and it was extremely irresponsible to deprive the bone of this source. In addition, the periosteum partially holds the moved fragment in place, preventing it from completely falling off.
At most, give yourself a strip 3-4 millimeters wide for working with the tool and fixing the screws. It would be enough.
4. Actually, osteotomy.
There are many ways to perform an osteotomy with dignity.
The cheapest, but not the easiest , is to use a raising tip in a thin cutter for this. When we didn't have an ultrasound surgical unit, this is exactly what we did.
The second method is ultrasound. In our case, a special surgical ultrasound machine with appropriate attachments. In principle, the thing is not cheap, but there are China and Taiwan, so the cost of such machines is decreasing all the time.
The third method is to use special oscillating microsaws. The thing is cool, but not the most universal and very expensive - only fairly large and wealthy clinics can afford to have all the necessary kits.
We don’t have those, so I just stole a picture from the Internet.
The fourth way is to simply take a hammer, a chisel and loosen everything. The worst thing is that some people still do this. And they call it precision, high-precision and gentle bone splitting.
I repeat, it doesn’t matter at all how you perform the osteotomy. There are even special kits for it:
What is more important is how correctly you choose the indications for its implementation. And how accurately do you implement it? The rest is just a matter of habit.
5. Actually, splitting.
To begin with, let's throw the hammer away. I am sure that if you have ever been hit on the head with a hammer, then you have already done it. If not yet, try knocking and then throw it away.
Splitting can be done using conventional elevators:
or you can buy special osteotomes:
not the point. Any of these tools are suitable for our work. And, to be honest, it seems to me that conventional elevators are much more convenient.
Having moved the bone fragment being moved, you will probably be surprised to notice that it moves back due to the rigidity of the tissue. So now we need to think about how to keep him.
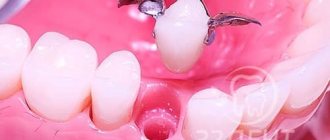
6. Fixation of the moved fragment.
This can be done in different ways.
The simplest option is using a graft. If you have a graft in the form of a solid block, then you can simply “wedge” the alveolar ridge with it - and this will be almost enough. “Almost” – because almost any graft shrinks, therefore, over time, the displaced fragment will become mobile. This is not our option.
For vertical osteotomy, it is very convenient to use long screws. So, as indicated in the diagram.
In addition, with the help of screws you can “precisely” fix a bone fragment, moving it as if on a jack:
For horizontal osteotomy, in my opinion, it is more convenient to use miniplates. As I noted above, in practice we use X- and H-shaped miniplates for screws measuring 0.9x4mm. The amount of metal in different conditions can be different - it all depends on at what stage complete immobility of the displaced bone fragment is achieved.
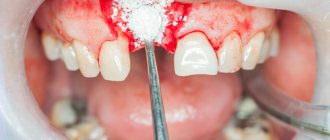
7. Filling the resulting space with a graft.
At what point should I do this? Probably, if you use a graft in the form of a solid block, then, it seems to me. It makes more sense to first place the graft, then fix the displaced bone fragment with screws or miniplates:
And vice versa, if you use a graft in the form of granules (such as Bio-Oss L), then, first, you need to fix the bone fragment, then lay the graft.
I do not recommend “pressing” the graft, as some doctors do. Firstly, the distance between the granules matters, because, in theory, your own bone tissue should grow there. Secondly, the graft particles break down and it turns into powder. Thirdly, with active pressing you can squeeze out the graft anywhere. For example, in the maxillo-lingual groove. There’s not much pleasant in this, you see.
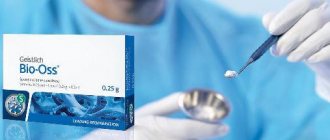
You can independently calculate the graft volume for a particular defect. To do this, you need to remember the formula for the volume of a parallelepiped formed by the walls of bone fragments. For example, we perform vertical augmentation in the area of two teeth, the length of the defect is 2.4 cm, the average width of the alveolar ridge along this length is 1.0 cm, the height of the “lift” of the moved fragment is 0.6 mm. Total, we get: 2.4 x 0.6 x 1.0 = 1.44 cubic meters. cm. This corresponds to one package of Geistlich Bio-Oss L 0.5g. And no need to push anymore. Chat, not a minibus at rush hour.
I would like to emphasize once again that the BRAND and BRAND of the graft do not matter much. Yes, it must meet certain requirements and have certain properties. But this is probably all I can tell you about the choice of biomaterials for now. We will discuss this topic in more detail at RegenerationDay.
8. Isolation of the defect area using a barrier membrane.
This stage is not particularly difficult. The procedure depends on which barrier membrane you are using - some of them must first be soaked in distilled water or saline solution. And some of them are hydrophilic enough to instantly become saturated with blood and become sticky and elastic right on the spot.
There is no need to fix the barrier membrane. It performs an isolating function and is not the frame of the form. True, some types of barrier membranes do not fit well and constantly slide out - in such cases, a couple of pins will not hurt.
9. Stitching.
I have never experienced any problems with suturing a surgical wound. As a rule, its edges converge quite easily without additional periostotomy. For suturing, we use monofilament non-resorbable threads with a diameter of 5-0 (Resolone, Prolene, Polypropylene, etc.).
10. Control.
After the operation, we take control photographs. This could be an orthopantomography:
or cone beam computed tomography. Whatever you prefer.
Let’s look at the site of the operation again, say “Thank you!” to the patient, make recommendations, prescriptions, and move on to studying the postoperative period.
Contraindications for bone splitting surgery
- The presence of foci of acute inflammatory diseases in the oral cavity;
- General acute and chronic diseases;
- Weakened immunity, immunodeficiency;
- Oncological diseases, especially in the oral cavity;
- Osteoporosis;
- Age over 50 years – a particularly thorough examination is required;
- Pregnancy and breastfeeding;
- Blood diseases, especially blood incoagulability;
- Mental illnesses in which the patient cannot behave adequately in the dentist's chair and during rehabilitation.
If there are complications, we recommend either eliminating them or choosing another method of prosthetics - for example, installing removable dentures.
Price
Our Center operates a case payment system for treatment. This pricing policy eliminates unexpected costs for patients that they often encounter in other clinics. The turnkey price includes a set of procedures and materials for a specific service.
The implant installation case includes:
- anesthesia;
- implant Nobel Biocare (Switzerland), installation;
- consumables and superstructures;
- anesthesia;
- CT scan of the jaw before and after implantation.
Case on sinus lift and NBR:
- anesthesia;
- consumables (except bone);
- operation;
- applying and removing sutures;
- a set of medications to take home;
- examinations and control CT image.
You can view the prices for services in our Center here.
Is implantation possible without osteoplasty?
In some cases, implantation without osteoplasty is possible, but more often it is a temporary solution or an operation without a guarantee.
Installation of mini implants
Implantation using mini-implants is usually performed with complete edentia. In this case, there are no requirements for the height and density of the jawbone. Implants of reduced size are fixed in the gums in a minimally invasive way without involving bone structures. Serve as additional support for conventional removable dentures. However, this is a temporary solution; such structures are short-lived.
Application of one-stage implantation protocols
Some clinics practice installing implants using immediate loading protocols - All-on-4, All-on-6, basal complex. The first two are used in cases of complete absence of teeth, basal - from 3 teeth in a row.
To install artificial roots, areas of the jaw are selected where at least a minimum volume of bone is still preserved. Since thin implants are used, they are fixed at an angle in the area of the chewing teeth to create a large area of contact between the artificial root and the thinned bone. With basal implantation, the deep layers of the jaw are involved, which are not subject to atrophy. The prosthesis is fixed immediately.
We do not recommend such experiments, since they contradict the entire law of biomechanics. Any orthopedic structures must be supported by implants installed in parallel. In this case, there will be no overload in the area of connection between the prosthesis and implants. In addition, basal implants fail in 40% of cases. It is better to grow the bone, wait for engraftment and carry out implantation without risks.
Other methods
In some cases, osteoplasty is avoided due to tricks, which we also do not recommend:
- When installing shortened implants to restore anterior teeth. This is due to the fact that in the frontal region of the jaw there is a slight decrease in bone height. But this approach does not guarantee success, since artificial roots of small diameter, but always of the required length, must be installed for the front teeth.
- When installing rods in the area of the posterior wall of the nasal sinus. The location outside the sinus allows the use of traditional implant models due to the greater height of the bone in this section. But when calculating the placement of implants, the law of distribution of chewing load must be taken into account and the correct distance between several roots must be observed.
- When using the thinnest and shortest rods from a number of classic ones on the bottom row, bypassing the trigeminal nerve. This option will not ensure the fulfillment of the functional responsibilities of the roots. With chewing loads, they can become loose or even break.