Sterilization is the process of complete disinfection of instruments, during which all microorganisms, as well as their spores, are killed.
Everything that comes into contact with the patient’s biological fluids and is used repeatedly is subject to sterilization. Human immunodeficiency virus, hepatitis B and C, malaria, typhus – this is an incomplete list of diseases that are transmitted through blood. Sterilization is necessary to prevent their spread.
At the Karmen-Med clinic, all instruments are subject to mandatory sterilization. Regardless of the manipulation performed, the dentist always has only clean instruments in his hands. Our patients do not have to worry about their health.
General requirements for compliance with sanitary standards
Today, the main requirement in dentistry is the use of disposable materials for patient treatment. Before the appointment, all auxiliary materials must be replaced, including gloves and a doctor’s cap. Reusable instruments must be removed from special sterilization bags that indicate the date and time of their sterilization.
Some patients are so eager to see a doctor that they want to enter the office immediately after the previous patient has left. They do not think that after seeing a patient, medical workers disinfect the office. Therefore, after one patient leaves, all surfaces with which he came into contact or could hypothetically come into contact are wiped with a disinfectant solution. Disposable instruments are disposed of in accordance with all sanitary standards. During the entire reception, the bactericidal recirculator lamp should be running, which can operate in continuous mode (without stopping).
Disinfection of instruments used in therapeutic practice
When answering the question about what instruments are disinfected in dentistry, we should immediately say that in the doctor’s office all surfaces are treated at the beginning of the working day. Also, medical staff must clean the dental chair and other surfaces of the equipment used after each patient.
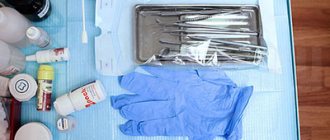
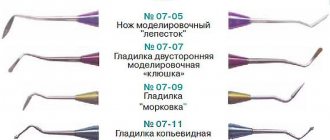
Therapeutic instruments must undergo appropriate multi-stage cleansing. The standard set includes a tray, a trowel, a spatula, an elevator, a probe and tweezers.
Disinfection and cleaning measures
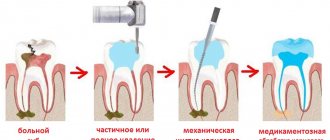
Instruments that have come into contact with the patient's saliva are a source of increased danger. Therefore, immediately after use, the instrument is loaded into a container with a disinfectant and cleaning solution. Then, it is processed in a thermal disinfector.
The next stage of processing is cleaning. It helps remove remnants of medications and fatty contaminants. The best method of cleaning is mechanical processing in special machines. This is the only method that allows complete removal of saliva and blood residues from the surfaces of instruments.
Sterilization methods used in dentistry
Sterilization is the general name for any disinfection process, regardless of the method of removing microorganisms. There are several such methods:
- Mechanical – removal of microorganisms by mechanical action. For example, liquids are passed through special filters that retain particles of certain sizes. Microorganisms can be mechanically removed from objects or surfaces by cleaning, wiping, and sweeping. The method is unreliable and is used in medicine only as a preliminary step.
- Biological - sterilization with antibiotics, is rarely used because it does not affect all pathogens.
- Chemical is a method of disinfection by applying special solutions or gas treatment. Gaseous ethylene oxide or formaldehyde is used as the latter. Acids with oxidizing agents, detergents, halogens and aldehydes are used as solutions. Most are known antiseptics, such as chlorhexidine or betadine. Used for processing cabinets, surfaces, and apparatus.
- Microwave - in this case, disinfection occurs in a special microwave sterilizer. Microorganisms die under the influence of an electromagnetic field. The method is rarely used in medicine.
- Physical - a method that includes exposure to temperature, pressure or ionizing rays. The most commonly used sterilization is high temperatures (in a dry-heat oven) or high temperatures and pressure (autoclaving). Most tools and materials can be cleaned using these methods. Ionizing radiation is used in factory conditions in the manufacture of sterile products.
Sterilization
Sterilization is the final stage of processing medical instruments. There are two main methods - steam and air. Steam sterilization uses:
- autoclave;
- wet sterilizer;
- hot steam sterilizer.
This method works using steam from distilled water under high pressure at temperatures up to 135o.
Air sterilization is carried out using a dry-air sterilizer or a dry-heat oven. The air temperature in such devices reaches 180°.
Sterilization takes place in several stages:
- steam treatment;
- sterilization;
- drying.
The entire procedure takes approximately 1.5 hours. After this, each instrument is placed in a disposable sterilization bag, on which the date and time of packaging is written. Sterility in such bags is maintained for about six months.
Methods for sanitizing instruments in the Da Vinci aesthetic dentistry studio
Our clinic is a modern dental center. And we approach the issue of patient safety thoroughly. Therefore, cabinet processing necessarily includes the following steps:
- disinfection of all surfaces in the office before each patient;
- placing all instruments related to the patient in a special sterilization bag;
- issuing disposable “clothing” to those coming for treatment - a disposable napkin, a cap;
- the bactericidal lamp operates throughout the entire appointment;
- sterilization of instruments after each use;
- The doctor changes gloves and cap after each appointment; gloves are also changed if the doctor leaves the patient. In our clinic, it is customary to do this in front of the patient so that he has no doubts about the complete safety of the entire treatment.
- During X-ray procedures, the device’s sensor is placed in a disposable bag, which is immediately thrown away after use.
We care about the health of our patients and strive to ensure that treatment is as safe as possible.
Add a comment
Leave your comment
Stages of sterilization of dental instruments
Very high demands are placed on the sterilization of instruments in dental clinics. To comply with them, it is necessary to properly prepare the tools for processing.
In this article we will talk about sterilization processing of instruments and materials.
The full cycle looks like this: disinfection → pre-sterilization cleaning → packaging → autoclaving → storage of sterile instruments.
Stage No. 1. Disinfection.
Disinfection is the first stage of preparing instruments.
There are two ways to process tools – mechanical (manual) and automatic (using specialized equipment).
Let's consider a mechanical method of disinfection of different types of instruments.
All dental instruments - burs, handpieces, etc. - are subject to disinfection. However, not all are subject to the same treatment.
All metal (for example, burs), plastic and glass instruments can be soaked in a disinfectant solution, but tips are strictly prohibited.
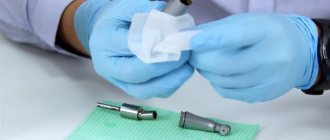
An alternative method of disinfection for handpieces is special wipes, such as Eco Jet. The wipes contain aggressive substances, so be sure to wear rubber gloves before use.
Important! Always follow the manufacturer's recommendations regarding dosage, solution concentration and exposure time for instruments. This will protect them from damage and premature wear.
Stage No. 2. Pre-sterilization cleaning.
At this stage, any contamination or residual disinfectant is removed from the products. The cleaning method depends on the texture of the products.
Tools with a smooth surface (for example, spatulas) can be cleaned with a special brush under running water.
And instruments with a ribbed or similar surface (for example, diamond burs) are cleaned only in equipment - an ultrasonic cleaner (bath). The fact is that the diameter of the bristles and threads on the surface of the tools, as a rule, do not match, and high-quality cleaning is impossible.
How does ultrasonic cleaning work? The device is a housing in which a container is placed. The tool is loaded into it, then the container is placed in the sink body. The cleaning agent is first poured into the device. Then the device turns on, the time is set - and the instruments are automatically cleaned of dirt.
After the cleaning cycle is completed, the instrument is removed from the sink, dried and packaged.
Important! Handpieces and similar instruments must not be cleaned in an ultrasonic cleaner!
Processing of collapsible tips. To easily and quickly clean the tips, choose dismountable models (for example, these are produced by W&H). They can be disassembled into elements and processed each separately.
As we said above, special wipes are used for disinfection.
Here are step-by-step instructions on how to process tools with them:
- Wear protective gloves;
- Disassemble the tip into its components;
- Wipe the surfaces of all elements with a napkin;
- Additionally, rinse the saline supply needles under running water using the needle that comes with the tip - this will thoroughly remove any remaining saline solution from the system.
Once the disinfection and cleaning cycle is complete, reassemble the tip completely and lubricate it.
Important! Be sure to lubricate the tips before packing.
Lubrication of tips. To lubricate the tool, use oil in a cylinder (it contains an attachment for mechanical tips) or in a special apparatus.
Be sure to remove excess oil from the tip. To do this, put it on the motor and turn it on for 30 seconds, wipe it with a napkin.
Stage No. 3. Package.
Manufacturers offer self-sealing bags and packaging devices.
The bags are available in different sizes and widths, so it won’t be difficult to choose one for the size of the tool. Packing products is very simple: place them in a bag, tear off the protective film with a sticky layer and seal the bag.
A packaging machine (for example, from Euronda) allows you to seal the bags yourself, adjusting their width and length. For this purpose, rolls of different winding widths are used (it is selected according to the size of the tools and trays).
Stages of making and sealing bags in a machine:
- Skip the required roll size to match the tool size;
- Pinch it - on the right side of the machine there is a lever that needs to be lowered down;
- Wait for a sound signal and color indication (orange) - this indicates that soldering has been completed;
- Cut the package (to do this, move the lever to the left, which is located on the right side of the device);
- Remove the bag from the machine.
Upon completion of the process, you receive a bag of the size you need, sealed on one side.
Now put the tool in it, wrap it, bring it to the heating element, fix it, press it and wait for the sound signal - and after a second the bag is hermetically sealed.
Self-sealing bags come in a standard length, while with a packaging machine you can adjust the length and width of the bags.
An important step in preparing for autoclaving! The packaging bags have 2 sides - one is transparent film, the other is paper. The paper used is special - with membranes. When you place a bag in an autoclave, the machine pumps the air out of the bag and steam passes through these membranes and sterilizes the items. During drying, these membranes are closed, and you receive a 100% sterile instrument, packaged in a sealed bag.
Therefore, it is important to place the instrument bags correctly on the tray before autoclaving: only with the paper facing up! This is the only way to guarantee high-quality sterilization and drying.
Stage No. 4. Autoclaving.
An autoclave is the most reliable way to sterilize instruments. It guarantees 100% sterility, and in terms of the quality of processing it simply has no equal.
Here are step-by-step instructions on how to sterilize instruments in an autoclave:
- Place trays of products on pallets in the machine;
- Select temperature mode and program;
- Confirm your choice - then the autoclave will perform the entire sterilization cycle automatically.
After the cycle is complete, remove the trays using the holder to avoid getting burned.
Possible mistakes when preparing for autoclaving:
Upon completion of sterilization in the machine, you will receive a completely sterile and dry instrument. But sometimes, after autoclaving, moisture remains in the bag. This should not be the case and means that at some stage you made a mistake.
This situation occurs for two reasons: incorrect placement of the instruments on the tray or incorrect packaging.
What to do to avoid this problem:
- always place bags on the tray with the paper facing up;
- make sure that the packages do not overlap each other, but are located freely on the tray;
- There should be a small distance between the bags for unhindered steam circulation.
After autoclaving, it is necessary to ensure proper storage of sterile instruments. Store it in packages in a dry and dust-free place.
Compliance with all stages of pre-sterilization preparation guarantees the safety of medical personnel and patients of the clinic, as well as the safety of instruments. You can buy the necessary equipment in the online store.
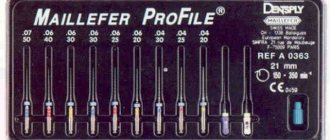
Features of working with endodontic instruments
The vast majority of instruments used in endodontic treatment today are disposable. When using them, specialists are guided by two basic rules:
- after use, the product must be properly disinfected,
- after that it must be sent for disposal.
As for reusable items, after each patient they are immediately sent to a disinfectant solution and usually left there for half an hour. After this, ultrasonic cleaning can be carried out, followed by treatment in an autoclave or oven. The method is chosen based on the type of tool used. After the full cycle, the processed items are sent for storage to specialized equipment, which is available in any modern clinic today.
Bottom line
- Whatever class analogue of equipment is used, you must always follow the operating rules.
- The tool should not be placed too tightly in the tray; all surfaces should be placed so that access to all surfaces is open. To do this, we recommend choosing cassettes.
- All hinge-type tools are sent into the container only when opened.
- Before sterilization, all particles must be eliminated before sterilization to avoid the accumulation of pathogenic flora.
- Residues that are difficult to remove (cement and composite) are best removed immediately after use.
Compliance with the basic rules for operating equipment in Russian clinics and small private dentistry will help you comply with all the rules of hygiene and safety at work.
Principle of operation
An autoclave for dentistry consists of a special sterilization container equipped with an air outlet valve, measuring instruments for pressure and temperature readings and a safety valve that protects the equipment when the pressure exceeds the maximum permissible norm.
The design consists of a steam boiler for heating water and converting it into steam, which then enters the autoclave chamber. The procedure requires high specialization of a medical professional, work in compliance with the instructions for using the equipment and general safety rules.
The sterilization mode in an autoclave is expressed in units of increased pressure over a period of processing time. An excess pressure of 1 atm is achieved at a temperature of 120 C, at T-125 - 1.5 atm, at a temperature of 135 C - 2 atm. Under such conditions, pathogenic microflora die in 3-5 minutes, spores in half an hour.
The parameters are selected depending on the properties of the materials or tools. Thus, the food medium is sterilized at a pressure of 4 atm 120 C/30 minutes or at 0.5 atm in a mode of 110 C/20 minutes.
Instruments and dressing components are disinfected under conditions of 1 atm/30 min.
Autoclave selection criteria
The choice of autoclave depends on three most important criteria:
- volume of tools for the planned installation,
- parameters of instruments to be autoclaved,
- the material from which the instruments are made.
Taking into account the above data, you can choose autoclaves of different classes.
Thus, class N autoclaves are used to sterilize solid instruments made of metal.
If it is necessary to sterilize instruments that do not have complex cavities, both in packaging and without it, and in addition to solutions and materials, it is best to buy an S class autoclave. They are cheaper than the previous analogue, are not equipped with a dressing room, but have vacuum drying, which makes this model quite competitive.
Class B autoclaves are considered the most “advanced”, as they are the most technical and ergonomic - they allow you to sterilize almost any dental instruments. All autoclaves operate on the same principle, which we will discuss in detail.
Horizontal and Vertical Autoclave for Tips
Depending on the method of loading instruments, a distinction is made between horizontal and vertical autoclave. However, the horizontal automatic sterilization device is better, this configuration creates back pressure. The operating principle allows you to sterilize objects without damaging them. Almost all autoclaves are classified as horizontal devices. Vertical is much less common, mainly it is large equipment used for a large clinic.
Stage two. Pre-sterilization cleaning of the disinfector
Any disinfectant is, first of all, a fairly strong chemical composition that must be removed from the surface of the instruments. In the case of smooth surfaces, using a special brush and running water is sufficient. But in the case of an uneven surface, such as diamond burs, immersion in an ultrasonic bath is necessary. However, it is worth remembering that high-tech instruments, such as tips, cannot be processed in an ultrasonic bath. It is for this reason that many experts recommend choosing collapsible tip models. It is easier to disassemble them and carry out the procedures separately, for example, using disinfectant wipes
Stage four. Autoclaving
Today, autoclaving is considered the safest and most importantly effective method of sterilizing instruments. The advantages of an autoclave are simply numerous:
- Guarantees 100% result
- No manual work
- Reliable
In order to avoid mistakes when processing dental instruments, several rules should be followed:
- Place bags correctly on trays, namely with the paper side up
- The packages in the tray should not overlap each other, but should be positioned freely
- There should be a small distance between the bags for the circulation of vapors and air
By following all these steps and rules, you will end up with sterilized instruments.