Let's look at one of the most common dental anomalies. Distal dental occlusion is a problem that accounts for approximately 20% of cases of total jaw pathologies in adults and 30% in children. Therefore, you need to understand what this violation is, why it occurs, what threat it poses and, most importantly, how to eliminate it and minimize the consequences.
Let us immediately note that characteristic symptoms appear at the age of 4-16 years. If you ignore them and do not take any measures, various complications may begin, including facial asymmetry, difficulties with chewing and swallowing, and inflammatory diseases. It is worth preventing the development of this anomaly, and even better, getting rid of it completely.
What is distal bite (occlusion)
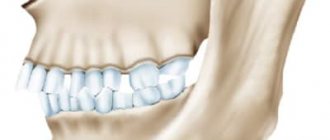
This is a pathology in which the upper jaw is not located at the same level as the lower jaw, but is significantly pushed forward, as a result of which the teeth close incorrectly, with displacement. And not only the front ones, but also the lateral ones, which creates a block that prevents the healthy development of all incisors.
It arises and develops as a result of one, several or a whole group of interrelated factors (discussed in detail below), which entails other anomalies, most often diastema. Over time, it also causes weakening of the chewing muscles, respiratory problems and other complications that are dangerous to the body.
Dental clinic No. 2
In order to always anticipate surprises, the doctor must be prepared to expand access to the dental cavity to facilitate the preparation of complex root canals and carefully examine the floor of the tooth cavity to look for such anatomical variations.
Endodontic dogma is that careful cavity and root canal preparation and obturation is the key to successful canal therapy. Endodontic preparation can be divided into cavity preparation (coronal preparation) and root canal preparation (radicular preparation). Transferring the principles of preparation of carious cavities according to Black in relation to endodontics, the following endodontic principles of preparation can be distinguished: creation of external, comfortable, retention (holding) and resistant forms. A complete preparation along the entire length of the tooth is the external form. In turn, the external shape can be modified for a comfortable shape to accommodate anatomy, canal curves and instrumentation. In some endodontic techniques, the canal can be prepared with slight retention of the first gutta-percha point (retention form). But the most important is the resistant form, in which the so-called “apical stop” is prepared in the apical section, a barrier that protects the tissues of the apical periodontium from the removal of the filling material and irrigating solution beyond the apex and creates a limit for the compaction of gutta-percha in the canal (Fig. 1).
| pic 1 |
Basic tools for preparing a tooth cavity. For trephination of an intact tooth crown, Ingle JI suggests using a cone-shaped fissure bur with a working rounded top for a turbine tip (Fig. 2 B). It is first directed at a right angle in the long axis of the tooth to remove only the enamel. Then it should be located parallel to the longitudinal axis of the tooth (Fig. 2 C, D). The roof of the tooth is removed using a low-speed tip with a round bur (Fig. 2 E, F) No. 2, 4 less often No. 6 of regular length (9 mm) for molars and premolars or surgical length (14 mm) for incisors and canines. The protrusion (“shoulder”) inside the cavity of the anterior teeth, which prevents the direct passage of the endodontic instrument into the root canal, is eliminated using a long, conical diamond bur on a turbine drill (Fig. 2 G). The remaining pulp from the pulp chamber is removed using a spherical bur No. 1 or 2 (Fig. 2 H).
| pic 2 |
It is necessary to remember the following axioms of the structure of the coronal cavity of the tooth and root canals when searching for root canal orifices (Ingle JI). 1. The two root canal orifices of the first maxillary premolars are located further buccal and lingually than is usually realized (Fig. 3 A). 2. The orifices of the mesiobuccal canals of the upper and lower molars are located under the mesiobuccal cusps, and the external shape should often be more expanded due to these cusps (Fig. 3 B, C). 3. The mouth of the palatal canal in the upper molars is located not so far to the palatal wall of the tooth cavity, but in the center of the medial half of the tooth (Fig. 3 B). 4. The orifice of the distal-buccal canal of the upper molars is not located so distally-buccally, but almost directly to the buccal side of the palatal canal (Fig. 3 B). 5. The orifice of the distal canal in mandibular molars is not so distally located, but in fact almost exactly in the center of the tooth (Fig. 3 C, E). 6. The orifice of the mesial-lingual canal of the lower molars is not so far mesial-lingual, but in fact directly buccally from the orifice of the distal canal (Fig. 3 B). 7. Certain anatomical variations that occur quite often: The mesial buccal root of the maxillary first molar often (up to 95% [4]) has an additional mesiopalatal canal located exactly oral to the orifice of the main canal. The mouth of the additional channel is located in the groove, which forms the mouth of the main channel like a “comma tail”. This entire groove should be examined to locate the mouth of the accessory canal (Fig. 3 B). The lower second molar often has a common mesial orifice, which divides approximately 1 mm below the floor of the dental cavity into mesial buccal and mesial lingual canals (Fig. 3 D). The lower first and second molars may have two distal canals with separate orifices or a common one. orifice, like the previously described medial canals (Fig. 3 E). The mandibular first premolar often has a second canal that branches off from the main canal buccally or lingually a few millimeters below the floor of the dental cavity (Fig. 3 E). The lower incisors and canines often have two canals. The medial lingual canal is hidden under the internal protrusion (“shoulder”), which corresponds to the lingual girdle. This protrusion should be removed with a #2 long shank round bur or finishing diamond cone bur to allow proper exploration of the root canals (Figure 3 G).
| pic 3 |
Table 1. Degree of deviation of teeth from the central axis
When preparing a tooth cavity, it is necessary to take into account the degree of deviation of the tooth from the central axis in the vestibulo-oral and medio-distal projections (Table 1). The upper incisors and canines are inclined palatally by 29°, the lower incisors are inclined lingually by 20°. The lateral lower and upper incisors are deviated medially at 17 and 16? respectively. If the doctor does not know about these deviations or ignores them, then he can make a perforation and a ledge on the walls of the tooth cavity (Fig. 4. A, B, C)
| pic 4 |
Table 2. Incidence (%) of root canals.
For successful endodontic treatment, it is also extremely important to know the variations in the number of root canals in order to avoid the error of missing a canal. Although back in 1921, Hess W., studying 513 teeth, indicated that four canals were found in 54% of the first molar, this fact was ignored. F. Pineda, J. Cutler (1972), studying the medial buccal roots of the first molars, found that in 39% of cases this root has one canal, in 61% - 2 canals. Later studies (J.K. Kalild and D.D. Peter, 1990) showed that in a study of 51 medial buccal roots of the upper first molars, a two-canal variant of the structure was identified in 95% of cases. Table 2 summarizes information from various authors about the frequency of occurrence of additional channels. As follows from this table, in the lower incisors, canines and premolars it is always necessary to look for the second canal, and the first upper molar should be considered a four-canal. Lower premolars can be extremely difficult teeth to treat endodontically. Two narrow canals are usually located vestibulo-orally; division into two roots can occur in the apical third. At higher magnifications, it is often possible to view more complex anatomy. The dentist’s knowledge of the anatomy of the tooth cavity and root canals is an important part of endodontic treatment, guaranteeing the success of the treatment and avoiding errors and complications.
Author: Trigolos N.N.
Signs of distal bite
It is quite possible to identify occlusion independently, not only by the incorrect position of the teeth when closing, but also by other signs: by certain facial features, features of facial expressions, even by body position or behavior. There are so many nuances that they can be divided into 3 main types.
Intraoral
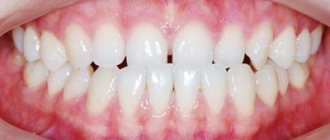
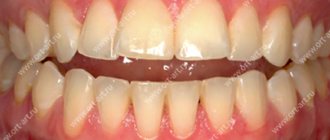
It is relatively easy to determine the anomaly by looking at the upper frontal incisors. Normally, they should overlap the lower ones by about one third. In case of violations, they are lowered more strongly, and even pushed forward - so much so that there is some distance between the rows, in scientific language it is called the sagittal gap.
External
You should think about how to correct a distal bite in an adult (or at least make an appointment with an orthodontist for a consultation) if:
- the facial profile is convex, “bird-like”;
- the chin is disproportionately small, sloping, with an impressive fold;
- the nose, small in itself, protrudes significantly;
- in a relaxed state, the lips do not close.
The problem is also reflected in posture: the body is always slightly tilted, the neck seems longer, the stomach sticks out, the shoulders are hunched.
Functional
If a person has this disorder, it is more difficult for him to breathe through his nose, chew food, swallow, even speak (often unclear diction, lisp). Although he usually does not notice these inconveniences, since the anomaly develops gradually, from the age of 4-6 years, and the body simply adapts to it.
Modeling from plastic
Plastic is another material from which you can create a beautiful tooth model. This is a fairly dense, non-sticky material that does not require special preparation for work, but it is necessary to observe the conditions for its storage: temperature changes at which the material is stored can have a negative impact on its properties. Plastic is convenient because you can work with it for an unlimited amount of time, it does not harden, which makes it possible to work out the microrelief of the future model in more detail and clearly, and make the necessary adjustments during the work.
Hardening of the material occurs when it is placed in hot water or heated to 110-120 degrees in an oven for 5-10 minutes. The possibility of long-term work and fixation of the result by heating - this is the similarity between plastic and composite. Plastic cannot be reused. Well suited for creating phantom teeth models.
The first stage of working with this material will be to warm it up in your hands and shape it into a ball, then give the overall outline of the model, determine the main surfaces of the tooth model (Fig. 16) (M - medial contact surface, D - distal contact surface, V - vestibular surface, L - lingual surface), applying markings corresponding to the first-order fissure of the F-shaped form.
Rice. 16. Giving the overall outline of the model, applying markings corresponding to the fissure of the first order, F-shaped. M - medial contact surface. D - distal contact surface, V - vestibular surface, L - lingual surface
On the chewing surface with a tool, spatula or trowel, according to the applied markings, a fissure of the first order is deepened, five main tubercles are identified (Fig. 17) (1 - anterior lingual, 2 - posterior lingual, 3 - anterior buccal, 4 - posterior buccal, 5 - distal ).
Rice. 17. Tops of the main tubercles: 1 - anterior lingual tubercle, 2 - posterior lingual tubercle, 3 - anterior buccal tubercle, 4 - posterior buccal tubercle, 5 - distal tubercle
The equator of the 36 tooth model is also formed. The formation of second-order fissures occurs by modeling the longitudinal, medial, and distal ridges of the four main tubercles (Fig. 18-19).
Rice. 18. Modeling of the longitudinal (b), distal (a), medial (c) ridges, anterior lingual tubercle (1). 1 - anterior lingual tubercle, 2 - posterior lingual tubercle, 3 - anterior buccal tubercle, 4 - posterior buccal tubercle, 5 - distal tubercle
Rice. 19. 1 - anterior lingual tubercle: (a) longitudinal ridge, (b) distal ridge, (c) medial ridge. 2 - posterior lingual tubercle. 3 - anterior buccal tubercle: (a) longitudinal, (b) medial ridge, (c) distal ridge. 4 - posterior buccal tubercle: (a) longitudinal ridge, (b) distal ridge, (c) medial ridge. 5 - distal tubercle. 6 - additional tubercle. Rice. 19. 1 - anterior lingual tubercle: (a) longitudinal ridge, (b) distal ridge, (c) medial ridge. 2 - posterior lingual tubercle. 3 - anterior buccal tubercle: (a) longitudinal, (b) medial ridge, (c) distal ridge. 4 - posterior buccal tubercle: (a) longitudinal ridge, (b) distal ridge, (c) medial ridge. 5 - distal tubercle. 6 - additional tubercle
The distal tubercle has a less differentiated surface (Fig. 20).
Rice. 20. The final result of the simulation. 1 - anterior lingual tubercle. 2 - posterior lingual tubercle. 3 - anterior buccal tubercle. 4 - posterior buccal tubercle. 5 - distal tubercle
Models made of plastic can be stored for a long time; they will remind you of the results achieved in modeling.
Rice. 21. Lingual and medial contact surfaces of the mandibular molar model. M - medial contact surface. D—distal contact surface. V - vestibular surface. L - lingual surface
Rice. 22. Vestibular and chewing surfaces of the mandibular molar model
How to identify distal occlusion: symptoms of occlusion
The most characteristic signs, especially for non-specialists, are facial, caused by improper formation of the skeleton and unbalanced development of the neck muscles. Because of this, the so-called bird profile appears with distorted proportions and retraction of the lower lip.
There are also more specific, but still quite noticeable points:
- protrusion (protrusion) of the frontal incisors;
- insufficient closure of the teeth of the lateral group.
Since the anomaly progresses from a very early age, the child gradually develops infantile swallowing and mouth breathing. The chewing muscles are not strengthened well enough, over time the functions of the TMJ are weakened, and all this provokes the appearance of periodontal and dental diseases.
Approaches to restoring the chewing surface
The approaches that will be discussed in this article are designed to greatly facilitate the work of doctors.
All the beauty that a specialist recreates ultimately turns into a shapeless, unaesthetic and low-functional “cake”. The dental literature describes a large number of various techniques to avoid such difficulties (compass method, orientation to adjacent teeth, occlusal compass, all kinds of schematizations, simplified construction algorithms, etc.). However, all these solutions provide only approximate results. The approaches that will be discussed in this article are designed to greatly facilitate the work of doctors and will allow the production of high-precision restorations. The main idea taken as the basis for this approach is that, depending on the degree of tooth decay, correspondingly different methodological variations of restoration are used. It should, however, be noted that these techniques are focused on working with vital teeth, that is, in conditions favorable for the formation of a strong adhesive connection. According to the degree of destruction, three conditional classes can be distinguished (the classification was developed by the author of the article).
Physiological features of the development of baby teeth
The front, or frontal, teeth are located very tightly to each other and only when the child reaches the age of four, diastemas become visible between them - physiological gaps that increase after a year or two against the background of jaw growth. If there are no diastemas at the age of six, this indicates insufficient jaw growth, leads to crowding and requires correction of the bite in children. Physiological abrasion of surfaces, which contributes to the timely development of the masticatory apparatus, begins at three years of age.
Prevention of wear of hard dental tissues
For the purpose of prevention, it is necessary to identify and eliminate risk factors that are important in the occurrence of tooth wear. These include the patient's use of highly abrasive hygiene products, frequent consumption of drinks and foods with low pH, eating disorders, bruxism, disorders of occlusal relationships, and somatic pathology.
Basic strategies for preventing wear of hard dental tissues, based on the main risk factors:
1. A balanced diet with minimizing the consumption of foods and drinks with low pH.
Careful assessment of dietary habits is important in assessing the erosive potential of a diet. The patient should be familiarized with a list of foods with low pH (salad dressings, vinegar, alcoholic beverages, carbonated soft drinks, herbal teas, fruit juices). The patient is advised to keep a food diary for at least 4 days, including weekends. Identification of consumption of foods and drinks with low pH in any combination more than 4 times [17] per day allows the patient to be classified as at risk of dental erosion.
2. Control of hygiene skills and informed choice of hygiene products.
Scientists assign the leading role in the erosive and abrasive wear of tooth tissue to mechanical factors: the active use of certain abrasive hygiene products, irrational brushing of teeth [18-21].
Patients at risk (gastrointestinal diseases, eating disorders, hazardous occupations, bruxism, etc.) should use toothpastes with a low degree of abrasiveness (RDA index = 30-50) and a soft toothbrush. It is not recommended to cleanse immediately after consuming fruits and drinks with low pH, vomiting, regurgitation or reflux.
To prevent erosion, at least 1 hour should pass between meals or drinks.
3. Strengthening hard tissues and normalizing saliva function. Strengthening hard tissues is possible due to fluorides and calcium phosphate technologies.
Scientists have recognized effective technologies for increasing the acid resistance of hard dental tissues using fluoride-containing preparations [22]. When exposed to erosion, there is no need for remineralization of the subsurface layer. The main thing is to strengthen the thin surface layer. Therefore, when treating erosions, high concentration fluoride applications are a more appropriate application. Fluoride gels provide good protection for eroded enamel from the abrasive action of a toothbrush.
The use of bicarbonate-containing toothpastes is one of the ways to introduce buffering agents into the oral cavity [23]. It is recommended to apply alkaline pastes or gels before bed to protect teeth from erosion due to reflux that occurs during sleep.
Adding calcium and phosphate to sour drinks can significantly reduce their erosive potential. Juices and carbonated drinks containing calcium and phosphates have appeared on sale.
Measures to increase the secretion of stimulated saliva, such as chewing sugar-free gum, are accordingly anti-erosive and support remineralization.
4. Referral to related specialists for timely detection and treatment of somatic pathology (endocrine pathology, hormonal disorders, gastrointestinal diseases, serious eating disorders: anorexia, bulimia, bruxism).
The appearance of tooth wear may be associated with endocrine pathology, disorders of hormonal and mineral homeostasis. Yu. M. Maksimovsky (1981) assigns an important role in the development of erosions to hyperfunction of the thyroid gland. Dental erosions in patients with thyrotoxicosis were detected twice as often as in persons with normal thyroid function; a direct connection was established between the intensity of dental damage and the duration of thyrotoxicosis {24}. In women, dental erosions are detected in a higher percentage of cases {25}. Examination of patients with non-carious lesions of teeth should be carried out jointly with a gynecologist and endocrinologist. The examination algorithm by related specialists includes hormonal indicators (estradiol, TSH, prolactin, cortisol).
If gastroesophageal reflux is suspected, patients need a referral to a physician or gastroenterologist. The dentist should be alerted to erosions on the oral surface of the chewing group of the teeth of the upper jaw and the patient’s specific complaints (sour taste in the mouth, halitosis, increased salivation, permanent cough, stomach pain, feeling of a “lump” in the throat, burning sensation, hoarseness, belching, heartburn) . Patients with a history of asymptomatic gastroesophageal reflux report wet spots on the pillow and a sour taste in the mouth after sleep.
Eating disorders include three main diagnoses [26]: anorexia, bulimia, and other unspecified eating disorders (a combination of several disorders). Anorexia is characterized by a conscious refusal to eat, a prolonged lack of appetite, and the disappearance of the basic instinct - hunger; bulimia - uncontrolled eating of large portions of food, followed by spontaneous vomiting.
Early detection of eating disorders is important for the outcome of the disease, secondary prevention, prevention of complications and reduction of harmful consequences in relation to the dental health and general somatic status of the patient. Patients with eating disorders often avoid medical professionals, and if they do, they hide the true origin of the problem. Therefore, knowledge of the manifestations of these disorders in the oral cavity is extremely important for the dentist.
Method of restoration of the chewing surface of the 1st class of destruction
A typical representative of class 1 is fissure caries, which is quite common. This pathology is very unpredictable, and often the volume of the lesion turns out to be much greater than the expected depth. The fissure form of caries, as a rule, is characterized by almost complete preservation of the chewing morphology, and no matter how high the skill of the restorer, we still will not be able to recreate the chewing surface better than it was. Therefore, it would be quite reasonable to copy the preserved anatomy and transfer it to a future restoration. This can be achieved using the occlusal key technique. The main difference between this approach and the traditional restoration option is that before the preparation, a key (small impression) is removed from the chewing surface, which could subsequently be used to press down a portion of the composite to give it the original tooth shape. The most suitable material for making a key is hard bite silicones for bite registration. They have sufficient hardness to push through the smallest details of the chewing surface, and at the same time practically do not stick to the composite.
Fissure dental caries [Clinical Case]
Figure 1 shows the initial situation. Classic fissure caries of teeth 16 and 17. As in most similar cases, the carious process is completely asymptomatic.
Rice. 1
After isolating the working field (Fig. 2) and mechanically removing plaque from the surface of the teeth, the key is removed with bite-silicone, taking into account the dimensions of the clamp (Fig. 3).
Rice. 2
Rice. 3
The appearance of the occlusal key is shown in Figure 4.
Rice. 4
Next, preparation and adhesive preparation are carried out using the XP Bond™ system based on tert-butanol (Fig. 5).
Rice. 5
After restoration and polymerization of the dentinal layer (Ceram•X™ duo+), shades of the base and surface enamel (Esthet•X® HD A2 and AE) with a total thickness of 1.5-2 mm were added one after another, carefully adapted to the surface with approximate contours marked without subsequent curing (Fig. 6).
Rice. 6
Now comes the turn of the occlusal key (Fig. 7).
Rice. 7
To prevent possible gluing, apply a small amount of adhesive to the silicone surface. The key is placed on the tooth and pressed slowly. After the silicone print is in place, you need to slowly remove it with light rocking movements. You should not rush and try to remove the key with one jerk: this will lead to deformation of the composite material. If done correctly, the portion of uncured enamel composite should take the exact shape of the original occlusal surface (Figure 8).
Rice. 8
Excess filling material is easily removed with a brush. If any deformation occurs, the key can be reinstalled. Next, polymerization is carried out for 30-40 seconds, taking into account the thickness of the composite layer (Fig. 9).
Rice. 9
After this, if desired, you can reproduce the characteristics using composite paints. View after finishing and polishing (Fig. 10).
Rice. 10
Occlusal correction is usually minimal or absent. View of the restorations after two days (Fig. 11).
Rice. eleven
It should be noted that an important condition for successful restoration using the occlusal silicone key technique is the use of composite materials that have a sufficiently dense consistency and are capable of retaining the shape transferred by the silicone key. In this regard, a very good option is the Esthet•X® HD composite, which, in addition to excellent chromatic and mechanical characteristics, also has the required degree of density and perfectly holds any shape.