Composition and main types of adhesives
Adhesive properties of adhesives
Influence of characteristics of labeled materials on adhesion
Influence of label application conditions on adhesion
Influence on adhesion of the conditions of transportation, storage and consumption of goods with an applied label
Theories of adhesion and bonding
The strength and durability of the adhesive joint depend on the strength of the adhesive layer and the materials being glued, as well as on the strength of the so-called adhesive seam. There are several theories of adhesion and bonding that explain the formation of an adhesive seam in different ways. To describe the processes that occur during labeling, mechanical and molecular theories are probably of greatest interest.
Adhesion - what is it?
In general, the word “adhesive” translated from English means “adhesive substance, adhesion.” This “glue” is used in dentistry to connect materials of different compositions to tooth tissue (not to be confused with adhesion and cohesion - this is a physical term).
The filling material itself does not have chemical adhesion, that is, the ability to stick to naturally moist dentin, so an “intermediary” is needed here to ensure reliable adhesion of two dissimilar tissues. During polymerization, the composite material shrinks, so if adhesive systems are not used, the desired adhesion quality cannot be achieved. And this is a direct road to the development of repeated caries or even pulpitis under the filling.
“Since childhood, I have been bothered by my diastema, the gap between my front teeth. About 5 years ago I heard that there is such a technique as adhesive dental reconstruction, in which no painful grinding is needed and the material literally “sticks” to the teeth. The doctor simply polished the enamel of the front teeth and covered the unattractive gap in layers with composite. The enamel remained intact, and the smile became open.”
Elena Salnikova, review on the website of one of the Moscow dentists
Innovative light-curing adhesive systems are used for filling teeth with composites, for fixing bridges, as well as for installing braces, veneers, and skypes.
Classification of adhesive systems
Essentially, the composition of the adhesive system is represented by a group of liquids consisting of an etching component, a bond, and a primer. Together they provide micromechanical bonds between artificial materials and dental tissues.
Since the structure of enamel and dentin is heterogeneous, the adhesive systems used for them are also different. In the classification of adhesive systems, options are distinguished separately for enamel and separately for dentin.
Modern adhesive systems differ in the following characteristics:
- the number of components that are included in their composition (1, 2 or more),
- filler content: if acid is present, it is a self-etching adhesive system,
- curing method: self-curing, light-curing, and double-curing.
Thus, enamel adhesives contain low-viscosity monomers of composite materials. The important point is that enamel adhesives do not work on dentin. Therefore, it is important to either install insulating spacers for the hard part of the tooth, or use a special dentin adhesive - a primer.
What are the types of adhesion?
There are several types of adhesion: mechanical, chemical, and their combinations. The simplest is mechanical. The essence of the system is the creation of micromechanical bonds between the components of the material and the rough surface of the tooth. To ensure high quality adhesion, the natural micro-grooves on the surface of the dental tissues are thoroughly dried before applying the adhesive.
Interesting! Dr. Buoncore 63 years ago experimentally discovered that phosphoric acid makes tooth enamel rough. This helps strengthen the adhesion of the composite to the tooth tissue. The technique of etching tooth enamel with acid, which appeared more than half a century ago, became the foundation for modern adhesive restorative methods.
The chemical bonding option is based on the chemical bond of the composite material with enamel and dentin. Only glass ionomer cements have this type of adhesion. Other materials that dentists use have only mechanical adhesion.
Molecular theory
According to molecular theory, adhesion is a process caused by the adsorption of glue molecule units by the surface of the material. The formation of an adhesive seam occurs as a result of the migration of large adhesive molecules to the surface of the material and the subsequent formation of a chemical adsorption compound under the influence of intermolecular attractive forces.
According to this theory, high adhesion is possible when the polarities of the adhesive and the material match, otherwise adhesion is difficult.
Literature:
Vorobiev D.V. Technology of post-printing processes. M.: MGUP, 2000.
Tests to evaluate the parameters of the adhesive layer
FINAT (International Association of Self-Adhesive Industries) has developed a series of FTM (FINAT Test Method) tests to evaluate various parameters of self-adhesive materials. Here is a description of tests that allow us to evaluate the parameters of the adhesive layer.
The FTM 1 and FTM 2 tests are designed to evaluate the adhesive strength of the adhesive layer when gluing a label to a product or its packaging.
To perform the tests, acclimatized* strips of self-adhesive material, 25 mm wide and approximately 175 mm long, are separated from the base and glued to a glass test plate, and then rolled onto it with an elastic roller. Measurements are taken after 20 minutes and after 24 hours (to assess final adhesion). When performing tests, it is recommended to use a tensile strength tester or similar devices. Adhesion force is measured in newtons.
According to the FTM 1 test, the strip of self-adhesive material is separated at an angle of 180? at a speed of 300 mm/min, when performing the FTM 2 test, the strip is separated at an angle of 90° at the same speed. Measurements are taken when separating the middle part of the strip. It is recommended to take a minimum of five measurements at 2 s intervals.
The tests described allow comparison of the adhesion of different self-adhesive materials, especially with removable adhesives (paper materials with permanent adhesives are likely to tear when subjected to such a test). The FTM 2 test allows for a more accurate assessment of adhesive adhesion, since when separating a strip of material at an angle of 180? The elastic forces of the label material have a significant impact on the measurement results.
In order to test the adhesion of self-adhesive material to real labeling materials, these tests can be easily modified.
The FTM 3 and FTM 4 tests measure the force required to separate a label from its liner. Before starting the test, strips of self-adhesive material with a width of 50 mm (FTM 3) or 25 mm (FTM 4) are kept for 20 hours at a pressure of 6.86 kPa (70 g/cm2), after which they must be acclimatized for at least 4 hours . The adhesion force of the label to the substrate is measured in centinewtons.
When performing tests, does the strip of facial material separate at an angle of 180°? from the substrate. The FTM 3 test simulates the process of label separation at a speed of 300 mm/min, the FTM 4 test at a speed of 10-300 m/min (label separation in high-performance labeling lines). When performing the FTM 3 test, it is recommended to take a minimum of five measurements at 2 s intervals. For the FTM 4 test, it is recommended to use a device that allows you to record label peel force values with high resolution.
The FTM 8 test allows you to evaluate the cohesion of the adhesive layer. When performing the test, the upper end of a strip of facing material, approximately 175 mm long, is glued onto a vertically mounted glass test plate and then rolled onto it with an elastic roller. The size of the glued area is 25x25 mm. 5-10 minutes after this, a load weighing 1 kg is suspended from the free lower end of the strip and the time during which the strip will be held on the plate is noted. It is recommended to carry out at least three tests.
The FTM 9 test allows you to evaluate the initial adhesion of the adhesive when gluing the label. When performing the test, a tensile strength tester or similar equipment should be used. The ends of a strip of facing material about 175 mm long and 25 mm wide with an adhesive layer facing outward are fixed in the upper movable mount of the device so that the strip forms a loop. A test glass plate measuring 25x30 mm is fixedly fixed at the bottom. During the test, the strip is lowered towards the plate at a speed of 300 mm/min, immediately after the contact area reaches its maximum size, the strip is raised and adhesion is measured. Adhesion force is measured in newtons.
Storing self-adhesive materials
Optimal climatic conditions for storing self-adhesive materials:
- temperature - 20-22? C;
- relative humidity - 40-60%.
To protect materials from changes in humidity, it is recommended to store them in their original packaging and unpack only before processing (after acclimatization). During storage, the self-adhesive should be protected from exposure to direct sunlight; it is not recommended to install heating devices near the pallets.
Rolls should be stored in a vertical position - on the end side, sheet materials - in a horizontal position.
Before processing, the self-adhesive should be acclimatized in the production area for 24-48 hours. This will help avoid warping of the material as a result of sudden changes in humidity.
Adhesive (glue) is an important component of self-adhesive material. The adhesive layer ensures reliable fastening of the label to the surface of the product or its packaging. The variety of materials on which labels are applied determines the large number of adhesives used in self-adhesive materials.
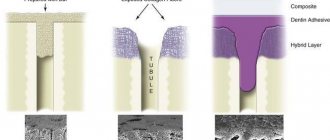
How the composite “sticks” to the enamel surface
As noted above, in dentistry the mechanisms of adhesion to enamel and dentin differ. The protective outer shell of teeth is transformed by acids. If you examine the enamel after acid etching under a microscope, it will resemble a honeycomb. In this case, the acid works to strengthen the bond with the composite. As a result, viscous hydrophobic adhesives more easily penetrate deeper layers of enamel and provide strong adhesion to the composite.
Interesting! Enamel is considered the hardest tissue in our body. It contains the largest amount of inorganic substances - approximately 97%. The remaining 2% is water, 1% is organic matter.
How enamel is etched
This processing method involves removing part of a layer of 10 micronewtons (µN) from the enamel. As a result, pores with a depth of 5–50 μN appear on its surface. Often, for etching, enamel is lubricated with orthophosphoric acid, but for dentin, organic acids can be used, but in low concentrations.
The etching process lasts from 30 to 60 seconds. The individual structural features of the enamel surface, in particular its initial porosity, are of decisive importance. If you overexpose the acid, it will inevitably affect the structure of the enamel and weaken the adhesion. So if the patient’s dental tissues are quite weak, then etching should last no longer than 15 seconds. The acid is removed with a stream of water, and for the same amount of time as it is kept on the enamel.
Comparative analysis of adhesive layers
Authors: Franz Galetsky, Doctor of Technical Sciences, ITM and VT im. S.A. Lebedeva;Ilya Leites, Ch. technologist RTS Engineering; Leonid Petrov, head sector, ITM and VT named after. S.A. Lebedeva; Evgenia Nikolaeva, Ph.D., ITM and VT named after. S.A. Lebedeva
To increase the adhesion strength of the internal layers of multilayer printed circuit boards (MPCs) with the dielectric material, the process of oxidation of the copper surface has been used for a number of years. In recent years, alternative technologies for producing adhesive layers have appeared, aimed at eliminating the problems associated with oxide layers. Based on the study conducted by the authors of the properties of oxide and some new adhesive layers, MPP manufacturers can compare their qualitative and quantitative characteristics and draw a practical conclusion about the feasibility of switching to a new technology.
The adhesion strength of the surface of the copper pattern of the circuit of the internal layers with the dielectric material during pressing is one of the most important conditions for the manufacture of multilayer printed circuit boards.
It is determined by a number of factors:
- dielectric material;
- dielectric quality;
- pressing mode;
- type of adhesive layer;
- mode of obtaining an adhesive layer;
- quality of the adhesive layer.
To increase the adhesion strength of the surface of the inner layer to the dielectric material, operations are used that make it possible in various ways to increase the specific surface of copper due to the development of microrelief.
When pressed under the influence of temperature and pressure, the molten prepreg resin flows into the recesses of the microrelief of the copper surface, providing a single monolith after curing of the resin.
Good results in increasing the specific surface area of copper are obtained by oxidation, which is usually carried out in alkaline solutions of strong oxidizing agents, such as sodium chlorite or potassium persulfate [1-5].
Fig. 1 Differences in the color of the oxide layers - a) bronze oxide b) brown oxide c) black oxide
In both solutions, depending on the depth of the oxidation process, copper can be oxidized to red copper (I) oxide or black copper (II) oxide:
8Cu + ClO2–+ 4OH– > 4Cu2O + Cl– + 2H2O
4Cu + ClO2– + 4OH– > 4 CuO + Cl– + 2H2O
4Cu + S2O82– + 4OH– > 2 Cu2O + + 2SO22– + 2H2O
Cu + S2O82– + 2 OH– > CuO ++ 2SO42– + H2O.
In practice, the oxidized surface is a mixture of these oxides. The ratio of red and black oxides in the mixture depends on parameters such as temperature, processing time, and the ratio of oxidizing and alkaline components.
The resulting oxidized surface color will vary (see Fig. 1)
The oxide layers differ from each other not only in color, but also in the following parameters:
- layer thickness;
- crystal structure;
- adhesion to the dielectric.
The crystal structure of oxide layers obtained from a persulfate-alkaline solution on a horizontal line from Schmid was studied using an electron microscope JSM-5300 LV from the Japanese company JEOL together with specialists from the Faculty of Chemistry of Moscow State University.
The samples used were 35 micron copper foil of the FMGATs grade from the Kyshtym Metallurgical Plant.
Rice. 2. SEM photographs of the sample surface at a magnification of 2000: a) original copper foil, b) bronze oxide, c) brown oxide, d) black oxide, e) black oxide with overgrown crystals
The topography of the original surface of the shiny side of the foil is shown in Fig. 2a.
In Fig. 26, c, d shows electron micrographs of bronze, brown and black oxides, respectively, at a magnification of x2000. The photographs clearly show that as the color of the oxide deepens, the topography of the surface of the original copper foil becomes less and less visible, indicating an increase in the thickness of the oxide layer.
In Fig. Figure 2d shows a SEM photograph of black oxide with overgrown crystals. Visually, this type of oxide is no different from black, but it is characterized by the phenomenon of crystal fragility. If you rub a piece of white cloth over the surface of such an oxide, it will turn black. Therefore, such an oxide layer is called “black chalk”. The photograph clearly shows the loose structure of this type of oxide. When pressed, the crystals of such an oxide layer break and adhere poorly to the prepreg resin, which leads to disruption of the bond between the layers.
When working according to the regime for producing black oxide, we are not immune to the fact that at certain ratios of oxidizing agent and alkali in the solution, conditions favorable for the formation of “black chalk” oxide will not be created.
Rice. 3. Change in the concentration of the main components in the oxidation bath depending on time (t = 60...65°C): a) NaOH, b) K2S208
Figure 3 shows how the concentration of NaOH and K2S2O8 changes in the oxidation solution in the absence of layers. 2 hours after adjustment, the concentration of potassium persulfate drops by more than half, i.e. by 50-60%. The concentration of caustic soda is reduced by only 25-30%. Thus, conditions are created in the oxidation bath that promote the formation of a “black chalk” type oxide. During the oxidation of layer blanks, there is a more intensive consumption of chemicals, and such unfavorable ratios of components can form much earlier.
Rice. 4. SEM photographs of the sample surface at a magnification of 15000: a) bronze oxide, b) brown oxide, c) black oxide, d) black oxide with overgrown crystals
Figure 4 demonstrates the structure of the 4 types of oxide discussed above at a magnification of x15000. As can be seen in these photographs, all types of oxide have a columnar crystalline structure, and in the series bronze - brown - black - “black chalk”, the height of the columns increases significantly. But at the same time, the structure becomes looser and less uniform. The “black chalk” oxide has more dense and less dense areas, as well as “spots” where there are no oxide crystals at all (see Fig. 4 d).
To evaluate the adhesion strength of the oxide layers to the dielectric material, 3 sheets of DURAVER E1080 fiberglass from ISOLA were pressed onto the oxidized copper foil samples. To monitor the effect of the polymerization process of the binder in the prepreg, 2 rolls of fiberglass with different shelf life were used. One roll was new, and the shelf life of the other roll exceeded 3 months.
Adhesive strength was measured using an AEM-2 adhesiometer by tearing off strips 3 mm wide. The highest values were recorded for brown oxide samples (see Table 1). The influence of the roll's shelf life is clearly visible. If it exceeds 3 months, then the fluidity of the resin no longer meets the necessary requirements. It turns out to be insufficient for the resin to flow between the oxide columns. Voids remain and, as a result, the adhesion of the oxide to the resin is weak. The separation of the strips occurs along the oxide layer, and not along the interface. If the fiberglass is of good quality, with a short shelf life, then the fluidity of the resin is sufficient to fill all the depressions in the microrelief of the oxide layer. The bond strength in this case is higher (see Table 1).
| No. | Oxide type | Adhesive strength, g/3 mm | |
| Old roll | New roll | ||
| 1 | 130 | 200 | |
| 2 | 165 | 240 | |
| 3 | Black | 155 | 210 |
| 4 | Black chalk | 120 | 165 |
| № | Oxide type | Adhesive strength, g/3 mm | (FP)/F.100,% | |
| p/p | Before thermal shock, F | After thermal shock, F1 | ||
| 1 | Bronze | 200 | 80 | 60,0 |
| 2 | Brown | 250 | 175 | 30,0 |
| 3 | Black | 220 | 140 | 36,4 |
| 4 | Black small | 165 | 40 | 75,8 |
Samples with “black chalk” oxide have the lowest adhesive strength values. The reason in this case lies both in the fragility of the oxide crystals and their poor adhesion to the prepreg resin, and in the presence of microareas without an oxide layer (see Fig. 4d). In these samples, stripes also detach along the oxide layer.
The adhesion strength of the oxidized internal layers to the dielectric material is affected by temperature effects at the stages of manufacturing, repair and operation of multilayer printed circuit boards. These are the operations of applying a solder mask, assembly, hot tinning, soldering, group infrared soldering, wave soldering, thermal loads on the printed circuit board during its operation in the finished product.
According to literature data [5], after thermal shock (260°C, 10 s), the adhesive strength of oxide layers decreases. Black oxide has 35%, and brown oxide has 17%.
In this work, the effect of temperature on the adhesion strength of oxide layers to the dielectric material was studied by immersing samples with 3 mm strips for 10 s in an organosilicon liquid heated to 260 ± 2°C.
The results obtained indicate that the adhesive strength of all types of oxide layers decreases after thermal shock by 30–76% (see Table 2). According to the intensity of the drop in adhesive strength, the oxide layers are arranged in the following row: “black chalk” > bronze > black > brown.
Rice. 5. Through hole of multilayer PCB after drilling
Rice. 6. Pink ring effect
Another problem that oxide layers can create is the “Fink ring effect”. It appears already on the finished board, but occurs during board preparation operations before chemical metallization. Acidic pretreatment solutions act on the oxide layers extending into the end of the through hole (see Fig. 5).
If the oxide layer is etched, a pink ring forms around the hole - exposed copper (see Fig. 6). On the finished board, this appears as a lighter area around the contact pad (CP) compared to the dark oxidized surface. The “pink ring” can also be seen on deeper layers of the board if a planar section is made. A transverse section does not make it possible to see the undercuts of the oxide layer due to its small thickness (less than 1 micron).
The solubility in acids of different types of oxide layer is almost the same, however, by reducing the thickness of the layer, the possibility of penetration of acidic solutions and, consequently, the likelihood of the occurrence of the “rose ring effect” in the series “black chalk” > black > brown > bronze is significantly reduced.
It should be noted that the possibility of penetration of acidic solutions is significantly influenced by drilling and pressing operations.
Rice. 7. Cross-section of a hole with wedge voids defect (wedge-shaped voids)
An incorrectly selected pressing mode, as well as, as mentioned above, insufficient fluidity of the prepreg resin can lead to disruption of the connection between the oxidized surface of the inner layer and the dielectric material, i.e. to the appearance of voids between layers. If these voids have access to holes, then an additional opportunity is created for the penetration of acidic solutions and the occurrence of the “rose ring effect”.
Poor drilling of holes can lead to chipping of the resin adjacent to the oxidized copper surface, which also allows the penetration of acidic solutions and the appearance of the “rose ring effect”. In foreign literature, this type of defect caused by poor-quality drilling is called wedge voids - wedge-shaped voids. A cross-section of a hole with this type of defect is shown in Figure 7.
In recent years, a number of companies J-KEM [6], Alfachimichi [7], Enthone [8], Atofech [9]) have proposed ways to modify adhesive layers based on copper oxides, aimed at increasing their stability in acidic solutions. To do this, after the oxidation stage, treatment is used in a reducing solution (Reducer), which converts copper oxides into metallic copper:
Cu2+ + 2e-→Cu0,
Cu1+ + e-→Cu0
Rice. 8. Topography of the copper surface before (a) and after (b) treatment of the oxide layer in the Multibond SR solution from Atotech
Rice. 9. Adhesive layer obtained using the Bond Film process from Atotech
Rice. 10. Appearance of adhesive layers: a) Circubond, b) Bond Film, c) Mec Etch Bond
Rice. 11. Pink rings around holes (Ø 0.3 mm) on samples after processing on an electrochemical copper plating line according to the operating mode: a) with bronze oxide, b) brown oxide
Rice. 12. Samples after keeping for 11 hours in a preactivation solution: a) with bronze oxide, b) with brown oxide, c) with an adhesive layer of Mec Etch Bond
At the same time, the surface topography remains as well developed as that of copper oxides (see Fig. 8).
The disadvantage of this method of processing oxide layers is the possibility of re-oxidation of reduced copper under the influence of temperature and moisture. Those. The risk of a “pink ring effect” cannot be completely ruled out.
Therefore, along with the modification of oxidized layers in a reducing agent solution, processes [6–11] appeared based on a completely different approach to the formation of an adhesion layer, which is created not by building up a microrelief on the copper surface, but by etching copper along the boundaries of crystal grains (see Fig. 9) . The copper surface structured in this way is treated with an organic antioxidant, which forms an organometallic compound with the outer layer of copper atoms, which also increases adhesion to the resin during the pressing process.
To get acquainted with the new adhesive layers, the following technological processes were chosen: Circubond from Shipley (UK), Bond Film from Atotech (Germany) and Mes Etch Bond from MEC (Belgium). In the latest technological process, the operations of creating a microrelief and processing in an organic antioxidant are separated and carried out in different baths, which makes it possible to evaluate the contribution of the organometallic coating during the formation of the adhesive layer to the adhesion strength to the resin.
Two types of copper foil were used as samples: factory-made 35-μm foil brand FMGATs (Russia) and galvanic 35-μm foil obtained at ITM and VT on a steel carrier from Electroposit 1300 electrolyte from Shipley (with a dense fine-crystalline structure of copper).
The samples were processed using three selected technical processes at the enterprises of the above companies. The appearance of the adhesive layers is presented in Figure 10. To compare the characteristics, samples were also prepared with the following types of adhesive layers and copper surface preparations: bronze oxidation, brown oxidation, pumice treatment, persulfate microetching, the rough side of the factory foil of the FMGATS brand (with a factory adhesive coating) .
Experiments to evaluate the adhesive strength of the prepared samples were carried out using the same methodology as when studying oxide layers. The results are presented in Table 3.
Table 4 presents the results of thermal effects on the adhesion strength of new adhesive layers to the dielectric material.
As can be seen from Table 4, the drop in the adhesive strength of new adhesive layers after temperature exposure is significantly less than that of oxide layers and does not exceed 16%.
The assessment of the stability of adhesive layers in solutions of pre-treatment of boards before chemical metallization was carried out as follows: 5 sheets of DURAVER E 1080 glass fabric from the company were pressed on both sides to foil samples processed using the Circubond, Bond Film, Mes Etch Bond, bronze oxide and brown oxide processes. ISOIA.
Holes of different diameters (from 0.4 to 1.3 mm) were drilled in the resulting bags. Bags with drilled holes were processed on the chemical copper plating line in solutions of degreasing, conditioning, micro-etching, pre-activation, activation and acceleration according to the operating mode.
Examination of the samples under a microscope showed that no “pink ring effect” was detected on any sample with new adhesive layers, while on samples with bronze and brown oxide a “pink ring” was found around some holes, mostly of small diameter (see Fig. Fig. 11). Moreover, on samples with brown oxide, “pink rings” were more common than on samples with bronze oxide. On both samples, the ring propagation length did not exceed 50 µm. That is, on working boards such rings would not extend beyond the contact pads.
More stringent conditions of holding samples in an acidic preactivation solution (75 g/l sodium bisulfate, 200 g/l sodium chloride) for 11 hours significantly enhanced the “pink ring effect” on samples with bronze and brown oxide (see Fig. 12a, b ). The length of the ring spread increased to 1…2 mm. However, the “pink ring” was not detected on samples with new adhesion layers (see Fig. 12c).
conclusions
- Of the three types of oxide layers, brown oxide has a well-developed surface;
- clearly defined columnar crystal structure, but there is no tendency to form over-resolved crystals;
- brown color guarantees the absence of areas with “black chalk” oxide;
- the adhesive strength of brown oxide is higher than that of bronze and black oxides;
- satisfactory resistance to thermal influences;
- satisfactory resistance to acidic solutions.
- Modification of oxide layers by reducing copper to an atomic state does not completely eliminate the appearance of the “pink ring effect.”
- The microrelief of the new adhesive layers is created not by brittle copper oxide, but by structured metallic copper, which significantly reduces the possibility of disruption of the bond between the layers due to crystal fracture during pressing.
- The adhesion strength of the new adhesive layers to the dielectric material is comparable to the adhesion strength of the oxide layers.
- The highest values of adhesive strength were recorded for the Circubond adhesive layer from Shipley.
- The surface roughness and structure of the deposit of the original copper foil make a certain contribution to the adhesion strength of the adhesive layers to the dielectric material.
- Using the example of the Mec Etch Bond adhesive layer, it was established that the metal-organic coating of the formed microrelief does not lead to a significant increase in the adhesion strength to the prepreg resin, but only inhibits the oxidation process of the copper surface.
- The resistance of new adhesive layers to thermal influences is much better than that of oxide layers. The drop in adhesive strength after exposure to thermal shock is 15-16%, which is half that of brown oxide.
- The resistance to acidic solutions of new adhesive layers is many times higher than that of oxide layers. After keeping the samples in a solution for preactivating the electrochemical copper plating line for 11 hours, no “pink ring effect” was detected.
LITERATURE
- Pro Bond 80 Oxidation Process. Shipley Brochure, 1988.
- Scheroxide is a process of chemical oxidation of the inner layers of multilayer printed circuit boards. Schering brochure, 1990.
- Rona bond oxidation process. Lea Ronal brochure, 1996.
- Grilikhes S.Ya. Oxidation and phosphating of metals. Leningrad, 1985, p. 79.
- Read A.N. Treating Copper with Brown Oxide For Improving Multilayer Board Adhesion, Electronics, 1983, p. 29.
- Oxidation of J-Ket. Electronic service technology. Catalog, 2004.
- LLC "Absolute" All-Russian practical seminar “Chemical processes in the production of printed circuit boards”. Methodological materials, St. Petersburg, March 2005.
- Enthone PWB Fabrication. Chemical Processes and Products, Product Selection Guide, 2005.
- Innerlayer Bonding Processes. Atotech prospectus, 2006.
- Circubond is a process for preparing the inner layers of multilayer printed circuit boards before pressing. Shipley Brochure, 2002.
- MultiBond 100. MacDermid brochure, 2006.
How the composite “sticks” to the dentin surface
The properties of dentin are such that its outer layer is wet. The fluid in this part of the tooth is renewed quickly, so it is very difficult to dry it out. And so that moisture does not affect the quality of adhesion of dentin to the composite, special water-compatible (in scientific terms - hydrophilic) systems are used. Also, the strength of bonds is directly influenced by the so-called “smear layer”, which arises as a result of instrumental processing of dentin. There are 2 approaches to using binding mechanisms:
- the smear layer is impregnated with water-compatible substances,
- the smear layer is artificially dissolved and cleaned off.
It is worth noting that the latter method, which involves removing excess microparticles from the surface of the enamel, is used today much more often than the first.
Adhesive properties of adhesives
The adhesive properties of glue are its main technological and operational characteristics. To evaluate the adhesion value, use test methods developed by FINAT (see sidebar “Tests for evaluating the parameters of the adhesive layer”).
Adhesion of the adhesive to the substrate should allow the label and flash to be separated from the substrate with little force (without tearing), but its magnitude should be sufficient to hold the label until it is forced to separate.
Based on the relative value of adhesion to the labeled material, adhesives are divided into removable and permanent (permanent).
Removable adhesive is characterized by higher adhesion to the label than to the material being labeled, as well as high cohesion. The amount of adhesion of the removable adhesive to the material being labeled must also be consistent with the tensile strength of the label. Thanks to this, it is possible to remove the pasted label without damaging the product or its packaging, the adhesive layer and the label itself. After this, the label can be re-glued onto another product. A label with removable adhesive will adhere to the material being labeled, after which there should be no significant change in adhesion.
Permanent adhesive ensures a stable connection between the label and the surface of the product or its packaging. When you try to remove a label, it usually breaks or the adhesive layer separates. Permanent adhesive is characterized by very high adhesion both to the label material and to the surface of the product or its packaging, as well as high cohesion. When using permanent adhesives, the label gluing process involves two stages: adhesion and curing. During the fixing process, the adhesion of the adhesive to the surface on which the label is applied must reach its maximum value.
When working with high-speed labeling lines, it is very important to be able to quickly correct an error when applying a label. For this purpose, permanent adhesives have been developed, the final fixation of which occurs only a few hours after gluing. Until this time, they act as removable adhesives and allow the label to be removed and reapplied.
The amount of adhesion is influenced by factors determined by the characteristics of the materials being labeled, the conditions for applying the label, the conditions of transportation, storage and consumption of the product with the label applied to it.
How dentin is etched
Japanese dentist Fuzayama was the first in history to use the dentin etching technique 39 years ago. Today, before the procedure, special conditioners are applied to the dental tissues - they help hydrophilic substances penetrate deeper into the dentin tissues and adhere to the water-repellent composite. The smear layer partially disappears, the dentinal tubules open, and mineral salts come out of the upper layer. After this, the conditioners are washed off with water. Next comes the drying stage, and the main thing is not to overdo it, otherwise it will affect the clutch.
Next, a primer is applied, which helps hydrophilic substances pass into the tubules and adhere to the collagen fibers. As a result, a kind of hybrid layer is formed, which contributes to the effective bonding of the composite to dentin. It also serves as a barrier against the penetration of chemicals and microbes into the internal structures of the tooth.
Adhesive systems for enamel
If we are talking about enamel, then adhesion here is ensured on the basis of micromechanical coupling. For this, hydrophobic liquids are used, but they will not provide the necessary “adhesion” to wet dentin, so a primer is also used. Handling enamel adhesives having a one-component composition is based on the following steps:
- etching of enamel with orthophosphoric acid - about half a minute,
- removal of etching gel with a water jet,
- drying enamel,
- connection in the same proportion of substances of the adhesive system,
- introduction of adhesive into the tooth cavity with an applicator,
- leveling it with an air stream.
Only after performing all of the above manipulations does the doctor introduce the composite material.
Influence of label application conditions on adhesion
Depending on climatic conditions, the surface to be labeled may have a temperature different from room temperature and be covered with a layer of moisture, which negatively affects the adhesion of the adhesive. At low temperatures, the adhesive becomes harder, which reduces its adhesive properties, especially the ability to initially set. At elevated temperatures, the glue, on the contrary, softens, which impairs its cohesive strength.
When applying a label to a refrigerated product, moisture may condense on its surface. Since water-based adhesives tend to absorb moisture, their adhesion to wet surfaces may be unsatisfactory.