Carious disease manifests itself in many cases quite unnoticed, very often having a small black dot in the tooth; when visiting the dentist, very deep caries is discovered.
Basically this confuses us and we immediately start thinking about what we should do, what material is better to use and how much it will cost us. We can answer all your questions without difficulty.
We want to tell you and offer the modern nanocomposite material Filtek. Its application is very wide, from the smallest restorations to filling large volumes of voids. In this article we will tell you about what Filtek restoration fillings are. About the areas in which they are used. We will also talk about the undoubted advantages of this light-curing material. And of course we will tell you about the different types of Filtek fillings.
What are Filtek fillings?
Filtek fillings are the word quality in the highest form of restoration materials from the American manufacturer - 3M ESPE. Similar nanocomposite materials for filling are used all over the world. With their use, it is possible to restore dental aesthetics, excellent anatomical shape and chewing function.
In what areas are Filtek materials used?
Filtek material is a nanocomposite material, its use is very extensive. Unlike many other materials, Filtek is used not only in the restoration of chewing teeth, but also in cases where it is necessary to restore the aesthetics of the front teeth. This material is universal!
Let's now list the undoubted advantages of this material!
Features of using Estelite
- Cleansing.
First, you need to very carefully clean the covering of the tooth with a rubber cup using phosphorus paste, then rinse well with water.
- Selection of shade.
Before installing a rubber dam, you need to choose the optimal tone using a special Estelite palette. You need to choose a color within five minutes, because dry teeth are lighter than when they are wet. One of the key points when choosing is a rich white shade. If there is a choice between two colors, it is better to prefer the white ones (with a more pronounced intensity of whiteness). When working with whitened teeth, you need to select a shade after 10-14 days, because they tend to darken a little.
- Insulation.
Rubber dam is considered the best option for isolating teeth.
- Preparation of the oral cavity.
First, prepare the cavity and clean it with water. Make bevels along the edge of the enamel when preparing anterior teeth (for grades 3, 4 and 5) and soften the edges when preparing lateral teeth (grades 1 and 2). Bevels and smoothing will ensure that the gap between the edge and the restoration disappears, which will give a good aesthetic effect. For strength, it is necessary to choose scalloped bevels. For restorations and composite restorations, a diamond bur can help roughen the coating to improve adhesion. To clean, you can etch the surface with phosphoric acid, rinse with water, dry and apply silane, following the recommendations.
- Pulp protection.
If the cavity is located very close to the pulp, a glass ionomer gasket must be installed. But eugenol-based raw materials should not be used, as this will impair adhesion and hardening.
- Adhesive composition.
The adhesive must be applied according to the manufacturer's instructions. It is especially recommended to use Tokuyama Bond Force, which is considered a one-component, self-etching, light-curing static substance. But it is strictly forbidden to use co-cured adhesive compositions or dual-curing compositions, because they will not give the same adhesive effect that is necessary when using composite raw materials. If you decide to use self-curing adhesive or dual-curing compounds, make sure that they are combined with light-curing raw materials.
- Dosage.
Before using unidose, you need to study the special instructions in the instructions, then you need to move the PLT into a special dispenser, remove the cap, apply the paste into the cavity itself or squeeze it onto a mixing tablet. When using a syringe, you need to remove the cap, turn the handle clockwise, apply the composition to the tablet, and put the cap back on. It is not recommended to apply extra force to the syringe if it has just been taken out of the refrigerator.
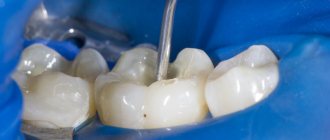
- Filling and creation of a contour for restoration.
It is necessary to apply the material to the surface layer by layer, but each layer must be within the specified depth (a special table has been developed for this). It is not recommended to mix Estelite with other types of composite materials or other colors from the Estelite palette. This is done in order to eliminate incomplete polymerization or the appearance of voids.
- Polymerization.
Each layer needs to be polymerized for at least the time indicated in the recommendations (you can check the table). In this case, you need to install the photopolymerizer at a distance of two millimeters from the composition. If you decide to use a composite composition from other manufacturers layer by layer with a cured composite, you must strictly adhere to the recommendations for their use.
- The final stage.
Process and polish the restoration result. At the final stage, use a diamond bur with a minimum grit. To level the boundary between the composite composition and a natural tooth, you need to perform work along the boundaries with a 12-sided bur, but without the use of water and at minimal speeds. It is also recommended to use metal or vinyl abrasive strips to finish the proximal surface. Rubber heads and all other special polishing devices are suitable for polishing.
Precautionary measures
In order to start working with the presented material, you need to comply with all the necessary safety rules specified by the developers. Here is a list of all requirements and contraindications:
- Under no circumstances should the composite be used for purposes other than those specified in the instructions.
- The presented material is used only for medicinal purposes and can only be purchased by a medical institution or persons who have confirmation of the right to conduct dental activities.
- If it is clear that the seal of the drug’s packaging is broken, there are some concerns regarding originality, and there is no special protective seal, then it is extremely undesirable to use such a product.
- The procedure is stopped immediately as soon as the patient shows the first signs of individual intolerance to the drug or its components.
- Since the composite contains methacrylic monomers, you need to be very careful. These substances are classified as allergens and should only be handled with gloves. Also remember that the substance penetrates through latex, so be sure to wash your hands thoroughly after the procedure.
- Do not allow the product to come into contact with exposed areas of the skin. If contact occurs, it is necessary to immediately rinse the affected area and consult a doctor.
- At the end of all procedures, the patient is recommended to rinse the oral cavity. Rinsing can be done several times, using plenty of water.
- Vapors from the drug Estelite should not be inhaled. Also avoid getting the material into the oropharynx. This can lead to very serious consequences.
- After completing the manipulations, the entire instrument must be thoroughly treated with alcohol-containing disinfectants.
- The doctor must carry out the entire work process wearing protective glasses.
Drug release format and cost
Estelite is produced in syringes, its cost ranges from 1500 to 2000 rubles. The kit contains either six test syringes or nine for standard use. For such a kit you will have to pay approximately 12,000-19,000 rubles.
Advantages of Filtek fillings
- Filtek fillings are used not only in frontal teeth, but also in chewing ones
- Low landing
- Reproducibility of natural properties of enamel and dentin
- High aesthetics and smoothness.
- Good wear resistance.
- Material from a well-known company provides a guarantee of effective treatment
- Of course, this manufacturer has a huge range of colors.
Now let's talk about the types of Filtek filling material.
Adhesive systems for dentin
Ensuring good adhesion of a hydrophobic material to a hydrophilic one is quite a difficult task, which they have been trying to solve for many years. In a fairly short period of time, several generations of adhesive systems for dentin have changed, with development going in two directions - simplifying the procedure for use and improving the adhesion itself. But we all know that simple and high quality are far from synonymous. The term “generation” does not, by and large, have any scientific basis; nevertheless, it allows us to structure in a certain way the whole variety of adhesive systems present on the market today. Belonging to a particular generation is determined by the chemical composition, mechanical adhesion indicators and ease of use.
1st generation adhesive systems
The first generation of adhesive systems has fairly strong adhesion to enamel, but minimal adhesion to dentin. The adhesion mechanism is carried out due to the interaction of calcium, which is part of the teeth, and the bond. After some time, postoperative sensitivity appeared, because the restoration in the dentin was “dangling”, holding on to the enamel with all its might. These generation adhesive systems have been recommended for use with Class III and V cavities only.
2nd generation adhesive systems
The main difference between the second generation adhesive system and the first is that this adhesive will interact with the smear layer, which was not previously involved. But this improvement only helped to slightly increase the period of stay of the restoration in the oral cavity. Postoperative sensitivity was still observed and about one third of the restorations required replacement after a year.
3rd generation adhesive systems
After some time, scientists were able to develop a two-component adhesive system that ensured adhesion of the composite to both enamel and dentin (adhesion values of 8-15 MPa), but apparently it was still not good enough. Postoperative sensitivity decreased significantly, the service life of the restoration increased, but most restorations required replacement after 3 years.
4th generation adhesive systems
4th generation adhesive systems were quite a big leap in the entire history of adhesive systems and are still the “gold standard”. As I said, simple and high quality are far from synonymous. Postoperative sensitivity decreased even more, and the adhesion rate doubled. The technique of total etching and wet dentin bonding appeared for the first time. These adhesive systems owe much to the hybrid layer that forms between the dentin and the composite. After etching, the adhesive interacts with the collagen fibers of dentin, penetrating the dentinal tubules and forming an intermediate layer that is neither dentin nor adhesive, which is called hybrid.
The main disadvantage of these systems is the difficulty of use, because All the necessary components (there are three of them) must be mixed in precise proportions. It was due to these inaccuracies that problems arose when using these systems.
As we have already said, these adhesive systems contain 3 components:
1) Conditioner (phosphoric acid in the form of a gel for etching enamel and dentin);
2) Primer (a mixture of hydrophilic low molecular weight compounds that penetrate wet dentin, saturate it and form a hybrid layer);
3) Enamel adhesive system (unfilled resin that ensures the bond of the composite with the hybrid layer and tooth enamel).
Stages of working with 4th generation adhesive systems Type 1:
Provides for cleaning only enamel.
- Etching the enamel surface for 20-30 seconds using 37% phosphoric acid, which is part of the etching gels;
- Removing the etching gel with a stream of running water for 20-30 seconds (you need to wash it off for the same number of seconds as you etched it).
- Drying the enamel and controlling the quality of the etching (etched enamel has a matte tint);
- Applying primer to the dentin of the carious cavity using an applicator (exposure 10 seconds);
- Distribution of the primer using a weak stream of air (in this way, excess is removed and the primer penetrates more deeply into the dentinal tubules).
- Introducing the enamel adhesive system into the carious cavity using an applicator (applied to prepared enamel and dentin);
- Distribution of the enamel adhesive system using a weak air stream;
- Photopolymerization of adhesive and primer;
- Addition of composite material.
Type 2:
Provides for complete dissolution of the smear layer by etching dentin with phosphoric acid.
Stages of working with 4th generation adhesive systems Type 2:
- Etching the enamel surface for 15 seconds using 37% phosphoric acid, which is part of the etching gels, adding the gel to the dentin for 15 seconds;
- Removing the etching gel with a stream of running water for 30 seconds;
- Drying enamel and dentin (quality control of etching - etched enamel has a matte tint, dentin should not be overdried - moist, shiny);
- Applying primer to the dentin of the carious cavity using an applicator (exposure 10 seconds);
- Distributing the primer using a gentle stream of air;
- Introducing the enamel adhesive system into the carious cavity using an applicator (applied to prepared enamel and dentin);
- Distribution of the enamel adhesive system using a weak air stream;
- Photopolymerization of adhesive and primer;
- Addition of composite material.
Types of Filtek filling material:
There are three types of Filtek fillings: Filtek Z250, Filtek Supreme and Filtek Ultimate.
So, the first one: Filtek Z250 - this material has good density, which allows it to adhere well to the edges of the teeth. This material is used in the so-called layer-by-layer technique, which means the moment when the filling is built up and more than one layer is used. This material minimizes the recurrence of caries to almost zero.
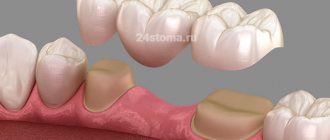
Second: Filtek SupremeXT - this material is great for making veneers or inlays. This material has a large number of shades, which makes it an excellent option for the restoration of front teeth.
And finally the third type: Filtek Ultimate - this material is newer, it was developed to improve and improve the Filtek Supreme material. It's essentially the same thing, but it has an improved formula for long-lasting shine. This material is also more convenient for the dentist to use, which will make the procedure faster.
5th generation adhesive systems
In the 5th generation adhesive systems, the mixing problem was eliminated - the “one bottle” concept was implemented, i.e. the adhesive and primer were placed in one container (they became one-component).
The use of one-component systems also involves total etching of enamel and dentin. The mechanism of their connection is similar to the mechanism of adhesion of 4th generation systems. These materials have good adhesion rates to enamel, dentin, ceramics and metal (at the level of 20-25 MPa), but their most important advantage is the absence of the component mixing stage, the poor performance of which led to a decrease in adhesion rates in fourth-generation systems.
Fifth generation adhesive systems are still the most popular because they are easy to use and give predictable results. Postoperative sensitivity when using them is also low. But the strength of adhesion, whatever one may say, is worse than that of our “gold standard” - the fourth generation.
Principles of working with adhesive systems
There are no special principles for working with adhesive systems, unlike the previous ones, but still consider
I understand that this should be stated.
- Etching the enamel surface for 15 seconds using 37% phosphoric acid, which is part of the etching gels, adding the gel to the dentin for 15 seconds;
- Removing the etching gel with a stream of running water for 30 seconds;
- Drying enamel and dentin (quality control of etching - etched enamel has a matte tint, dentin should not be overdried - moist, shiny);
- Application of the adhesive system to the enamel and dentin of the carious cavity using an applicator (exposure 15 seconds);
- Distribution of the adhesive system using a weak air stream;
- Photopolymerization of the adhesive system;
- Addition of composite material.
6th generation adhesive systems
The next task of developers when improving adhesive systems was the need to remove the etching stage from the list of procedures performed. In sixth generation systems this problem has been solved.
Generation 6 adhesive systems are one-step, self-etching systems that come in 2 bottles and require mixing immediately before use. The system is then applied to the enamel and dentin. At the same time, etching, diffusion into the tooth tissue and the formation of a hybrid zone are ensured.
Compared to adhesive systems of the 4th and 5th generations, they are easier to use, working with them requires less time due to the reduction in the number of steps, and the risk of technical errors is reduced.
However, adhesion to dentin (18-23 MPa) remains virtually unchanged over time, while adhesion to enamel deteriorates.
Stages of working with 6th generation adhesive systems:
- outside the oral cavity, the components of the adhesive system are mixed (inside a disposable package or in a special cell);
- applying the adhesive system to the enamel and dentin of the carious cavity using an applicator (exposure 15 seconds);
- distribution of the adhesive system using a weak air stream;
- photopolymerization of the adhesive system;
- introduction of composite material.
Our clinics
Clinic "Elident" on Varshavskaya
Varshavskoe highway, 75, bldg. 1, Moscow 117556
- Varshavskaya (500 m, closed until 2021)
- Nakhimovsky Prospekt (1,300 m)
Mon-Sat : 09:00-21:00; Sun : 09:00-19:00.
Online registration
+7 (495) 649-41-19
Elident Clinic in Annino
Varshavskoe highway, 154, building 1, Moscow 117405
- Annino (500 m)
- Academician Yangelya (700 m)
Mon-Sat : 09:00-21:00; Sun : 09:00-19:00.
Online registration
+7 (495) 649-41-19
Prices for caries treatment
| Service | Price, ₽. |
| Examination of the patient, calculation of the cost of services | for free |
| Light polymer (Light) filling Estelite | 2800 |
| Light-polymer (Light) filling Vitrimer | 2700 |
| Light polymer (Light) filling Filtek | 2500 |
| Fuji glass ionomer cement | 2200 |
| Light-polymer (Light) filling Revolution (for a crown) | 1800 |
| Treatment of average caries MOD Estelite | 4000 |
| Treatment of average caries MOD Filtek | 3800 |
| Treatment of medium caries MOD Fuji | 3500 |
| Grinding the filling | 350 |
| Temporary filling with Septopak medicinal preparations | 550 |
| Temporary filling (dentin) | 300 |
| Temporary light filling Clip | 400 |
| Fuji insulating gasket, revolutionary | 450 |
| Light polymer therapeutic pad | 450 |
| Fiberglass pin | 1600 |
| Anchor pin | 800 |
| Titanium pin | 1500 |
| Additional surface no more than one Estelite | 800 |
| Additional surface no more than one Filtek | 600 |
| Additional surface no more than one Fuji | 500 |
| Aesthetic restoration of anterior teeth according to class III | 3500 |
| Aesthetic restoration of anterior teeth according to class IV | 3800 |
| Clinical/home whitening | 6500-8500 |