Method of fitting and applying a removable denture in case of partial absence of teeth.
1) Assessment of workmanship. A removable laminar denture received by a doctor from a dental laboratory must be carefully examined and, if there are minor roughnesses, individual sharp edges and protrusions that are unusual for the CO relief, it must be removed by grinding. In addition, you should look at the quality of the polymerizing base resin (color, presence of streaks or clouding of the prosthesis base, presence of pores, etc.)
2) Overlay on abutment teeth. The base of the prosthesis should rest on the CO. They examine the edges of the prosthesis and the mucous membrane in the area of the transitional fold on the vestibular and lingual sides, as well as on the hard palate. The gap between the SB of the hard palate and the prosthesis indicates its neoplastic fit. The distal edge of the upper denture is thinned to create a smooth transition from its surface to the palate. The movable folds of the mouth ensure that when the mouth is opened wide, they are not injured by the base of the prosthesis. The next step in installing an orothosis is checking the clasps. During fitting, they should not be bent too much, as this makes it difficult to apply the orothosis and creates unnecessary pressure on the tooth. Then the color is checked and the cause is eliminated. If this does not give results, it is necessary to reline or start making a new prosthesis.
3) Checking interocclusal contacts using carbon paper. First, the closure of the teeth is checked in the central center. Identified suoercontacts are eliminated. An increase in interalveolar height on individual teeth is established using articulation paper with progressive staining. The correction is carried out very carefully. It should be remembered that CO is the initial and final stage of the act of chewing. The effectiveness of the chewing function depends on the relationship between opposing pairs of teeth. When checking lateral occlusion, blocking points must be eliminated. without disturbing multiple contacts. On each side of the dentition there should be approximately 16 contact zones of contacting cusps with fissures and marginal ridges of the altagonist teeth. Consequently, in the oral cavity there should be at least 32 contacts in an amount of about 100 points. In the central area, the slopes of the protective tubercles should overlap the supporting tubercles to prevent biting of the cheeks and tongue. The correction is made on the supporting cusps so as not to disturb the overlap of the antagonist teeth. With lateral movements, correction is achieved by grinding the cusps in accordance with the rule “upper buccal - lower lingual”
Criteria for assessing the quality of prostheses.
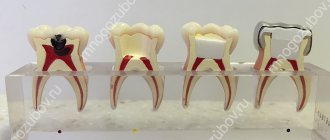
Before applying the finished prosthesis, you should evaluate the quality of its manufacture, paying attention to the thickness of the base and its edges. their surface, quality of finishing and polishing, clasp positions and artificial teeth. The clasps should be located in the base of the prosthesis in the center of the alveolar process. Sharp, non-rounded ends are dangerous - they can injure the lips when inserting and removing the prosthesis, and also during operation. Often, on the edges of the prosthesis that go around the tubercle of the upper jaw, there are jagged edges, sharp protrusions that must be removed and smoothed before applying the prosthesis. The edges of the prosthesis must be given a rounded shape. It is important to pay attention to the quality of treatment of interdental spaces. If the polymerization regime is violated, pores appear in the base of the prosthesis. During polishing, the polishing mass gets into them, and the prosthesis takes on an unkempt appearance.
Phases of adaptation to prostheses.
There are three phases of adaptation to dental tyrothesis.
The first phase is irritation. It is observed on the first day of application of the prosthesis and is characterized by increased salivation, decreased chewing efficiency, and changes in speech.
The second phase is partial braking. In most patients, it lasts from 3 to 7 days and is characterized by moderate salivation, restoration of diction, disappearance of soft tissue tension, and restoration of chewing efficiency.
The third phase is complete inhibition, lasting from 7 to 30 days. The patient does not feel any discomfort from the prosthesis. That is, getting used to a prosthesis is a complex neuro-reflex process, consisting of:
• Inhibition of the reaction to the prosthesis as to a normal stimulus
• Formation of new movements of the tongue and lips when pronouncing sounds
• Adaptation of muscle activity to the new interalveolar height
• Reflex restructuring of the activity of muscles and joints, the end result of which is the development of functionally appropriate movements of the lower jaw.
Rules for using ChSPP:
1. You can eat hot and cold food
2. Avoid eating solid foods that require significant effort.
3. During the first time of using dentures, the patient will experience discomfort. There may be pain under the denture. In case of severe pain, it is recommended to take out the prosthesis at night and put it on 3-4 hours before the doctor’s appointment.
4. Speech disturbances may appear in the first days after application of the prosthesis. It is recommended to train the function by reading aloud.
In the first days, there is increased salivation and the urge to vomit, which are caused by mechanical stimulation of the receptors of the root of the tongue or soft palate. Over time, the response to irritation begins to subside. In cases of vomiting associated with irritation of the soft palate, the borders of the prosthesis are shortened (if possible).
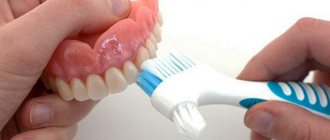
6. Clean the denture regularly (at least 2 times a day). After each appointment, the removable denture should be removed from the mouth and rinsed thoroughly with water, soap and a brush. Clean your dentures twice a day with toothpaste or tooth powder and a stiff brush. You need to brush your teeth separately.
7. In case of cracks, fractures, etc. Do not attempt to repair the denture yourself. You need to take him to the doctor.
8. It is not recommended to take breaks from wearing the prosthesis for more than 1.5-2 weeks, because this may lead to the reappearance of the initial discomfort and may make it difficult to install the prosthesis exactly in place. If you do not use a prosthesis for more than a month, as a rule, it is no longer suitable and a new one needs to be made.
Dental prosthetics is a topic that sooner or later each of us will have to face. After all, tooth loss with age or as a result of injury is almost inevitable, and installing dentures is the only way to restore oral health.
Usually a person knows little about dental prosthetics. Patients learn about the types of prosthetics, removable and fixed dentures, and the stages of this procedure only when faced with the need to install dentures face to face. Meanwhile, this is a very interesting section of dentistry, and it doesn’t hurt to have an idea about it before sitting in the dentist’s chair. So.
Dental prosthetics is the main section of orthopedic dentistry, which deals with the restoration of individual teeth, missing teeth, and improvement of the functional and aesthetic characteristics of teeth.
When you lose at least one tooth, the question inevitably arises about the need to recreate it. The absence of at least one tooth affects the appearance, deprives one of self-confidence, and has a negative impact on overall health - chewing function suffers, and diseases of the gastrointestinal tract develop. Therefore, the installation of prostheses is a treatment that almost all of us face sooner or later.
Modern prosthetics make it possible to compensate for any defect in the dentition using crowns or prostheses (orthopedic structures). Now even the problem of complete absence of teeth on the jaw is easily solved.
Modern dental prosthetics
Modern dental prosthetics uses effective advanced techniques, using the safest and most biocompatible materials, installing long-term, durable and comfortable dentures. For example, rubber dentures in which layered porcelain teeth were mounted were widely used in the past. Now they have been replaced by more advanced, aesthetic and comfortable all-ceramic designs, but this is not the limit. Neutral metal alloys, composite materials are widely used, and, of course, the most advanced technique is dental implantation.
In addition to the centuries-old and developing practice of making dentures, orthopedic dentistry now sets itself other tasks. Nowadays, dentists also deal with the complete restoration of the appearance and functions of remaining teeth, which may be partially destroyed or lose their whiteness, as well as adjusting the size and color of teeth in order to improve the patient’s appearance. In solving these problems, orthopedics is directly related to aesthetic dentistry.
Stages of dental prosthetics
At Afalin Dentistry we carry out all types of both removable and fixed dental prosthetics. It is very important that it is done professionally and efficiently - after all, the patient will have to live with new artificial teeth, and the convenience, strength, and functionality of the dentures affect the quality of life and the health of the body as a whole.
At each stage, the orthopedic dentist approaches the matter responsibly, thinking through every step, taking into account all the details and characteristics of the patient, delving into all the nuances.
The first stage of treatment is examination. This is a preparatory stage, and it is extremely important, because before prosthetics (especially if we are talking about such a serious design), it is necessary to undergo a number of examinations and prepare the oral cavity for the installation of high-quality and reliable dentures.
Usually, before dental prosthetics, an orthopedic dentist examines the condition of the remaining teeth and gums. The doctor carefully evaluates the condition of the oral cavity and decides which prosthesis is best for the patient in this individual case. To select a prosthetic technique and develop an individual treatment plan, the dentist or orthopedist will refer you for additional diagnostics - this is an X-ray examination of the oral cavity or an MRI, where all your teeth and roots can be seen as if on an unfolded piece of paper. The doctor finds out the condition of each tooth, not only those located near the place of prosthetics, but also far from it.
The second stage is treatment. If necessary, the patient is prescribed oral sanitation by a dentist-therapist.
The third stage is dental prosthetics. After the necessary subsequent treatment has been carried out, the final stage begins, which is also divided into two more stages: preparation for installation of the prosthesis and prosthetics .
Preparation for installation of a prosthesis can also be one-step or multi-stage. For example, with permanent prosthetics (installation of a crown or bridge), doctors carefully prepare the tooth: they remove the pulp, fill the roots to the top, install an inlay, and, finally, grind the tooth (or supporting teeth for the bridge). Now metal-ceramics are placed on “living” teeth (according to the doctor’s indications, individually). Then the crown itself is designed and manufactured. And here the work and experience of a dental technician is important. We work with dental technicians from the laboratory of the city of Omsk, dentistry "SibDent" in the oil workers, "Vita" in the city of Isilkul. We trust their quality.
If a prosthesis is made for the jaw, then a whole series of preparatory work is required: preparation of teeth, taking impressions of both jaws, making diagnostic and working models, determining the central relationship of the jaws, checking the design of the prosthesis, application, fitting, fitting.
Fitting is a stage of testing the prosthesis, which is necessary in this case. If the fitting shows that the prosthesis is made correctly, then installation and fixation of the prosthesis follows.
After installing the prosthesis, the patient should not only carefully follow the dentist’s recommendations, but also regularly visit the doctor, who will monitor the condition of the prosthesis. This is necessary for the prevention of various periodontal diseases and other possible complications. And, of course, if the patient has questions and concerns about how the denture “feels” in the mouth, it is better for him to immediately seek professional advice from his doctor. As we say, just come for correction. Many people are embarrassed to seek advice on time - “it’s inconvenient to bother the doctor”, and in the meantime the warranty expires. Both the patient and the doctor find themselves in an unpleasant situation in relation to each other.
Please do not hesitate to come, because we are responsible for the quality of the orthopedic design and want you to enjoy using it.
You can get more detailed information at an initial consultation in our clinic, which you can sign up for by calling (381-73) 20-336, cell number (8) 950-217-40-40
At this consultation, you will receive answers to all your questions, and even if for some reason you continue treatment in another treatment facility, you will be ready for a serious conversation with your treating specialist.
Don't put off restoring your health until tomorrow. Call us right now!
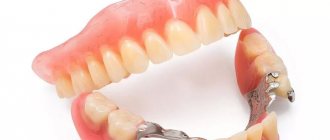
Stages of fitting the frame of a clasp prosthesis
Topic No. 14.
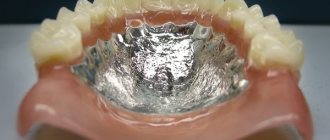
The clinical stage of checking and fitting the clasp denture frame begins with assessing the quality of the working model and the clasp denture frame, which arrives to the clinic from the dental laboratory on a plaster model in an articulator or occluder. After assessing the manufacture of all elements of the clasp denture frame on a plaster model, the frame is wiped with an aqueous solution of ethyl alcohol and introduced into the oral cavity.
The arch of the clasp prosthesis should be separated from the mucous membrane by the amount of compliance of the soft tissues of the alveolar part of the prosthetic bed. Otherwise, the arc, which has a small area, will be pressed into the mucous membrane, injuring it, up to the formation of bedsores. This is especially important in the presence of end defects. The arches must exactly follow the configuration of the hard palate or the alveolar part of the lower jaw (located parallel to the alveolar part).
The location of the arch on the upper jaw depends on the topography of the dentition defects. The most typical arrangement of the arch is: beginning and end at the level of the first molars, middle. The distance between the mucous membrane and the arch should not exceed 0.5 mm. Particular attention should be paid to the placement of the arch when the torus is pronounced. The arch must be strong, since it is a load-bearing structure, and at the same time not thick, so as not to interfere with the tongue, therefore strength is achieved by increasing its width. On average, its optimal width is 5.0 – 10.0 mm, and its thickness is up to 1 mm. The arch on the lower jaw has the shape of a semi-ellipse, the long diameter of which is 4.0 - 5.0 mm, and is located in the area of the front teeth, between the gingival margin and the floor of the mouth. In this case, it is necessary that the arch is located strictly parallel to the alveolar part of the lower jaw below the necks of the teeth by 1.0 - 1.5 mm, depending on the severity of the alveolar part, and does not reach the bottom of the oral cavity by 2.0 - 3.0 mm. In the area of the saddles of the frames of clasp dentures, the gap between the mucous membrane and the frame should be at least 1.5 - 2.0 mm.
Support-retaining clasps must fit snugly to the surface of the teeth throughout, must be of sufficient thickness (1.5 - 2.0 mm) and, like the arms of the clasps, must have the shape of a triangle with the base facing the body of the clasp.
A correctly made frame should be freely inserted into and out of the oral cavity, fixed well on the teeth and not balance both on the model and in the mouth. Not only the arc, but also the branches should not touch the mucous membrane and not be too far from it. Clasps and their supporting parts, located in their bed, should not increase the interalveolar height and interfere with the lateral movements of the lower jaw.
The clinical stage of fitting and checking the frame of the clasp denture ends with the choice of the color of the artificial teeth. After this, the dental technician constructs the artificial dentition, and the doctor carries out the clinical stage of checking the design of the clasp denture. Then the dental laboratory replaces the wax with plastic, grinding and polishing.
The method of fitting and applying a clasp prosthesis and its subsequent correction are carried out in the same way as when applying and correcting a removable lamellar prosthesis.
Stages of fitting the frame of a clasp prosthesis
1) Having received from the dental laboratory the frame of the clasp denture fitted by the dental technician on a combined model and processed, the doctor fits it in the patient’s mouth. First, check the correct fit of the frame on the jaw, adhering to the chosen route of insertion of the prosthesis.
2) The prosthesis must be applied to the supporting teeth without much force. The patient should not feel pain in the teeth. The occurrence of pain indicates the presence of interference with the fit of the prosthesis. Interferences should be eliminated by grinding the metal. Places that prevent the prosthesis from fitting can be conveniently identified using carbon paper. To do this, fold a strip of copy paper in half with the writing side facing out, place it on the frame in the area of the expected interference, and try to fit the frame onto the jaw. There will be carbon paper marks on the areas that need sanding.
3) The doctor must make sure that all its parts are positioned correctly: the clasps are in the right place, the occlusal pads do not interfere with the bite, and there is the necessary gap between the arches, bars and mucous membrane. After this, the frame is sent to a dental technician for final polishing, heat treatment, construction of artificial dentition and the base of the prosthesis. The frame, fitted in the oral cavity, must be installed in the same position on the plaster model of the jaw, on which the remaining stages of making the prosthesis are performed. This stage should not be left to the technician, since the slightest deviation from this position can lead to the unsuitability of the prosthesis.
4) Before applying the finished prosthesis, it should be inspected, paying attention to the thickness of the base and edges, their surface, the quality of finishing and polishing, and the position of the clasps. The quality of polishing between teeth is especially important. If the polymerization regime or the relationship between the weight content of polymer and monomer is violated, pores, cavities, cracks and other defects appear in the prosthesis base. When polishing, the polishing mass gets packed into them and the prosthesis takes on an unkempt appearance. The pores can occupy a small area, and they can easily be eliminated by layering self-hardening plastic with polymerization under pressure. When they are scattered over the entire surface of the prosthesis, it should be redone.
Often, in the edges of the prosthesis that go around the alveolar tubercle of the upper jaw, there are notches and sharp protrusions that must be removed before applying the prosthesis.
5) The edges of the prosthesis must be given a rounded shape. Clasps should also be the subject of inspection. Particular attention should be paid to their ends. Sharp, unrounded ends of clasps are dangerous. They can injure the mucous membrane of the lips when inserting and removing the prosthesis. Pay attention to the color of the teeth, their size and position. After this, they begin to insert the prosthesis into the mouth, having previously treated it with a cotton swab moistened with 3% hydrogen peroxide and a solution of potassium permanganate. No matter how carefully the prosthesis is made, it will never immediately fit freely onto the prosthetic bed. The delay occurs primarily on natural teeth. Areas that interfere with the application of the prosthesis can be easily identified using carbon paper, placing it between the prosthesis and natural teeth. Excess plastic is removed gradually, in several stages, using cutters or spherical heads. The prosthesis should be adjusted so that it can be inserted and removed from the oral cavity without much effort not only by the doctor, but also by the patient.
When removing excess plastic that interferes with the application of the prosthesis, errors are possible that will lead to a violation of the accuracy of the fit of the prosthesis to natural teeth. Food will fall into the resulting cracks. As it decomposes, it will worsen oral hygiene. These gaps near the teeth, which support the clasps, are especially dangerous. The base of the prosthesis should be on the mucous membrane. The fit should be checked using a mirror in good lighting. At the same time, the fit of the edges of the prosthesis is examined along the transitional fold on the vestibular and lingual sides, as well as on the hard palate. The gap between the mucous membrane of the hard palate and the prosthesis indicates its incomplete fit. In this case, you need to find the cause and eliminate it. However, it should be borne in mind that in patients using plate-type removable dentures for the first time, the final occlusal correction should be carried out the next day after application of the prosthesis due to its inevitable settling into the mucous membrane. The distal edge of the upper denture is thinned to create a smooth transition from its surface to the palate. Movable folds of the mucous membrane are released. Otherwise, during conversation and laughter, they will be damaged by the edge of the prosthesis. When applying a clasp prosthesis, first of all, guided by parallelometry data, they record in the medical history and ask the patient to remember the route of insertion of the prosthesis. Typically, the insertion path is in the opposite direction to the selected tilt of the model. When fitting an arched prosthesis, pay attention to the position of the arch on the upper and lower jaw. There must be a gap between the arch and the mucous membrane, the size of which can be checked with an angled probe. When the arch fits tightly, bedsores occur, especially when there is a poorly pliable mucous membrane on the hard palate. A large gap between the arch and the mucous membrane when it is located in the middle and posterior third of the palate is also inconvenient. In order to understand this, you should remember the path of movement of the food bolus. As is known, the latter, after its formation, presses the tongue against the hard palate, along which it slides towards the pharynx. The low position of the arch creates an obstacle to the sliding of the food bolus and interferes with the tongue during swallowing. In the lower jaw, a significant distance between the arch and the mucous membrane of the alveolar process can also interfere with the tongue. Its low location will lead to damage to the lingual frenulum. If, when checking the frame of an arched prosthesis, the fit of the arches and clasps was correct, then their position can change only if there are gross violations of the prosthesis manufacturing technique.
6) The next stage of fitting the prosthesis is checking the clasps. Clasps, especially retaining ones, can bend when finishing the prosthesis. When correcting them, they should not be bent too much, as this makes it difficult to apply the prosthesis and creates unnecessary pressure on the tooth enamel. Then the stability of the prosthesis is checked. In case of balancing, it is necessary to establish the reason for it. Balancing occurs for various reasons: improper gluing of parts of the plaster cast, deformation of the working model, negligence during polishing. Finally, balancing is possible when the fit of the prosthesis is insufficient. A frequent cause of patient complaints about unsatisfactory fixation of a removable denture is its balance on the upper jaw in the absence of isolation of the pronounced palatal torus. To prevent this complication, it is necessary, at the stage of checking the wax composition of a removable plate denture, to palpate the palate in order to identify the torus, outline it on the model and indicate in the dental technician’s order the degree of its isolation (the number of layers of adhesive plaster or foil). If such a balance is detected in the clinic, an attempt should be made to isolate the torus with appropriate modification of the base. If poor fixation of the prosthesis is due to incorrect placement of artificial teeth with a displacement to the vestibular side relative to the top (middle) of the alveolar ridge, it is necessary to remove the artificial teeth from the base, redefine the central occlusion and re-install the artificial teeth taking into account the above requirement. This error is a consequence of an error by the dental technician, which was not promptly controlled by the doctor at the stage of checking the wax composition, and, as a rule, occurs when making removable dentures immediately “ready”, without checking the position of the teeth in the mouth. Unsatisfactory fixation of the prosthesis is also possible with uncalibrated occlusal relationships in various phases of all types of occlusion, especially when using porcelain teeth. Therefore, it is necessary to carefully carry out the occlusal adjustment of artificial natural teeth during all movements of the lower jaw. To prevent such complications, it is advisable to perform placement in an articulator. Occlusal relationships are first checked in central occlusion. Observed errors are eliminated. The increase in interalveolar height on individual teeth is checked using carbon paper. The bumps that increase the bite are ground off. In the case of a significant increase in the height of the bite (interalveolar), it is not advisable to grind off the cusps of a row of teeth. It is better to remove all the teeth from one of the dentures, then place wax rollers on the base and again determine the interalveolar height. When the height decreases, repeated determination is made by layering a strip of wax on the teeth of one of the dentures. Then the teeth are repositioned. When checking lateral occlusions, it is necessary to eliminate blocking moments without disturbing multiple contacts. When correcting occlusion with lateral movements, you should not grind the cusps that hold the height of the bite. On the lower jaw these are the buccal tuberosities, and on the upper jaw they are the palatine tubercles. Grinding them leads to a decrease in the alveolar height, and if it is held on natural teeth, a gap appears between the artificial ones in the position of central occlusion. This reduces the functional properties of the prosthesis. When the lower jaw moves forward, blocking moments can occur in the anterior region as a result of deep overlap. In this case, the front teeth should be shortened. This changes their size and shape, which is not always desirable. However, if the incisal overlap was correct during the design check, then the relationships of the anterior teeth in the finished prosthesis are unlikely to change. Consequently, blocking the lower dentition with the upper front teeth is possible only if an error was made during the setting of the teeth and went unnoticed when checking the design of the prosthesis. Aesthetic defects identified by patients are often associated with a mismatch in the color, size or shape of the teeth, the unnatural color of the artificial gum, as well as unsatisfactory placement of artificial teeth or the location of clasps. Little attention is paid to the selection of the color of artificial gum in practical dentistry, although modern base plastics are produced in different shades and intensities, and in the plastic “Bacryl” the base can be colored differently by the technician himself using the dye supplied with the plastic. When restoring the dentition of the upper jaw in the frontal area, for aesthetic reasons, it is better to use dentures with teeth in the “indentation”, especially with prognathism, a short lip, and a mushroom-shaped alveolar process. To avoid mistakes when choosing the color of artificial teeth, you should adhere to certain rules: check the correspondence of the color of natural teeth to the color standard, which should be moistened, in daylight, in dim diffused lighting. When restoring the frontal portion of the dentition, a photograph of the patient with natural teeth can serve as a guide to some extent. At the same time, it is necessary to take into account that the clinical situation does not always allow one to accurately recreate the previous shape of the dentition and its size, which is necessary to inform the patient in advance.
After fitting, the patient is taught to put on the prosthesis independently and given advice on how to use it. With a denture you can eat cold and hot food (bread, meat, vegetables, fruits, etc.). You cannot chew nuts, sugar, crackers, i.e. hard foods that require significant chewing effort. Dentures need to be looked after. They should be brushed with a toothbrush in running water before and after meals. The denture should not be washed in hot water or boiled in it. This causes the dentures to become deformed and unusable. For storage, dentures should be cleaned and placed in a plastic box, and in the morning moistened with water and inserted into the mouth. It is best to use a special Denta vessel. The patient should be warned that at first he will experience discomfort from the prosthesis as from a foreign body. Work and distracting activities will help overcome awkwardness, addiction will set in and the sensation of the prosthesis will disappear. Pain may occur. In case of severe pain, it is recommended to remove the prosthesis and insert it 3-hours before your appointment with the doctor.
After the application of a removable denture, subsequent corrections are required in most cases. This is due to varying degrees of compliance of the mucous membrane of the prosthetic bed and the inability to fully take this factor into account when designing removable dentures. Each physician must skillfully carry out these additional steps. First, the patients' complaints are carefully analyzed, isolating complaints of a phonetic, aesthetic and functional nature (poor fixation when biting or chewing), pain (when talking, eating), etc. Particular attention is paid to the pain syndrome, determining the nature of the pain, its location, and degree. First, the dentures are examined in the mouth without removing them. Pay attention to the nature of the occlusal relationships, the degree of fixation and stabilization of the prostheses. Identified deficiencies are eliminated by correcting occlusal contacts and activating retaining elements. Then the prosthetic bed is carefully examined. Identified areas of hyperemia of the mucous membrane, erosion or ulcers are outlined with a chemical pencil and transferred to the base of the prosthesis, which are ground off. Currently, the domestic industry has mastered the production of special indicator paste. The paste is applied to the area of the damaged mucous membrane, covered with the prosthesis and leaves an exact visible mark on the base, indicating the area of necessary correction. If there is a contrast between the abundance of the patient’s complaints and the absence of visible pathological changes in the mucous membrane, they find out whether the patient has previously used similar designs of dentures, conduct a detailed conversation with the patient about the complexity and individuality of the process of adaptation to removable dentures, and explain the rules for their care and use.
There is no consensus among experts regarding the need to remove dentures during night sleep. On the one hand, removing removable dentures at night in cases where there are single preserved teeth in the mouth with damaged supporting apparatus can lead to their injury and subsequent rapid loss. On the other hand, constant compression of the vessels of the submucosal layer by the base of the prosthesis can lead to deterioration of tissue trophism and increased atrophic processes. Therefore, in each specific case, the doctor must choose the most optimal option for the patient. When treating patients with removable dentures, complications may arise due to medical errors and technical errors or due to side effects of the denture material. In these cases, patients may present the following typical complaints: unsatisfactory fixation of prostheses; violation of diction; pain or burning; breakage of prosthetic parts; aesthetic defects.
Fitting Features
Tissue factors
• Bone or soft tissue obstructions, combined with misdirected force, prevent normal crown retention. This especially applies to the mucous membrane of the palate in the frontal area. • Targeting or flap of soft tissue may be required to detect obstructions. • In some cases (upper anterior restorations), not only gingival reamer and oblique release incisions may be necessary, but also removal of the lunate fragment of the palatal mucosa.
Interdental contacts
•
All interproximal contacts of integrated restorations must be passive.
If the contacts are too tight, the orientation, fit and operation of the locking mechanism are disrupted.
• An orientation (bite) template facilitates the correct positioning of the restoration. However, before fixation, it is necessary to evaluate the aesthetic and functional characteristics, on which the final position of the crown depends. • In maxillary anterior restorations, special attention should be paid to passive interproximal contact
and proper orientation of the post relative to the implant site.
If the abutment is not oriented correctly, tapping will cause deformation of the implant bed.
Fixation force
• Use a special sizing tray to make a bite guide. The template is especially important when restoring the upper front teeth. • To fix the crown, tap it several times with a hammer (250 g). It is extremely important to direct the force along the long axis of the abutment and implant site. • Do not tap crowns until you are sure the force is aligned with the long axis of the implant site. The displaced force will cause permanent deformation of the abutment and implant.
Abutment Post and Implant Site
• Do not handle the abutment post with your hands or tools. Any change in its contours or contamination can lead to retention failure. • Incorrect implantation technique can compromise the integrity of the implant and interfere with the restoration. • Deviation of the integrated restoration from the long axis of the abutment and implant (eg due to bony obstructions) may cause deformation of the implant site and prevent placement of the restoration. • To achieve the best retention of the abutment to the implant, it is recommended to slightly rotate the abutment within the implant site (clockwise and counterclockwise) and then tap the crown several times in the long axis direction.