9356
An impression or cast of teeth is necessary in the process of prosthetics of any elements of the dentition.
Also, orthodontics cannot do without the use of impressions when creating alignment or bite-correcting systems.
It is used to produce the most precise orthopedic and orthodontic devices.
general description
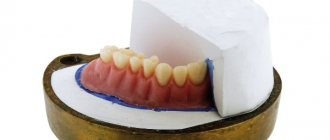
An impression is an impression of one or all elements of the dentition, according to which models of future designs for prosthetics are cast in laboratories.
The scope of application of impressions is orthopedic dentistry. When taking an impression, the specialist uses impression trays, as well as various types of materials - plaster, silicone, etc. Impressions are made before making corrective devices.
Casts are also used for aesthetic purposes, such as bleaching units. Silicone mouth guards are made based on tooth imprints, which are used to perform remineralization restoration of elements.
Using impressions, you can make a diagnostic model and determine the type of dental disease.
How much does a dental service cost?
Average cost of work in Moscow clinics:
| Name of service | Cost, rub.) |
| Impression using alginate material | from 300 |
| Using polyvinylsiloxane or silicone material | about 500 |
| Taking a digital impression using the Omnicam camera (1 jaw) | from 600 |
| Using A-silicone | 1000-2000 |
| Creating a custom spoon (hard) | 1500-2000 |
Types of impressions
Impressions are divided into anatomical and functional. In the first case, the construction is manufactured without taking into account the characteristics of the tissues that are located on the border of removable dentures.
In the process of creating functional structures, medical instruments are used, selected in accordance with the individual characteristics of the patient.
Due to this, the mobility of the soft tissue folds located on the border of the implantation bed is reflected on the impression. A functional impression is indicated for patients who have lost all or part of their teeth.
Functional type products are classified into types:
- Compression. Used to take an impression of the lower jaw.
The products reflect the relief of the base of the prosthesis and allow you to redistribute the load during chewing over a larger area of its base. Due to this property, premature atrophy of bone structures is prevented. To make a compression print, materials with high viscosity values are used. - Unloading. The base of the prosthesis made from the unloading cast will have the shape of uncompressed mucous membranes.
This type of device is recommended for people whose professional activities involve speaking. The load during chewing will be distributed unevenly due to the mismatch between the relief of the bone tissue and the base of the prosthesis. - Combined. Necessary for creating devices that compress the pliable and unload the sedentary areas of the mucous membranes of the mouth located in the prosthesis area.
Thanks to differentiated impressions, implants are created that provide an even load during chewing or speaking.
How to install braces inexpensively?
Of course, everyone wants to have beautiful, straight teeth. But in the pursuit of the perfect smile, not the least important question is where the installation of braces in Moscow is inexpensive. The compulsory medical insurance policy does not include bite correction and teeth straightening, which means you have to pay for them. Orphans, disabled children, and children with congenital jaw pathologies have the right to preferential treatment. Free installation of braces in the clinic is provided for patients injured due to medical errors.
You can use tricks and look for great deals at dental clinics. Often, braces are offered as a gift during orthodontic treatment. There are also gifts from trial batches of new products. Many clinics actively use savings systems. The bonuses accumulated over the year may well be enough to pay for braces. The most profitable offers are in the turnkey format.
It is immediately clear how much you will have to spend, and in the future - to avoid mark-ups.
However, be prepared for serious financial costs. Orthodontic treatment is not quick; it takes from 1 to 2.5 years to correct a bite. The most economical braces are metal, from 15,000 rubles. Ceramic models will cost more - from 35,000 rubles and sapphire - from 40,000 rubles. For invisible lingual braces you will have to pay significantly more than for vestibular models - from 100,000 rubles. All prices are for installing braces on one jaw.
.
Material groups
All materials used to make impressions are hypoallergenic.
The domestic industry offers 3 types of materials for creating impressions - hard, thermoplastic and elastic.
Solid
Gypsum is most often used to make the structure. It consists of a powder diluted with water and contains:
- calcium sulfate;
- borax;
- starch;
- hemihydrate
The hardening process of gypsum is easily controlled by introducing additional amounts of borax and calcium sulfate.
The material mixes easily, the main thing is not to trap air during the procedure. Otherwise, pores will form on the surface of the material.
The hardening time of the plaster impression is 2-3 minutes. The mixture is characterized by low viscosity and good spreading over the surface of mucous membranes.
Among the advantages of gypsum it should be noted:
- reproduction of the relief of soft tissues with high accuracy;
- ease of use;
- maintaining original dimensions;
- possibility of delayed production of a plaster model.
The disadvantages of the material include:
- increased rigidity;
- the impossibility of creating an imprint from those parts of the tooth that are located close to the surface of the gums (undercuts);
- Patients have a feeling of dry mouth after removal of the impression.
Among the hard materials used to create an impression, dentol should also be noted. The material is a mixture of guaiacol and zinc oxide eugenol.
Advantages of Dentol:
- low degree of shrinkage and deformation;
- the ability to create accurate impressions of the surface of teeth and soft tissues;
- possibility of long-term storage;
- harmlessness.
Is it always necessary to file teeth before installing braces?
Learn more here about how braces work.
At this address https://orto-info.ru/ortodonticheskoe-lechenie/podgotovitelnyiy-period/separatsiya-zubov.html we will tell you what teeth separation is.
Elastic
Elastic impressions are divided into 3 groups - silicone, alginate and thiokol. The basis of these materials is agar.
To ensure product strength, fillers are added to the impression mass. When heated, materials become soft, and when cooled, they become elastic.
Analginate products include novalgin and stomalgin. The design is characterized by a high degree of elasticity and a clear recreation of the contours of the prosthetic bed.
In dentistry, prostheses for jaws with partial absence of teeth are made from this material. This type of cast is characterized by a significant degree of shrinkage, so they are not suitable for long-term storage.
Sodium alginate, which is part of the material, allows you to easily separate the impression from the prepared model.
Silicone materials are made from liquid polymers mixed with a hardener. Silicone is used in the manufacture of:
- porcelain crowns;
- metal-ceramic and bulge prostheses.
Silicone impressions shrink on average 3 hours after production. Therefore, the creation of models occurs no later than this time.
Thiokol prints in dentistry are used for the same purposes as silicone prints. The advantages of these products include a low degree of shrinkage, and the disadvantages include the difficulty of obtaining the required shape.
Thermoplastic
Thermoplastic impressions are produced in the form of disks with a diameter of 100 mm. The material begins to melt at a temperature of 50-70 degrees.
Thermoplastic products include gutta-percha and wall. Among the negative properties of thermoplastic, the following should be highlighted:
- difficulty in making models;
- lack of “delay”.
There are 3 types of thermoplastic masses:
- No. 1 – used to take impressions of jaws that do not have teeth;
- No. 2 – used in orthopedics to take maxillofacial impressions;
- No. 3 – used for the production of pin teeth and splints.
Advantages of thermoplastic:
- separates well from models made from them;
- amenable to metallization;
- can be repeatedly introduced into the patient’s oral cavity;
- suitable for performing functional tests.
Modeling
Modeling materials include various types of wax - casting, base and for inlays. In dentistry, modeling impressions are used in the process of creating metal prostheses.
Inlay materials are used to create locking fastenings in combined type prostheses.
Casting wax is used in the production of thin dentures, and base wax is used for modeling temporary bridge models.
The advantage of the materials is a clear display of the contours of teeth and soft tissues. Lack of wax means a high risk of deformation.
More details about the materials and devices used are described in the video.
Do-it-yourself prosthesis repair at home
The best way to repair a prosthesis is to contact a specialized laboratory technician. He will not only eliminate the defect, but also carry out preventive cleaning and correct the unbalanced basis. But situations arise when a visit to the dentist is simply impossible, so you can repair the structure at home.
The success of the procedure depends on the cause of the breakdown:
- poor quality and dentist errors;
- wear and tear of the material after the end of its service life ;
- abuse of crackers, nuts;
- gum subsidence.
At home, you can fix minor damage: a loose artificial molar, a chip on the base or a crack on the base. If deformation occurs due to subsidence of the gums, the appearance of a tumor or frequent inflammation, it is necessary to apply for a full correction of the prosthesis. Broken support pins and cemented crowns cannot be repaired with your own hands.
Features of pharmacy adhesive for dentures
You can repair a cracked removable denture using pharmaceutical glue (Coracryl and Protacryl-M). These are special formulations that have a number of advantages:
- do not provoke allergies;
- do not react with saliva and food;
- do not degrade the quality of the prosthesis;
- eliminate damage for a long time.
Read Dentures with suction cups - how to use them, storage and care of such dentures
The product in two bottles can be purchased in special stores. They offer entire kits for urgent repair of denture structures. They contain varnishes and wax polymers that are safe for mucous membranes, which reliably and quickly glue the edges of the crack without deforming the base.
How to use it correctly?
To prepare the glue, you need to mix a little liquid from each bubble in a 2 to 1 ratio and place it carefully. The crack on the prosthesis is carefully rubbed and sanded to eliminate unevenness. Using a miniature spatula or syringe, apply a thick layer of glue to the defect. The polymer lamp speeds up the curing process. After complete drying, it is necessary to remove the tubercles and remove the seal, making sure there are no sharp corners.
Why can't you use ordinary industrial glue?
To repair artificial teeth with your own hands, you must use only high-quality materials. Conventional glue for working with plastic is attractive due to its low price and availability, but has a number of serious disadvantages:
- may corrode acrylic or nylon soft base;
- provokes deformation and curvature of the base;
- causes an allergic reaction;
- leaves a specific taste.
Household glue often contains dangerous toxic compounds. With saliva, they enter the esophageal mucosa and provoke inflammation of the stomach walls, corroding them. This can cause painful gastritis or ulcers.
Basic requirements for products
In dentistry, there are a number of requirements for impressions:
- products must accurately follow the contours of the soft tissues that will come into contact with the prostheses;
- when removed from the oral cavity, the print should not be deformed;
- during storage, the impression should not shrink significantly;
- materials used to create the product must be disinfected without loss of quality;
- The print must be freely separated from the model made from it.
Adaptation after installation of braces
The first days after installing braces are the most difficult. May have problems.
- Teeth hurt after installing braces.
- The mucous membrane is irritated.
- Diction has worsened.
- Difficulty chewing food.
- Braces interfere with the tongue.
All of the above is a natural reaction of the body to foreign objects. Teeth begin to move in the right direction immediately after treatment begins. It's painful, you'll have to be patient for a while. After installing braces, how much your teeth hurt is the most common question for an orthodontist. If he calculated everything correctly, after a few days the discomfort will decrease. If you can't stand it, take a painkiller. Continuous unbearable pain is a reason for an immediate visit to the doctor.
Pain after installing braces can be caused by irritation of the mucous membrane, in this case orthodontic wax will help. If there is strong pressure from the staples on soft tissue, rinse your mouth with a solution of 1 teaspoon of regular salt per glass of warm water. It is better to treat wounds in the oral cavity with disinfectants.
Gradually, the teeth will change their incorrect position, and the orthodontist will change the metal arch. After this, pain may appear again for a few days, but not as severe as on the first day after installing braces.
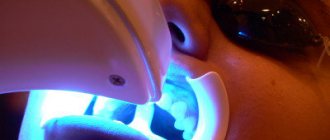
Oral preparation
The specialist begins creating an impression immediately after selecting suitable material and medical instruments. Before making an imprint, the bony organs of the oral cavity are dissected.
After this, the mouth is thoroughly dried with cotton swabs or a dental gun. Then the doctor kneads the materials he has chosen.
With complete adhesion, which is often observed in older people, the bone structures of the jaw undergo some changes.
In places where elements are missing, growths - exostoses - can form. The impression is taken after surgical removal of all bone growths.
Indications for correcting defects using orthognathic surgery and patient reviews about the effectiveness of the radical method.
In this article we will find out whether it is possible to put braces on crowns.
Here https://orto-info.ru/sistemyi-vyiravnivaniya-zubov/breketyi/kak-mozhno-tselovatsya-otkrovenno-o-sokrovennom.html read whether braces interfere with kissing.
Pain during the procedure
Often adults and children are interested in the question of whether it hurts to make impressions. Since during this process the nerve endings in the teeth are not touched, there is no pain.
But some people still experience discomfort. This happens when, after inserting a spoon, the gag reflex is activated. To prevent this reaction, the dentist first inserts the spoon several times and touches it to the roof of the mouth. Repeating these actions allows the patient to get used to the new sensations. Sometimes, as a distraction, a person is recommended to rinse his mouth with cool water after each time he removes a spoon - this helps him not to concentrate on unpleasant sensations.
If all these methods do not help overcome the gag reflex, then the doctor uses special freezing sprays for the mucous membrane, which temporarily dull sensitivity and allow all the necessary actions to be carried out.
Removal methods
The doctor selects the spoons with which the impression will be made, focusing on the shape of the patient’s jaws.
Orthopedists have a standard set of spoons in their arsenal, differing in size. Using fitting, the required tool number is determined.
Taking an impression is usually performed in several stages:
- First, a thick paste is applied to a tray lubricated with an adhesive substance and an impression is taken. Manipulations are performed before preparing the elements in order to leave room for the corrective composition.
- After tooth preparation, the gum pockets of the supporting elements are expanded. Retraction threads, pre-impregnated with vasoconstrictor compounds, are inserted into these grooves.
- To stop bleeding from the periodontal pockets and fix the retraction threads, a cotton cylinder is placed into the prepared element.
- The patient closes the teeth to ensure the gum pocket is dry.
The first layer of the print is shaped like the spoon with which it was made.
A layer of paste located on the top of the palate and along the edges is removed from the cast. This ensures free insertion of the impression into the oral cavity.
Intergingival partitions are also eliminated to eliminate the risk of squeezing the papillae located between the teeth.
The first layer of the product is thoroughly dried and filled with clarifying compounds. The impression is again filled with corrective pastes and left until completely dry. After this, the product is removed from the patient’s mouth.
There is another method for obtaining a dental imprint:
- First, the specialist fills the dental tray with the basic composition, and then with the corrective one.
- The correction paste is applied to the prepared units using a syringe.
- A dental tray with two types of pastes is inserted into the oral cavity to obtain an impression.
For one-step impression taking, silicone masses are used. Despite minor deformation and shrinkage, the resulting prints must be used within several hours.
The video shows the process of taking dental impressions.
Process of creation
Making an impression begins with selecting a suitable spoon. It can be standard, customized or converted from a standard one.
In particular, the edge of a standard spoon may need to be lengthened or shortened. A properly selected tool makes it easier to obtain a high-quality impression.
Basic parameters that must be observed when selecting a spoon.
- The distance from its side to the teeth should be at least 3-4 mm. Too small a distance can lead to the transition of elastic deformation into plastic deformation when taking an impression, and the unsuitability of the impression.
- The convexity of the spoon should be approximately the same distance from the palate.
- For a low-frequency spoon, the lingual edge should be higher than the outer one.
Further, after selecting a tool, actions are performed in the following sequence:
- The edges of the tray are covered with adhesive plaster , the inner area is coated with a special adhesive that ensures the impression mixture sticks to the tray.
- corresponding to the clinical picture is selected
- Kneading. In a special mechanical mixer or on a surface suitable for mixing - coated or waxed paper, glass - the material is kneaded in strict accordance with the instructions.
Cartridges with mixing tips pre-filled with mixtures can also be used. - The patient's mouth is rinsed with an antiseptic.
- Place the prepared mixture flush with the edges of the spoon.
Additionally, places in the oral cavity are coated where the mixture flows with difficulty, and there is a danger of the formation of zones with air - the vestibule of the mouth, the vault of the palate, the alveolar tubercles at the HF and the sublingual space at the LF. - The corners of the mouth are covered with cream or Vaseline.
- The spoon is placed in the mouth with the left side, pushing away the corner of the mouth. Then the right corner is pulled back with the instrument, and the entire spoon is placed in the mouth in the row projection with the handle located along the midline of the dentition.
Then the mixture, starting from the posterior sections, is pressed against the dentition. If excess mass is squeezed into the soft palate, it is carefully removed with a mirror. - The patient's head should be held upright or tilted forward during the procedure . This is necessary so that the mass with saliva does not flow into the larynx and a gag reflex does not occur.
- Supporting the tray with his right hand, the dentist forms the outer edge of the impression with his left hand. To ensure the correct formation of the lingual edge of the LF, the tongue rises and moves forward.
- When the mass hardens (time according to the instructions), the impression is pulled off the teeth with the index fingers inserted into the lateral zones of the vestibule of the mouth. At the same time, press with your thumbs on the handle, removing the spoon from your teeth. You need to remove it carefully so as not to hit the teeth of the other jaw with the spoon.
The impression is considered good if the relief of the teeth and alveolar process is accurately imprinted, and there are no pores or blurriness.
Typically, impressions of the HF and LF are taken sequentially - first from one jaw, then from the other. But there is a technique in which an impression is taken simultaneously from both jaws.
From the moment the impressions are taken to the installation of the brace system, it can take from 1 week to a month, depending on the type and severity of the anomaly.
The video describes the entire process of taking an impression for braces.
Price
The price of a print depends on the following factors:
- Features of the pathology. For example, in edentulous cases, individual dental trays are required to make impressions. This increases the cost of the procedure.
- Type of material. Typically, specialists do not use expensive raw materials when cheaper materials, for example, alginate, can be used.
On average, casting a plaster model will cost patients 300 rubles, and making an alginate impression costs the same. A silicone impression will cost more – from 550 rubles.
Why is a dental impression made?
A dental impression is the basis of the future prosthesis. You can make a plaster model only with a high-quality cast. The model, in turn, is used to create complex orthopedic structures.
They are used for the production of:
- removable or fixed dentures;
- crowns;
- bridges;
- individual abutments.
- braces used for malocclusion;
- trainers, is also used in the treatment of malocclusion.
The more complex the orthopedic design, the more accurate the impression must be made. Errors when transferring an impression into plaster and subsequent digitization can be so great that the adjustment of the prosthesis is carried out in several steps. A 3D dental impression is completely free of this drawback.