These materials for molding jaws or individual teeth help dentists in prosthetics. They are designed to be convenient for both the patient and the doctor. The main task of alginate is to most accurately reflect the shape of the patient’s prosthetic bed. What are “alginates”, how do they differ from the means previously used in dentistry for taking dental impressions, their pros and cons - we will talk about this further.
Before the advent of alginate, dentists used plaster of Paris. However, it has both advantages and disadvantages. For example, the disadvantage of gypsum is that it is difficult to remove from the oral cavity. In addition, the plaster often broke when removed. Fortunately, it was replaced in the early 40s of the 20th century by elastic and elastic hydrocolloids. The mentioned alginates belong to them. This innovation is making a real splash in prosthetics and makes life much easier for dentists who were previously forced to painstakingly tinker with plaster. Finally, the possibility of taking entire oral impressions with undercuts has become a reality. Now dentists are actively using a variety of advanced mixtures based on alginates.
One-step impressions with alginate impression materials
Single-stage impressions save time, but obtaining impressions cannot be rushed, but excessive slowness can also cause an unforgivable error, which is especially applicable to alginate impression materials. Prolonged mixing of such materials by an inexperienced doctor will lead to the material becoming elastic before it is introduced into the oral cavity. Therefore, the time for mixing alginate should be limited to 30-45 seconds (depending on the instructions of the material manufacturer), which is achieved by active movements in which the powder and water are rubbed into the sides of the rubber flask, which, for the convenience of such movements, lies with its side surface in kneader's palms.
After filling the tray with impression material, it is inserted into the oral cavity at an angle, retracting the cheek, and positioned so that the center line of the tray and jaw coincide, and the dental arch corresponds to the center of the arch of the impression tray. After the tray is positioned, it is applied to the tissues of the oral cavity, while on the upper jaw, the distal part is first applied and, pushing back the cheeks and upper lip, they continue to be applied in the medial direction, while observing that excess material extends beyond the sides of the tray , adapted to the gum and transitional fold. While the material is in the plastic phase, the edges of the impression are shaped using active and passive movements and functional tests.
| Retracting the cheek with a finger, a spoon with impression material is inserted at an angle into the patient’s oral cavity |
Next, the impression must be removed from the mouth so that it is safe for both the patient and the impression. Since alginate is quite elastic, its separation from tissues is not difficult. To minimize deformation, the impression is removed from the tissues of the prosthetic bed with a finger placed behind the distal edge on one side, pressing on the impression and separating it from the mucous membrane and teeth, or the patient is asked to cover his mouth and the resulting movements of the mucous membrane can disrupt the vacuum between the tissues and the impression, making it easier to pull it out by the handle of the spoon.
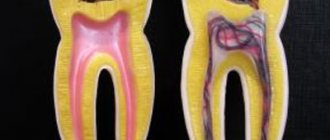
What are “alginates”
Alginate materials are produced on the basis of alginic acid, which is a product of the processing of seaweed. Alginic acid does not dissolve in basic organic solvents, including water, but alginates of its salt still readily dissolve in water, releasing viscous sol-gel substances. It is this property of alginates that allows them to be widely used in production.
One-step impressions with elastomeric impression materials
One-stage impressions with elastomeric impression materials and the technique used to work with them pose a more complex task than making impressions with alginate materials. This is primarily due to increased quality requirements, since elastomeric materials are mostly used to make impressions for fixed structures, implant-supported structures or complete removable dentures, which are more sensitive to impression inaccuracies, and sometimes are not at all forgiving of mistakes.
However, obtaining one-stage impressions is less difficult than two-stage ones, and at the same time they have a quality that is sometimes superior to that of the latter.
Most often, two-phase impressions are obtained from one-stage impressions, in which the polymerization of the base and corrective layers of the impression material occurs simultaneously. In this case, the corrective impression mass can be applied either directly to the teeth and surrounding tissues, or on top of the base impression material.
A-type silicone materials and low-viscosity polyester impression materials (corrective), in addition to the standard form of release in tubes, are produced in cartridges with separate sections for the base portion of the material and the catalyst paste. To work with such cartridges, special dispensers are used. With the help of a thin nozzle tip and an easy-to-use dispenser, a corrective portion of the material can be applied not just directly to the teeth and soft tissues, but purposefully and dosed in the most inaccessible places: in the periodontal sulcus and cervical area with the preparation border and in the interdental spaces. After application on top of the base layer, which has a high viscosity, the corrective material adheres even more precisely to the tissues and the polymerization processes in two layers of material occur simultaneously. The fact that the polymerization processes in the corrective and base masses occur simultaneously has valuable functional significance. In this case, the materials at the moment of contact and change in the spatial dimensions of each other are in a fluid state and do not have the property of elasticity, so the materials harden in the newly obtained shape, which is why the final picture is not distorted. The opposite can happen when receiving a two-stage impression, when the corrective layer, with a lack of space between the tissues and the hardened base material, begins to press down, including the latter, which, after removing the impression from the oral cavity, restores its previous spatial parameters, but deforms the impression, which is why it makes it the quality is unsatisfactory for further work.
| When choosing an impression tray, first of all, it is determined whether it belongs to the upper or lower jaw and whether it corresponds to the jaw size of each individual patient. | ||
| When mixing by hand, it is important to achieve homogeneity of consistency and color. | |
| The tray is filled with impression material a couple of millimeters above its sides. | |
Regardless of the method of obtaining a one-stage elastomeric impression, as well as a two-stage one, it must be remembered that the method of applying a tray with material to tissue differs significantly from that with alginate impression material. When applying a tray with alginate impression material, the tray is applied unevenly in such a way as to track the release of excess impression material and not cause inconvenience to the patient and accurately remove the transitional fold. When applying a spoon with an elastomeric material, the logic is radically different. Elastomeric impression materials, and in particular high-viscosity base materials, which are always present in the tray, have significantly less elasticity than alginate ones, as a result of which deformations during insertion and removal of the material are more significant for elastomeric materials. In addition, taking impressions with elastomeric materials primarily aims to accurately depict the dentition and soft tissues adjacent to the teeth, and the display of the transitional fold does not play a role, except in the case of taking impressions from edentulous jaws using an individual tray and a corrective (rather than the basic) impression material. Also, elastomeric materials are not as fluid as alginate materials and are not introduced into the oral cavity in such quantities. All this affects the process of applying the material to the tissue of the prosthetic bed.
When applying elastomeric impression material, the planned route of insertion of the prosthesis is important, since taking this parameter into account, the residual deformation of the impression can be significantly reduced. The material is introduced according to the route of insertion of the prosthesis, which is determined by the inclination of the teeth holding it. Although the principles of preparing teeth for fixed structures imply the absence of undercuts, they can be caused by the inclination of the teeth, which is why in bridge-like or splinting structures it is so important to maintain the parallelism of the axes of the prepared teeth, but these undercuts can also be caused by the deformation of the impression material, which does not yet have elasticity, and Even with sufficient and adequate force applied to the impression tray, the base impression material may not fully press the corrective mass into the empty spaces. Therefore, you should not rush to quickly apply the material to the tissue in order to avoid its hardening, but, on the contrary, foresee in advance the most favorable and simplest route for introducing the material and only then advance the spoon to the tissues of the prosthetic bed.
| You should not put pressure on the tray during the entire time of taking the impression, but simply hold it with your fingers after application. Excessive pressure will be uncomfortable for the patient and will negatively affect the quality of the impression. | |
After the material has cured, it is necessary to properly separate the impression from the tissues and then remove it from the oral cavity. The finite rigidity of elastomeric materials sometimes adds additional difficulties in this process, and can also cause inelastic deformation, which will lead to unsatisfactory print quality. To avoid such a mistake, it is also necessary to take into account the inclination of the teeth and the path of application of the prosthesis and separate the impression in such a way that deformations in this area are minimal, since they cannot be avoided 100%. To do this, in the absence of a pronounced inclination of the teeth, the impression should be evenly separated from one side and the other in turn. If there is a pronounced lingual or palatal inclination of the tooth, the impression must first be separated from the side of the prepared tooth or several teeth, since with such separation of the impression, like a lever with a support on the opposite side, it will tilt towards the lingual side, which to some extent compensates for the resulting deformation. When the teeth are inclined buccally, the opposite side should be separated first, since the rotation of the fulcrum, which in this case will fall on the area of the prepared teeth, will also be directed to the buccal side. The same logic applies to the labial or palatal and lingual inclination of the frontal group of teeth, when it is preferable to apply force to the handle of the spoon with a palatal or lingual inclination, or first separate the tray with impression material in the area of the chewing group of teeth with a labial inclination.
Usage
First, you should carefully select the impression tray. Since plastic spoons should not be used when working with alginate masses, it is better to choose a plastic product for the job. Moreover, the size of the spoon should be such that the impression in the thinnest place is less than five millimeters. The adhesion force to the spoon material is not enough for alginate materials. Mechanical retention is usually used.
Taking an impression
There are mixing systems that make the job easier and the result more consistent, however, they do not improve the quality of the finished material.
Thus, the stages can be distinguished:
First you need to shake the powder to mix it well. Then pour the required amount of water into the container. Then add powder, the amount of which is consistent with the instructions. Mix. Stir the mixture for 30-40 seconds. The finished mixture is placed in a spoon, and the paste layer should be more than five millimeters thick. A spoonful of the mixture is then placed into the patient's mouth to make an impression. And finally, only after this the finished impression is taken, which is controlled by the dentist, cleaned and disinfected.
In order for the impression to be of high quality, it is necessary to follow the ratio of mixture components specified in the instructions for the preparation. The product also comes with dosage containers, which are best used when mixing. If the water is harder than distilled water or the water temperature during mixing exceeds 23C, then the mixture processing time should be reduced.
Two-stage impressions
Two-stage impressions essentially differ from single-stage impressions not so much in that the impression tray is brought into the oral cavity twice, but in the rule that a larger thickness of the layer of polymerizing material has a greater degree of shrinkage than a smaller thickness of such a layer. Therefore, the two-stage technique offers a smaller layer of impression material, which gives less shrinkage, and the high fluidity of the corrective mass determines the high quality of the resulting impression. In this case, an impression using only the base impression material, the production of which is the first stage, is a kind of individual impression tray, which makes it possible to reduce the thickness of the simultaneously polymerizing layer of impression material, which will be the corrective impression mass.
The first stage and the principle of obtaining the base layer of the print are half similar to the method of obtaining a one-step print. Half because it is more important to correctly place the tray with the impression material on the tissue, while separating and removing it does not require such care to avoid deformation - only for the patient’s comfort. In addition, you should not wait for complete polymerization of the material, since, while maintaining plasticity, deformations will help create additional space for the corrective layer of impression material. Plus, at this stage you can further loosen the impression a little to create more space for the impression material.
| At the stage of obtaining the base layer of a two-stage impression, the correct location of the teeth relative to the sides of the tray is important, and not the accuracy of the display |
In the resulting impression, using a sharp instrument, the interproximal septa are removed and additional grooves are created for the outflow of excess corrective material. At this stage there is a danger of creating insufficient space for the flowable impression material. From a theoretical point of view, what complicates the situation is that different studies provide different conclusions: some of them indicate that creating grooves to remove excess material does not affect the quality of the impression, but in practice these same excesses can cause the inferiority of the impression. In addition, the need to create additional space is indicated by the fact that in practice it is extremely difficult to position the print exactly in the same place. The quality of the two-stage print is also indicated by the uniformity of the color of the correction layer, without pressing through the base layer, which will indicate a high probability of deformation. Therefore, the operator’s experience in creating both sufficient and not excessive space for the correction layer is important at this stage.
| There is no need to remove thick interdental septa in the base layer, since a thick layer of corrective mass will lead to large deformations when taking an impression and casting models |
At the second stage, it is important to apply the primary impression with the corrective mass added to it as accurately as possible. This is sometimes difficult, for which you should not spare any effort, but you must be careful not to injure the patient.
After complete polymerization of the material, separation and removal of the impression from the oral cavity are similar to those with a one-step technique.
| After extracting the print, it is necessary to assess its quality |
Features of alginate masks
1. The finer the powder the dry mask is, the higher its quality. If the powder is more like sand, then such a mask will not fit well on the skin and form lumps.
2. A gel alginate mask does not dry out like a powder mask and is washed off with just plain warm water. It is convenient to take it on the road or use it in cases where it is not possible to dilute powder.
3. There are practically no allergies to alginate masks. They contain only one allergen - iodine, extracted from algae. Therefore, if you are allergic, but you are not allergic to iodine, then feel free to use alginate masks - everything will be fine.
Beneficial features
Alginate masks have the following positive effects on the face:
- relieve inflammation;
- nourish the skin and restore its protective function;
- constrict blood vessels, causing minor irritations to disappear;
- remove harmful substances;
- normalize the balance of minerals at the cellular level;
- break down excess fat, which effectively eliminates double chin;
- improve complexion;
- eliminate swelling;
- get rid of wrinkles and folds;
- make the skin elastic and smooth.
To get only the benefits of the procedure, you need to properly prepare the product and know how to dilute the alginate mask.
Reviews
The opinions of women who have tried to use an alginate mask at least once are only positive.
They all agree on one thing: the product has an excellent effect after the first procedure. The skin becomes elastic, the facial contour is tightened. This allows women to feel much younger.
In combination with other cosmetic products, this mask provides a noticeable increase in the effect.
An alginate mask is a product that has a positive effect on the skin, it is affordable and can be used at home. Regular use of the described mask will help you maintain beauty and youth for a long time.
Advantages
Before diluting an alginate mask, you need to know about some of its advantages. So, it is suitable for any skin type. It has virtually no contraindications. After using the product, the positive effect will instantly be reflected on the skin. In addition, the advantages of the mask are:
- Guaranteed positive result. Wrinkles and folds are smoothed out. Skin looks fresher and more elastic. Pores become smaller.
- Availability of the product. Powder for making a mask can be bought at any pharmacy.
- Such cosmetics are a conductor of beneficial substances. They greatly enhance the effect of various tonics, serums and creams.
The product has great benefits. A similar procedure is carried out in any beauty salon, because the positive effect of its use is immediately noticeable.
Before preparing the product at home, you need to familiarize yourself with the intricacies of the process. And then we will find out how to properly dilute the alginate mask.
Indications for use
Alginate mask is used in the following situations:
- Dry, oily or atonic skin.
- Age-related changes in the dermis.
- Premature aging of the skin.
- Large pigment spots.
- Dermatoses.
- The presence of scars, cicatrices and stretch marks.
- Cuperosis.
- Excess body fat.
- Acne treatment.
In order to get rid of these skin problems, you need to properly prepare the product and apply it to your face. But before you figure out how to dilute an alginate mask at home, you should find out its types.