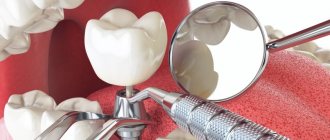
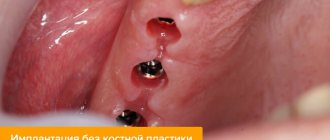
Single-stage dental implantation is the implantation of a titanium root into the bone immediately after the removal of your tooth. In this case, bone augmentation is not required (as with the classical scheme), since after the removal of one’s tooth, the volume of hard tissue is quite sufficient. The procedure for implanting a titanium pin is performed in one visit to the dentist, but the patient will still have to visit the office several times: for diagnostics, replacing the temporary crown with a permanent one, and monitoring the healing process.
Basic conditions for immediate implantation
- sufficient volume of bone tissue;
- satisfactory condition of the gums and other dental units, absence of carious lesions and inflammatory processes;
- the presence of strong teeth near the implantation site, since during the healing of the implant, neighboring teeth will have to withstand a greater chewing load.
Note! Before the immediate installation of a new tooth, the patient must undergo a series of diagnostic measures so that the doctor can make sure of his health and physical resources for a quick recovery.
Price
- Primary appointment (examination, consultation) with a dentist (special offer) 100001
For free
Promotion
- Simple tooth extraction 160001
1 900 ₽
- SGS implant + turnkey crown
24 900 ₽
Promotion
- Osstem implant + turnkey zirconium crown
29 900 ₽
Promotion
- Astra Tech implant + turnkey zirconium crown
59 900 ₽
Promotion
- Nobel implant + turnkey zirconium crown
59 900 ₽
Promotion
- Straumann implant + turnkey zirconium crown
59 900 ₽
Promotion
Single-stage implantation is a procedure for installing an implant immediately after tooth extraction. Combining two operations shortens the treatment by 4-5 months - no time is required for the formation of bone tissue in the resulting hole. The crown can be placed immediately or after the implant has healed, depending on the location of the defect in the dentition.
Indications and contraindications for simultaneous extraction and implantation of teeth
- restoration of one or more teeth;
- correction of dental problems in people whose professional activities involve constant contact with people;
- narrow ridge of the alveolar process, etc.
Note! There are many contraindications for performing the operation. Read them carefully and undergo a comprehensive examination to eliminate possible risks.
Main contraindications for immediate implantation:
- young age (up to 16 years);
- cancerous tumors;
- HIV AIDS;
- diseases of the heart and blood vessels;
- connective tissue diseases;
- diabetes;
- somatic diseases;
- diseases of the nervous system;
- renal failure;
- inflammatory processes in the body;
- viral infections;
- pregnancy;
- taking anticoagulants, etc.
Caring for single-phase implants
An important part of rapid rehabilitation and a means of extending the life of dental implants is proper care.
Maintaining oral hygiene prevents the development of pathogenic microorganisms leading to periodontal diseases and impaired implant fixation.
Be sure to brush your teeth in the morning and before bed with a suitable toothbrush and toothpaste. When choosing a brush, the main attention is paid to the softness, elasticity of the bristles, and gentle effect on gum tissue.
After meals, it is necessary to rinse your mouth with clean water, or it is better to use an irrigator that removes remaining food particles from hard-to-reach interdental spaces and the surface of the gums using a pulsating stream of water. Special solutions can be added to the irrigator water to help gently cleanse dental surfaces, relieve inflammation, and accelerate tissue healing.
Careful care of dentures and maintaining oral hygiene can significantly increase their service life.
During the first year after implantation, the patient must visit the dentist monthly to monitor the healing process.
Our experienced doctors will help you quickly and comfortably restore the beauty and health of your smile.
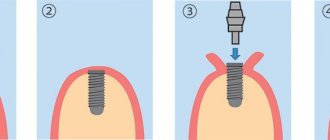
The main stages of simultaneous implantation
- Diagnostics and examination, testing, radiography.
- The dentist performs computer modeling of the future design, makes impressions, and sends the data to the dental laboratory.
- The patient comes for an appointment on the appointed day and is given anesthesia.
- The tooth is removed and a titanium pin is inserted into the resulting hole. Sutures are not applied in all cases - sometimes the wound heals on its own.
- There is a temporary crown on the aba.
- When the artificial root has completely taken root (after about 4 – 6 months), the permanent tooth is installed.
As you can see for yourself, the procedure is relatively time-consuming; the patient will still have to visit the clinic several times to get the ideal result. But in this case, the installation of an artificial root and tooth will take much less time than with the classical method.
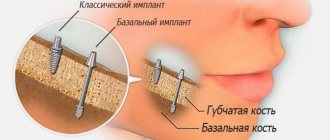
Doctor's advice: an implant can only be installed if the bone size is sufficient.
In all cases, the parameters of bone tissue are taken into account - density, height, width. Only when there is sufficient bone size can an implant be installed with a selected size and shape that can cope with chewing loads in the future. If there is not enough bone tissue, it is impossible to install the “correct” implant.
Levin Dmitry Valerievich
Chief physician, Ph.D.
If the bone dimensions do not correspond to the norm, preliminary osteoplasty is required, followed by installation of an implant according to the classical protocol. If the deficiency is small, a one-step bone augmentation and implant installation is possible.
A high-quality one-stage technique cannot be carried out in conditions of insufficient bone tissue. And it is also impossible to carry out bone augmentation at the same time - the operation is performed through a puncture, the doctor does not have access to the bone, he places the implant blindly.
In addition, with a one-stage protocol, the implant is immediately loaded with a temporary crown, which does not completely compensate for chewing functions. The implant cannot be actively used to avoid displacement. Full load is possible only after engraftment of the titanium root after 2-6 months, as with the classical method.
Complete restoration of chewing ability is no different for the classic and one-stage protocols. One-stage allows you to quickly hide an aesthetic defect, which is only relevant for the front teeth.
Classic implantation lasts longer, especially if the bone is previously built up. But the method is reliable and designed for long-term results:
- an implant of the correct shape and size is selected;
- before engraftment, it is sutured, overgrown with bone tissue, and not loaded—the risk of displacement during chewing is eliminated;
- during installation, the doctor sees the area of the operation and can perform manipulations to adapt the bone to future loads - this is impossible with immediate loading.
One-stage dental implantation pros and cons
The advantages of one-step implantation of an artificial root include the following factors:
- speed of the procedure;
- comfort for the patient;
- the ability to replace an unhealthy tooth with a new, strong one in one session;
- there is no need to perform bone grafting;
- flawless results in one visit to the doctor.
Disadvantages of one-step tooth implantation:
- a large list of contraindications;
- considerable cost;
- with a small amount of bone tissue, the tooth may not stand securely (sometimes bone grafting cannot be avoided);
- the service life of the implant is about 20 years (among the classic analogues, you can select options with a longer service life);
- the structure must still take root - instantaneous loading is not recommended.
Three variants of one-step technology
When the implant is fixed in the patient’s jaw bone, the next phase begins. One of the following scenarios is possible:
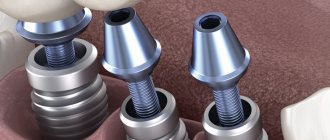
- An abutment (an adapter between the implant and an artificial crown) is fixed onto the installed titanium root, and a temporary (plastic) prosthesis is placed on it. Upon completion of the osseointegration process (3–6 months), it is replaced with a permanent one made of metal ceramics or zirconium dioxide;
- the area where the implant was integrated is sutured and left in this form until the titanium rod is completely implanted. Then an incision is made and a permanent crown is installed;
- a gum former is attached to the fixed implant to create a neat contour (the so-called “pink aesthetics”), and if necessary, a temporary prosthetic structure is fixed.
Which implantation is better, classic or one-stage?
This question is best answered by a dentist who will undertake the operation to remove his tooth and insert a new one. The fundamental difference between a one-step procedure is the simultaneous installation of a new tooth. This method helps to solve the problem of missing teeth in the shortest possible time. Also, the classic procedure is quite traumatic and requires cutting soft tissue. If bone grafting is required, the period of classical implantation is significantly increased. However, the classic has many fewer contraindications than the one-step procedure.
Advantages and disadvantages
Single-phase implantation does not involve extensive intervention. All that is needed is a gap in the gum for implantation. The procedure does not take much time, and the probability of engraftment is 100%. Among the main advantages of the method:
- Minimal trauma to gums and bone tissue.
- Fast adaptation and minimal healing period due to gentle effects.
- The prosthesis is installed immediately or after one or two days.
- Very high survival rate.
The disadvantages include the need for the patient to be 100% healthy at the time of implantation. If there is an infection in the body, the likelihood of rejection increases. In some cases, it is better to use the classic implantation protocol, which involves two stages with breaks for healing.
Video about immediate dental implantation in an aesthetically important area.
Find out about the premium class implantation system at an economy price!
ROOTT implants from Trate AG. ROOTT implant system manufactured by Trate AG.
Risk of implant rejection
Such strict and numerous contraindications are prescribed to minimize cases of titanium implant rejection. Statistics say 2-4%, and this is a very small figure. But doctors are trying to completely exclude it.
The risks of implant rejection with a one-step technique may include:
- poor removal and severe trauma to the gums;
- plaque in the oral cavity - not only on the teeth, but also on the mucous membrane around the hole;
- weak fixation of the implant - porous bone tissue or other prerequisites;
- incorrect selection of a temporary crown and excessive load on the implant.
Immediate implantation is the optimal solution in any clinical situation
One of the pressing problems of dental implantology is the long treatment period. In fact, with the delayed implantation method, the entire course of treatment (from tooth extraction to prosthetics), even under the most favorable conditions, takes at least four months, and more often than not. Not every patient is willing to wait that long. In addition, immediately after tooth extraction, atrophic processes begin to develop in the socket area. The volume of bone tissue decreases and, which is especially noticeable in the aesthetically significant area, the structure and volume of the attached gum changes.
While waiting for the hole to heal, we lose those ideal conditions for implantation, which we then have to recreate using osteo- or mucoplasty.
All this makes immediate implantation (i.e. placing an implant in the socket of a newly extracted tooth) highly desirable for solving these problems. Unfortunately, it is still viewed with skepticism by some implant surgeons, primarily due to the risk of complications. There is also an opinion that immediate implantation has a lot of contraindications, which makes it impossible in most cases.
In this article, using the example of individual clinical situations, I would like to share my own experience and clearly show that immediate implantation is possible in most clinical cases, and the possibilities of using this method are much wider than most implantologists think. I would also like to share some practical nuances that make such treatment as predictable and effective as possible.
Patient selection
When selecting patients for treatment with immediate implantation, we are guided by the same criteria as for classical delayed implantation. In this case, local selection criteria come first, namely:
- absence of acute inflammatory process in the area of proposed implantation;
- a sufficient amount of bone tissue and mucous membrane (the latter is most important) in the area of the tooth being removed.
Consultation with an orthopedic dentist and, in some cases, an orthodontist is required.
Computed tomography and diagnostic models are required. In some cases, a surgical template may be required.
Features of choosing implants for immediate implantation
Currently, some manufacturers (Nobel Biocare, AlphaBio, Biohorizont, etc.) produce separate lines of implants designed for installation in the socket of a newly extracted tooth. As a rule, they are distinguished by large aggressive threads, the purpose of which is to ensure high-quality stabilization of the implant in conditions of a post-extraction defect. However, as my own practice has shown, implants with aggressive threads behave less predictably (Table No. 1).
Table No. 1. Frequency of complications when using implants with different types of thread (Vasiliev S., 2011)
RANGE OF IMPLANTS | THREAD TYPE | NUMBER OF IMPLANTS INSTALLED* | NUMBER OF COMPLICATIONS (PERI-IMPLANTITIS AND IMPLANT LOSS) | % COMPLICATIONS (PERI-IMPLANTITIS AND IMPLANT LOSS) |
| AlphaBio SPI | aggressive | 14 | 2 | 28,6±0.02 |
| Nobel Active | aggressive | 8 | 1 | 12,5 |
| Friadent Xive Plus S | non-aggressive | 60 | 0 | 0 |
| Astratech Osseospeed | non-aggressive | 52 | 0 | 0 |
* Immediate implantation technique.
In my opinion, this is due to two nuances. firstly, large pronounced coils exert strong pressure on the bone tissue surrounding the implant, disrupting the microcirculation so necessary for normal healing; and secondly, loose contact of the implant surface with the socket wall complicates osseointegration and contributes to infection of the implant surface. In other words, the most optimal from a prognosis point of view are screw implants with small, non-aggressive threads. on the one hand, due to the contact area, high-quality stabilization of the implant is ensured, and on the other hand, due to the tight fit, the conditions for infection of the implant surface disappear.
Preoperative preparation and planning
In general, preoperative preparation does not differ from that for delayed implantation. Despite the fact that the presence of a socket and the removed tooth root makes it easier for us to select the size of the implant and position it, in some cases it is necessary to make surgical templates. This is especially true for situations where, for some reason, the teeth being removed have moved (for example, due to the absence of neighboring teeth). Computed tomography during immediate surgery is mandatory, since it allows you to assess the condition of the bone tissue around the tooth socket, accurately determine the localization of the anatomical structures surrounding the surgical area, measure the parameters of the tooth socket and make a preliminary decision on the possibility of immediate implantation.
Prescribing antibacterial prophylaxis will reduce the number of antibiotics taken and reduce the risk of infectious and inflammatory complications in the postoperative period. It is important to know that the decision to install an implant largely depends on the quality and minimal trauma of the tooth extraction operation, so it is made by the doctor only after the tooth is completely removed removed from the hole. The patient is warned about this without fail. In 2012, in two cases out of 183, we were unable to complete the immediate implantation operation due to bone loss during extraction, so we limited ourselves to tooth extraction only. Subsequently, patients underwent delayed implant placement. In some cases, it is advisable to prescribe antibacterial prophylaxis. This will reduce the number of antibiotics taken and reduce the risk of infectious and inflammatory complications in the postoperative period.
Laboratory tests are prescribed only according to indications and, as a rule, involve the need to consult doctors of the relevant specialty (cardiologist, endocrinologist, allergist, etc.). There is no point in prescribing laboratory tests for everyone, since the result of implantological treatment is noticeably affected only by severe general somatic pathology, which in any case requires the attention of both doctors and the patient himself.
Positioning and selection of implants by size
One of the advantages of immediate implantation is the almost complete absence of atrophic changes in the area of operation, as well as the presence of a socket of the extracted tooth, which greatly facilitates the positioning and selection of implants by size. The length and diameter of the implant should correspond as closely as possible to the length and size of the tooth being removed.
The most important is the diameter of the orthopedic platform; the quality of prosthetics and the convenience of further use of the orthopedic structure depend on its size. Below, using examples from my patients, I will try to show the features of immediate implantation surgery in different clinical cases.
Clinical case No. 1
Single-rooted tooth, chronic periodontitis, impossibility of endodontic retreatment and orthopedic restoration due to severe damage to the coronal part (Fig. 1, 2).
Rice. 1. Clinical situation at the time of treatment. Rice. 2. Clinical situation at the time of treatment.
The incision is made along the periodontal sulcus. The tooth is removed using an elevator and beak-shaped forceps. The latter are used only to extract the root from the socket, since when luxating a tooth with forceps, the outer wall of the socket can be damaged, which will seriously complicate the subsequent installation of the implant (Fig. 3, 4).
Rice. 3. Tooth socket after extraction. Rice. 4. Tooth socket after extraction.
The opinion on the need for curettage of the hole after removal is controversial. On the one hand, the remaining periodontal fibers help keep the blood clot in the socket. On the other hand, the presence of fibers can interfere with bone tissue regeneration and, as a consequence, osseointegration of the implant.
I try not to resort to socket curettage unless unnecessary. Because the bone tissue in contact with the implant is in any case processed with cutters and all fibers are cut off. And in those places where the implant does not come into contact with the wall of the socket, periodontal fibers retain the blood clot, and therefore there is no need to fill the space between the wall of the socket and the implant with anything else. It is at this stage that the decision to install an implant is made. If there are doubts about the possibility of primary stabilization of the implant in the existing volume of bone tissue, it is better to refuse immediate implantation and consider a delayed technique. After a visual and instrumental examination of the alveoli, I begin preparing the hole for the implant according to the usual surgical protocol. Using the implant analog included in the Friadent Xive surgical kit, you can check the correct preparation of the socket and the positioning of the future implant (Fig. 5, 6).
Rice. 5. Checking the positioning of the implant using an analogue. Rice. 6. Checking the positioning of the implant using an analogue.
The implant analogue must be firmly held by the walls of the socket, not have excessive mobility and not fall through (Fig. 7).
Rice. 7. The ratio of the sizes of the implant and the root of the extracted tooth.
In this case I use Friadent Xive with a diameter of 4.5 mm and a length of 13 mm. As can be seen in Figure 7, the implant itself is slightly larger than the root of the extracted tooth, but generally corresponds to it. The difference in size allows for high-quality primary stabilization of the implant. The implant is installed in the prepared hole (Fig. 8, 9).
Rice. 8. Installation of the implant in the prepared hole. Rice. 9. Installation of the implant in the prepared hole.
The implant is positioned more lingually and is adjacent to the inner wall of the alveolus. This position is most optimal from the point of view of distribution of the chewing load and aesthetic result (Fig. 10, 11).
Rice. 10. Position of the implant in the tooth socket. Rice. 11. Position of the implant in the tooth socket.
Please note that the implant does not go too deep. Its neck is at the same level as the necks of natural teeth. Excessive implant depth can lead to bone loss and gum recession in adjacent teeth. The question of the need to fill the free space between the implant and the walls of the socket remains open. In my opinion, if you preserve the bone walls of the socket and the intact mucous membrane around it, you can simply wait until the socket is filled with a blood clot.
It itself is an excellent substrate for bone tissue regeneration and does not interfere with osseointegration. A gum former is installed on the implant. Sutures are placed on the mucous membrane (Fig. 12, 13).
Rice. 12. Clinical picture after surgery. Rice. 13. Clinical picture after surgery.
The gum former is installed only on a stable implant. If the primary stability of the implant is in doubt, it is best to close it with a plug and suture the tooth socket using a collagen matrix (Mucograft Seal, Mucoderm, etc.) or using a free mucous tissue autograft. Postoperative examination after 2 days (Fig. 14).
Rice. 14. View of the postoperative wound 2 days after the intervention.
The condition of the mucous membrane in the postoperative area and the gum former require attention. With gentle pressure on the former, there should be no pain, but slight mobility is acceptable. We make sure to warn the patient about the need for careful oral hygiene. The stitches are removed on the 10-12th day. If the course of the postoperative period is favorable, the next examination is carried out immediately before the prosthetic stage (after 6-8 weeks) (Fig. 15-18).
Rice. 15. Clinical picture 8 weeks after surgery. Rice. 16. Clinical picture 8 weeks after surgery. Rice. 17. Clinical picture 8 weeks after surgery. Rice. 18. Clinical picture 8 weeks after surgery.
The patient is sent to an orthopedic dentist to make a temporary crown for the implant (Fig. 19, 20).
Rice. 19. Temporary composite crown on the implant of the 15th tooth. Rice. 20. Temporary composite crown on the implant of the 15th tooth.
In this clinical case, the entire treatment period from the moment of removal to the moment of temporary prosthetics was a little more than two months. At the same time, we were able to completely preserve all the tissues surrounding the tooth, especially the keratinized gum and interdental papillae, which are especially important for the aesthetic and functional result. It is unlikely that such a result would be achievable with the delayed implantation technique.
Clinical case No. 2
Central incisor, recurrence of radicular cyst after cystectomy. Unsatisfactory aesthetics. The tooth must be removed for orthopedic and therapeutic indications (Fig. 21).
Rice. 21. Clinical picture before surgery.
The immediate implantation technique is of particular importance when making dental prosthetics in an aesthetically significant area. The natural appearance of a prosthetic structure largely depends on maintaining the volume of soft tissue and bone surrounding the implant. The timing of treatment is also important - few patients will agree to remain without central teeth for a long time. As in clinical case No. 1, an incision is made (namely an incision, not peeling) along the periodontal sulcus plus additional vertical loosening incisions, after which the periosteum is peeled off to a normally visible surgical field (Fig. 22).
Rice. 22. Defect of the vestibular wall of the alveolus.
And one of the problems is immediately revealed - a significant loss of height of the vestibular wall of the socket, associated with long-term chronic inflammation. The tooth is removed using forceps, after which the root cyst and granulations are removed through the hole (Fig. 23, 24).
Rice. 23. Alveolus after tooth extraction. Rice. 24. Tooth root and root cyst after removal.
The tooth socket is prepared for the implant according to a standard surgical protocol, similar to clinical case No. 1. The quality of the socket preparation and positioning is checked using an analogue of the implant. In this case, the implant is positioned palatally, tightly adjacent to the inner wall of the alveoli (Fig. 25).
Rice. 25. Checking implant positioning using an analogue.
A Friadent Xive implant with a diameter of 4.5 and a length of 13 mm is installed (Fig. 26, 27).
Rice. 26. Installation of the implant in the prepared tooth socket. Rice. 27. Installation of the implant in the prepared tooth socket.
In this situation, it is important to avoid excessive immersion of the implant; ideally, its neck should be located at the level of the edge of the palatal wall of the socket or 1-1.5 mm lower. In case of excessively strong immersion, we risk not only deteriorating the aesthetic result, but also getting complications in the form of gum recession in the area of adjacent teeth (Fig. 28).
Rice. 28. Excessive immersion of the implant into the socket can lead to complications in the form of gum recession.
The implant holder is removed. We are left with only the problem that was already mentioned earlier - the loss of height of the vestibular wall of the socket. It should be taken into account that, despite implantation, slight atrophy of bone tissue occurs in the area of the extracted tooth socket, which can lead to a deterioration in the aesthetic result. Therefore, in this case, a decision is made about osteoplasty using a collagen membrane and a xenograft mixed with autogenous bone chips. Bio-Gide collagen membrane 16x22 mm is fixed palatally (Fig. 29).
Rice. 29. Bio-Gide collagen membrane fixation.
The space between the implant and the vestibular wall of the socket is filled with Bio-Oss xenograft mixed with autologous bone shavings in a ratio of 2.1. (Fig. 30).
Rice. 30. Filling the alveoli with Bio-Oss xenograft mixed with autologous bone shavings.
To prevent material from entering the implant shaft, it is closed with a plug during filling. The main task of this stage is to prevent “subsidence” of the bone tissue in the implant area and maintain its volume. The membrane is fixed with a gum former through a previously made hole (Fig. 31, 32).
Rice. 31. Fixation of the collagen membrane using a gum former. Rice. 32. Fixation of the collagen membrane using a gum former.
To preserve the appearance of the gums, when preparing for suturing, you should avoid making loose incisions under the periosteum. Stitches are applied. Non-resorbable suture material is used (Fig. 33, 34).
Rice. 33. View of a postoperative wound after suturing. Rice. 34. View of a postoperative wound after suturing.
Recommendations and prescriptions in the postoperative period are practically no different from those for delayed implantation. If the primary stability of the implant is high, after 1-2 days a temporary crown can be made and fixed to it. But in this case, implantation is complicated by the presence of a root cyst and partial loss of the vestibular wall of the socket. That is why a gum former is installed on the implant, and the dentition defect is replaced with an adhesive crown made by the direct method. Clinical situation after 3 days (Fig. 35).
Rice. 35. Clinical situation 3 days after surgery.
As in the first clinical case, we pay attention to the condition of the mucous membrane in the area of the postoperative wound, the stability of the implant and the sensations when pressing on it. After 6 weeks, the temporary adhesive crown, masking the dentition defect, is removed, and the orthopedic dentist begins making a temporary composite crown for the implant (Fig. 36-39).
Rice. 36. Clinical situation 6 weeks after implantation. Taking impressions to make a temporary crown for the implant. Rice. 37. Clinical situation 6 weeks after implantation. Taking impressions to make a temporary crown for the implant. Rice. 38. Intermediate result: temporary composite crown on the implant of the 11th tooth. Restoration of the 12th tooth with a temporary composite crown. Rice. 39. Intermediate result: temporary composite crown on the implant of the 11th tooth. Restoration of the 12th tooth with a temporary composite crown.
A temporary composite crown is made for the implant. In parallel, the 12th tooth is restored with a temporary crown.
One of the features of the Friadent Xive implant system is that there are only two diameters of healing abutments, which does not always allow achieving the desired “pink” aesthetics. Therefore, to individualize the gums in an aesthetically significant area, it is better to use temporary crowns or, in extreme cases, composite Estetic Base abutments, which are easily selected and adjusted to the size of a specific tooth.
Clinical case No. 3
The above clinical situations are resolved relatively simply. We worked with single-rooted teeth under conditions of relative preservation of the volume of bone tissue and mucous membrane. However, this is not always the case.
Clinical situation. the upper sixth tooth, previously treated with the resorcinol-formalin method. An attempt to perform endodontic retreatment was unsuccessful (Fig. 40).
Rice. 40. Clinical situation before treatment.
The tooth must be removed. The situation is complicated by the low location of the bottom of the maxillary sinus. Together with the patient, a decision is made to combine tooth extraction, immediate implantation and sinus lift into one procedure. The 16th tooth is removed. At the same time, the gum former is fixed to the implant installed two months earlier in the place of the 15th tooth (Fig. 41).
Rice. 41. Hole 16th tooth. Gum former on the implant in place of the 15th tooth.
The reference point for positioning the implant is the interradicular septum. Despite the fact that installing an implant in one of the alveoli would avoid sinus lifting, it is extremely undesirable to do this, since such positioning will create a number of serious problems during prosthetics and further operation of the prosthetic structure. An additional lateral approach is used for sinus lift surgery (Fig. 42).
Rice. 42. Lateral access for sinus lift.
The subantral space is filled with Bio-Oss xenograft mixed with autogenous bone shavings in a ratio of 2.1. This material is also used to fill the sockets of the tooth roots, although there is no great need for this (Fig. 43).
Rice. 43. An implant is installed, the alveoli are filled with Bio-Oss xenograft mixed with autogenous bone shavings.
A Friadent Xive implant with a diameter of 5.5 and a length of 11 mm is installed. The implant holder is removed (Fig. 44).
Rice. 44. Positioning the implant in the socket of the extracted tooth.
In this case, the primary stability of the implant is extremely low. Therefore, the decision was made to abandon the installation of a gum former. The tooth socket is closed with a Bio-Gide collagen membrane, which is fixed to the implant with a plug through a pre-made hole (Fig. 45).
Rice. 45. Fixation of the collagen membrane using an implant plug.
Unlike the previous case, the surgical wound is completely sutured. This is associated with certain technical difficulties, but is necessary because, as mentioned earlier, the stability of the implant is relatively low, and the use of a collagen membrane and xenograft requires hermetically suturing the wound to avoid infection (Fig. 46).
Rice. 46. After surgery.
The postoperative regimen and prescriptions do not differ from those for delayed implantation and sinus lift. After 10 weeks, you can begin to open the implant and install the healing abutment (Fig. 47).
Rice. 47. Clinical picture 2 weeks after the installation of gingival formers.
After resection covering the mucosal former, we refer the patient to an orthopedic dentist for the manufacture of temporary prosthetic structures (Fig. 48, 49).
Rice. 48. Temporary composite crowns were installed on the implants of teeth 16 and 15. Rice. 49. Temporary composite crowns were installed on the implants of teeth 16 and 15.
This clinical case clearly shows that the low primary stability of the implant and the low location of the bottom of the maxillary sinus are not an obstacle to immediate implantation. However, it is necessary to carry out a number of additional procedures to avoid infection of the operating area, namely. hermetic suturing of the wound, refusal to immediately install a gum former, etc. In the postoperative period, special attention is paid to antibacterial therapy, it is advisable to prescribe vitamins C and D3 in therapeutic dosages.
Clinical case No. 4
What to do in the case when, in addition to the above factors, the tooth is the cause of an active inflammatory process? Even in this case, we can consider immediate implantation as an alternative to a delayed technique.
Clinical situation. The upper sixth tooth is subject to removal for orthopedic and therapeutic indications. The case is complicated by the low location of the bottom of the maxillary sinus and the presence of a fistula with purulent discharge (Fig. 50).
Rice. 50. Clinical situation before surgery. On the vestibular surface of the alveolar process we can discern a fistulous tract with scanty purulent discharge.
Since the inflammatory process in the area of this tooth is in a chronic stage and nothing bothers the patient, it was decided to carry out tooth extraction, sinus lift surgery and implant installation at the same time. The incision is made along the periodontal sulcus with a vertical release incision sufficient to perform a sinus lift using a lateral approach. Since there is a fistula opening on the mucous membrane, its detachment should be carried out as carefully as possible (Fig. 51).
Rice. 51. Review of the surgical wound.
Previously, computed tomography determined that the fistulous tract originates from the mesial buccal root of the 16th tooth. Therefore, when examining the surgical wound, we see destruction of the vestibular wall of the socket and a partial granuloma at the apex of the mesial buccal root.
The tooth is removed. During the removal of a tooth and root granuloma, the vestibular bone wall of the socket is completely destroyed (Fig. 52).
Rice. 52. Tooth socket after extraction.
The sinus lift stage is carried out. Using the Variosurge device, osteoplastic access to the subantral space is created. The mucous membrane of the maxillary sinus is lifted, in parallel the bed for the implant is prepared (Fig. 53, 54), the Friadent Xive implant 4.5 × 11 mm is installed, and the Bio-Oss Collagen xenograft is placed in the subantral space (Fig. 55, 56).
Rice. 53. Sinus lift stage. Rice. 54. Sinus lift stage. Rice. 55. Bio-Oss Collagen block and its positioning relative to the implant. Rice. 56. Bio-Oss Collagen block and its positioning relative to the implant.
Working in this sequence helps to better control the condition of the mucous membrane of the maxillary sinus and avoid perforations. In addition, it is possible to work with very small amounts of osteoplastic material in this way. There is only one problem left to solve, namely the lack of an outer wall of the hole. For this purpose, you can use a fragment of the outer wall of the maxillary sinus, which remains after creating access to the subantral space. It is fixed in place of the vestibular wall of the socket using a screw (Fig. 57, 58).
Rice. 57. Replacement of a defect in the vestibular wall of the socket using a bone fragment. Rice. 58. Replacement of a defect in the vestibular wall of the socket using a bone fragment.
In this clinical situation, we do not use any materials to fill the tooth socket. The installed implant has high primary stability, which makes this procedure unnecessary. Sutures are placed on the mucous membrane (Fig. 59, 60).
Rice. 59. View of the surgical wound after suturing. Rice. 60. View of the surgical wound after suturing.
In Figure 60 it is clearly visible that there is empty space between the gum and the former. In this case, we are guided by the principle “it is better to under-tighten than over-tighten,” since excessive tension of the mucous membrane will lead not only to its thinning and atrophy, but also to bone loss. We expect the area to fill with a blood clot. In the postoperative period, special attention is paid to antibacterial therapy - the dosage of the antibiotic is increased by one and a half times. The patient is also recommended to take keratoplasty vitamins. C, A, E, as well as vitamin D3.
As can be seen in Figures 62, 62, the fistula opening on the vestibular side of the alveolar process is completely closed and epithelialized.
Rice. 61. Clinical picture 2 days after surgery. Rice. 62. Clinical picture 2 days after surgery.
The condition of the mucous membrane is normal. The implant is stable and painless upon percussion. Already at 8 weeks we can state that the operation was successful. The patient has no complaints, the implant is stable, painless upon percussion, the condition of the mucous membrane in the area of the intervention is satisfactory. After 8 weeks we can begin temporary prosthetics. This clinical case further expands the possibilities of immediate implantation. In fact, we performed four operations (tooth extraction, sinus lift, osteoplasty, implantation) in one intervention, and we operated under conditions of an active inflammatory process. As a result, we have significantly reduced not only the treatment time, but also maintained acceptable volumes of hard and soft tissue in the implantation area.
conclusions
Immediate implantation has the same limits as delayed implantation and, provided the conditions for adequate stabilization of the implant are met, is quite compatible with operations such as sinus lift or osteoplasty.
At the same time, by preserving the soft and hard tissues surrounding the tooth using immediate implantation, a satisfactory clinical result is easily achieved. Also, this technique greatly facilitates the positioning of implants, with the exception of cases of removal and subsequent implantation of abnormally located teeth.
The timing of osseointegration of implants is quite comparable with the timing of tooth socket regeneration, therefore these processes occur simultaneously and in parallel. The period at which we begin prosthetics after tooth extraction and implant installation is on average 6-10 weeks, which makes immediate implantation very desirable for the prosthetic treatment of dentition defects in an aesthetically significant area. The incidence of complications with immediate implantation does not exceed that with a delayed technique. This is due to the fact that the majority of implantation complications are generally associated with a deficiency of bone tissue and mucous membrane, and with the immediate implantation method this problem is absent in principle.
However, there are disadvantages:
- Not every brand of implant is suitable for installation in the socket of a newly extracted tooth. Preference should be given to screw implants with small, non-aggressive threads.
- The immediate implantation technique is very demanding on the technique and quality of tooth extraction. From this point of view, low-traumatic tooth extraction with preservation of all alveolar walls represents the most difficult task for a dental surgeon.
- Despite the fact that in my practice there were two successful cases of tooth extraction with immediate implantation during exacerbation of chronic periodontitis, I would not recommend using this technique in the area of acute inflammatory process.
- The roots of an extracted tooth are not always an accurate guide for selecting an implant of the required length and optimal diameter. Therefore, the immediate implantation technique does not replace the need for computed tomography (and in some cases, the production of a surgical template) for diagnosis and surgical planning.
- The decision to install an implant is made only after the tooth is removed, after a visual and instrumental examination of the alveolus. Therefore, before the operation begins, it is impossible to guarantee the patient that immediate implantation will be performed in his case, and he must always be warned about this.
- Working in an initially infected tooth socket requires increased attention to the postoperative regimen and prescriptions. Vitamin therapy is also recommended.
Conclusion
At the moment, in our clinic, immediate implantation is the main trend in implantological treatment. If in 2010 the share of immediate implantation operations was about 17% of the total number of interventions performed, then at the end of 2012 it exceeded 40% and continues to increase. We have significantly expanded the range of indications for this intervention - now neither the need for a sinus lift, nor chronic inflammatory processes, nor even a slight deficiency of bone tissue are an obstacle to installing an implant in the socket of a just extracted tooth.
In fact, now I can formulate only two medical contraindications for such an operation.
- acute inflammatory process;
- a significant deficiency of bone tissue, which makes it impossible to position an implant of the required size in the desired position.
There are no other contraindications for immediate implantation.
Features of the technology
Single-phase dental implantation refers to the basal technique, but has a number of differences. The titanium root is immersed in the hard structures of the jaw and loaded on it in one phase. The introduction is carried out into the basal layer, which is not subject to atrophy and provides stabilization. A small puncture is required, there is no detachment of the mucous membrane, and no sutures are required.
Subsequently, during chewing, blood circulation is stimulated and tissue healing is accelerated. Restoring a row of teeth takes 3-4 days, the discomfort experienced is minimal. Residual pain syndrome is effectively relieved with medications.
Surgical manipulation is minimally traumatic, has no age restrictions and is suitable for most people, including nicotine-dependent citizens.
Contraindications
Contraindications to simultaneous implantation are:
- blood diseases, cancer;
- uncompensated diseases of the endocrine system;
- other chronic diseases in the acute stage.
Implantation is also not performed:
- during pregnancy;
- in the postpartum period;
- during lactation (breastfeeding).
Single-phase Roott implantation
The Swiss brand produces more than a hundred types of structures used in restoration. The manufacturer offers various variations, taking into account:
- Severe anomaly of the alveolar process.
- Presence and degree of bone deficiency.
- Number of teeth to be restored.
- Desires for aesthetics.
For a monoblock procedure, the Compressive line is suitable, in which the implants are combined with an abutment. Implementation is possible immediately after destruction of the unit - restoration is carried out in a few days. The accelerated technique is popular in progressive countries and is gradually replacing classical implantations. If you are interested in single-phase implantation, turnkey technology prices will be provided by specialists from our clinic.
Indications for the procedure
For successful surgical treatment, certain conditions must be met:
- Missing one tooth in the smile area
- There are indications for tooth extraction
- Tooth root injury
Most often, removal is performed according to indications, and then an implant is installed and loaded with a crown. In this way, it is possible to reduce the entire treatment time from several months to one visit. For an aesthetically important area, this is the most effective method of restoring the dentition.