Features of recovery
After removing the plaster, the patient feels discomfort. Joints lose elasticity. They become motionless. Rehabilitation will help. It will allow you to achieve the following results:
- Muscle recovery after injury;
- Stimulation of blood circulation from the day the cast is removed;
- Strengthening blood vessels;
- Protection against thrombosis;
- Reduced swelling;
- Return of mobility.
For complicated fractures and long-term immobility, rehabilitation prescribed by a professional is required. It must be carried out strictly according to the doctor’s recommendations from the removal of the plaster. Neglecting the rule will lead to complications.
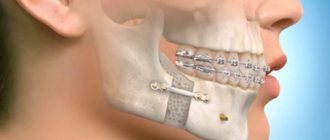
How to remove splints after a jaw fracture?
Typically, rehabilitation takes from one and a half months to two, depending on age and individual characteristics.
Complications after wearing a splint for a long time:
- discomfort and even pain in the jaw joint;
- the occurrence of diseases of teeth and gums.
The tire is removed in several short stages. The dentist sends the patient for a repeat x-ray and, if the fracture has healed, the fastenings of the structure are carefully removed using dental instruments. Upon completion of the procedure, the patient is prescribed special gymnastics to develop the jaw joint. Also, a specialist must examine the oral cavity to identify dental problems.
A visit to the dentist after removing the splint is an extremely important time in the process of treating a fracture. You can make an appointment with our specialists at the KRH-Medical clinic. We will provide you with professional assistance in removing jaw splints, conducting an examination and prescribing effective gymnastics.
Stages
In order not to harm your health after a hip or lower leg injury, it is important to follow a certain course of action during rehabilitation. It consists of the following stages:
- The first stage from the date of plaster removal. Thoroughly rubbing the affected area. Carrying out a massage. Doing light exercises. Application of local drugs to stimulate bone regeneration.
- Second phase. Performing complex sets of exercises. Exercise therapy is prescribed. Physiotherapy is carried out.
- Third stage. Activity increases. Walks are available. Referrals for spa treatment are given.
It is important to accompany each stage of rehabilitation after removing the cast with a diet. It will speed up your metabolism. Quickly strengthens bone tissue and muscles after injury.
Activities and auxiliary things
If the fracture of the limb was uncomplicated, it is enough to wear insoles. They will help not to overload the injured limb. If a person breaks a hip, the recovery time will be more difficult and lengthy. You can’t do it without a special program and devices.
Even in the clinic, the patient’s bed is equipped with a belt. A person grabs it with his hands in order to sit or rise comfortably. Doctors prescribe physical therapy in the first week after an injury, when canes and crutches are still used.
First, breathing exercises are prescribed for the patient. Balloons are used for this. Afterwards, exercises are prescribed, aimed at developing the mobility of the torso. After about a month, the doctor prescribes the following complexes:
- General. Designed for general human health.
- Special. To restore a diseased limb from the day the cast is removed.
Well-thought-out treatment and rehabilitation based on physical education can achieve the following goals:
- Restoring blood circulation through massage;
- Prevention of dangerous complications;
- Serious strengthening of the muscles at the fracture site;
- Restoration of motor ability.
To achieve the above goals, it is important to start exercising while lying down. After this period, quitting classes is not recommended. The features of each gymnastics option should be studied in more detail.
Recovery in a supine position
Exercise and loading after a limb injury should be started immediately. The muscles relax. The fragments grow together correctly. Here is an approximate complex of therapeutic exercises for the rehabilitation of a patient:
- Elbow and shoulder raises.
- Leg flexion and extension.
- Foot movements.
- Hand rotations.
Manipulations with the load should be performed approximately 10 times. They are carried out by healthy parts of the body. As for the sore leg, here it is necessary to lower, raise, abduct, and bring the leg to the body. At the initial stage, gymnastics should be performed with an assistant. Then, during rehabilitation, you can study independently.
At the initial stage of rehabilitation, the patient has swelling. To remove it, it is useful to wear support bandages and perform the following movements:
- Lying in bed, raise your legs slightly, hold them, lower them.
- Contraction and relaxation of the muscles of the limb.
- Flexion, subsequent extension of the fingers.
- Rotation of the feet.
- Pulling your legs to your chest.
As soon as the doctor realizes that the patient can walk, he is prescribed another exercise. The load increases. Medication treatment is stopped. The process of resuming walking is carried out with the help of a crutch. You can use a cane. After removing the plaster, do gymnastics:
- Lying on your back, hug your leg with your arms. Unbend, bend it.
- While sitting, move your leg quickly back and forth.
- Move your foot, drawing a figure eight.
From the day the cast is removed, the load is increased gradually, not quickly, under the supervision of a doctor. This is expressed in the use of weighting agents. The number of repetitions and the total load also increases.
Instruction No. 1 (from 2 to 5 weeks after surgery).
Basic exercise to restore sensitivity / Do this exercise using a small brush (for example, a toothbrush or cosmetic brush) at least 3 times a day for 5 minutes each time (morning, afternoon and evening).
First you will need a mirror. 1. Alternately touch and stroke the entire surface of the face with the brush. 2. Then make a series of light touches at a relatively large distance from each other, first on one side of the face and then on the other. The frequency of movements with the brush should be as if you were trying to touch a piece of fabric. 3. As the exercise progresses, remember the place where you made the touches and then repeat the next series in a similar place, but on the other side of the face. 4. Be careful and go over the entire surface of the face (forehead, cheeks, chin, upper and lower lip). Don't get stuck in one place. Additional exercises to restore sensitivity / You can perform exercises to restore sensitivity an unlimited number of times a day. At the initial stage, it is important to look in the mirror during the exercise. If you don't have a brush, you can do this exercise with your fingertip. 1. Close your eyes and continue alternately touching and stroking your face with the brush. Tell yourself before you do this what will happen next: a series of touches or stroking. It is important to feel this difference. 2. You can ask someone to do this exercise for you. The first few times, the assistant first tells you what movement he is going to do: a stroke or a series of touches. Remember that your eyes are closed. The assistant continues to do the exercise and then stops telling what movements will follow, and you must determine them yourself. If you can do this with ease, this is a good sign. It is also important to weaken the force of the touches and make them closer to each other, which will complicate the task. 3. Remember to make a series of light touches both horizontally and vertically. If you have difficulty feeling touch even at a fairly large distance, do not despair. For most people, sensitivity returns slowly and you need to be patient. We remind you that the full return of sensitivity in some cases can take up to 12 months.
Instruction No. 2 (from 5 to 12 weeks after surgery)
Basic exercise to restore sensitivity / Do this exercise using a brush in the morning, afternoon and evening for 5-15 minutes each time. First, monitor your actions in the mirror. 1. Use light tapping on one side of the face and then on the other. 2. As you complete the exercise, remember where you tap. 3. As you begin the side-to-side exercise, start on one side of your face and tap to a similar area on the other side. For example, start at the base of the ear on one side and work your way through the upper lip area to the base of the ear on the other side. 4. When you do the exercise in the vertical direction, also go over the entire face from above and below. Start, for example, at the neck and work all the way up the side of the face to the forehead, and then back to the neck. You can also do the exercise from the infraorbital region down to the neck and back. 5. As you complete the exercise, note your sensations, whether there is a difference and what its magnitude is. 6. Be careful and do the exercise over the entire surface of the face (forehead, cheeks, chin, upper and lower lip). Don't get stuck in one place.
Additional exercises to restore sensitivity / You can perform exercises to restore sensitivity an unlimited number of times a day. At the initial stage, it is important to look in the mirror during the exercise. Also, if you don't have a brush, this exercise can be done with your fingertip. 1. Close your eyes. Before you start lightly tapping your face, tell yourself exactly how you will start doing it and in what direction. 2. If there is someone who can help you do this exercise, then the first few times the assistant says where he is going to start and in what direction he will proceed: from side to side or from bottom to top. Next, without opening your eyes, ask your assistant to continue the exercise without notifying the next places and direction of touch. If you can easily identify the differences, this is a good sign. 3. Remember to try every day to make the touches softer and closer and closer together to make the task more difficult. If you have difficulty feeling touch even at a fairly large distance, don’t worry. For most people, sensation returns slowly and you will need to be patient.
Working with gait
Along with the listed exercises, you need to add a complex for quick gait restoration and rehabilitation. Here are some effective options:
- Use your toes to grab and hold a small object;
- Roll a ball with the foot of the sore limb;
- Standing on your toes, on your heels;
- Walking sideways and backwards.
If possible, you can exercise on exercise bikes. The listed exercises and prescribed treatment after an injury cannot be neglected. Physical education during rehabilitation quickly restores and heals the body from the day the cast is removed.
Recovery after a fracture should continue until the body is completely restored. You can stop exercising after you have regained mobility, swelling has subsided, and there is no pain. The success of rehabilitation depends not only on the will of the patient and the treatment program.
Useful tips
To make treatment after a fracture go faster, you should not only use special rehabilitation equipment, but also follow the recommendations:
- Daily massage. It must be started from the very beginning, from the day the plaster is removed. This will prevent the cells from going to sleep. Recovery will go much faster;
- It is necessary to take vitamins and healthy dietary supplements;
- Crutches and elastic bandages should be used for as long as the doctor advises. The first steps must be taken only with the help of devices. You need to remember the risk of getting a re-fracture or improper fusion of the limb. First, a crutch is used, then you can switch to a cane;
- When walking with a cane, then without it, it is advisable to use a boot made of plastic or silicone, or a bandage. Depends on the location of the fracture. This will prevent bone displacement and speed up the healing process after a limb injury.
It is important to regularly visit the doctor who prescribed the treatment. It is necessary to take x-rays to track the dynamics of fusion.
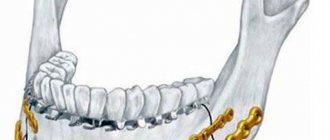
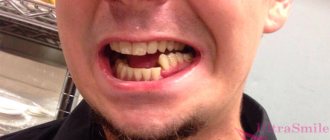
Fracture of the lower jaw
Differential diagnosis
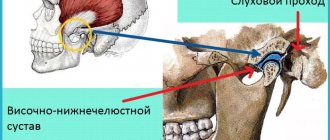
If a fracture of the lower jaw is suspected, a differential diagnosis is made with a dislocation of the temporomandibular joint, as well as between a fracture and a bone bruise [8,10].
Fracture and bruise of the bone lead to swelling of the soft tissues of the face and bruising [7]. However, with a bruise of the jaw, there is no violation of the closure of the jaws and no crepitus (crunching). A fracture of the lower jaw, on the contrary, is accompanied by a change in the bite, jaw joint line and the appearance of a crunch, which is caused by the displacement of bone fragments [11,20]. With a bruise, there is no sign of a “bone step”, which is present with a fracture and is determined by palpation. To confirm the diagnosis, additional examination is carried out using X-ray diagnostics, CT and MRI[9,20].
Dislocation of the temporomandibular joint and fracture of the lower jaw are accompanied by the inability to move the chin forward. A distinctive feature is the position of the dentition and chin - with a dislocation they move forward, and with a fracture - posteriorly. The diagnosis can be made after the results of an x-ray; with a dislocation, the head of the temporomandibular joint is not in its “usual” place [1,8].
Clinical examination
Clinical examination of a patient with a mandibular fracture includes the following methods.
- External (physical) examination.
It is carried out to determine the integrity and swelling of soft tissues, identify hematomas, and facial asymmetry [2].
- Palpation (palpation).
Allows you to establish the configuration of the lower jaw, identify the gradation of the bone (recessions, irregularities), the density of edema, exclude subcutaneous formations (emphysema, infiltration, hematoma), determine the degree of mobility of jaw fragments at the fracture site [11,18].
- Instrumental examination of the oral cavity.
Makes it possible to identify damage to the mucous membrane and bone of the alveolar process of the lower jaw, dislocation of the temporomandibular joint, relationship and fractures of the teeth of the upper and lower jaws[15].
Plain radiography
Used to visualize the bones of the skull and face in frontal and lateral projections. An image in a direct projection allows us to identify combined jaw fractures with damage to the skull. Based on the results of lateral images, the following is determined:
- number of fractures, type and location;
- the size of the gap between the jaw fragments and the presence of displacements between them;
- presence/absence of teeth in the fracture line.
If a mental (along the central line of the jaw) or fracture of the condylar process of the mandibular branch is suspected, a targeted X-ray is taken[3].
Orthopantomography
Orthopantomography is a type of X-ray diagnostics and makes it possible to obtain a high-resolution, all-round (panoramic) image of the jaws. The method allows a detailed assessment of the condition of the jaws and teeth, maxillary sinuses, and sinuses [19].
Computed tomography (CT)
The method is used to identify bruises, pathologies of joints, ligaments, sinuses and bones, and damage to the neurovascular bundle. During computed tomography, at least 16 sections of the area under study are performed, which allows for a detailed examination of any changes and deviations from the norm [1,18].
Magnetic resonance imaging (MRI)
The most informative and modern research method for diagnosing jaw fractures is magnetic resonance imaging [17]. Makes it possible to assess fracture-related damage to soft tissues, ligaments, cartilage and capsules of the temporomandibular joints (TMJ). MRI can determine the presence of TMJ effusion and inflammation [5,20].