Osteotomy is a surgical operation aimed at eliminating deformity or eliminating anatomical and functional disorders by artificially breaking the bone and correct fusion. This operation is performed to treat both congenital and acquired pathologies, for example, in case of improperly healed fractures.
Indications for osteotomy:
- improperly healed bone fractures;
- ankylosed joints;
- change, shortening of the limb;
- rachitic curvatures;
- formation of a false joint;
- osteomyelitis;
- osteoarthritis, spondioarthrosis;
Depending on the surgeon’s goal and the patient’s clinical picture, the following types of osteotomy can be performed:
- wedge-shaped;
- linear (oblique and transverse);
- hinged (can be arc-shaped, that is, made in one plane, or angular, spherical - in several planes);
- staircase;
- Z-shaped;
- derotational.
By purpose they are distinguished:
- Corrective osteotomy - to correct deformity after complications that led to malunion.
- Hinge osteotomy is an operation to lengthen the limbs.
Osteoplasty techniques are also divided into closed and open. The first is performed with minimal access, through a 2-3 cm incision. The open method involves wide access - an 8-12 cm incision is made exposing the bone. In some cases, when there is a risk of damage to nerves and large vessels, preference is given to open osteotomy, despite its low invasiveness, over closed one.
The choice of method depends on the type of pathology, volume and area for surgical intervention - pelvis, jaw, hip, etc. Most often, the operation is aimed at restoring the function of the musculoskeletal system and removing bone deformations.
To equalize the lengths of the lower extremities, osteotomy is performed according to the principle of oblique cutting of the bone in mandatory combination with extrafocal compression-distraction osteosynthesis. The design for osteosynthesis is selected individually for each patient.
Osteotomy: a scientific view
How does it work and why trim the bones? The entire human musculoskeletal system is penetrated by thin axes. They can only be seen in an anatomical atlas, but it is by them that the correct formation of the skeleton is determined. With pathologies, bones deviate from the anatomical axis. This is expressed by crooked legs, protruding joints, and other symptoms. In addition to aesthetic aspects, deviation from natural axes leads to diseases of the musculoskeletal system and disability. Bone tissue has an amazing ability: it is renewed throughout life. This happens quickly in childhood, but the ability decreases with age. However, bones can repair themselves by growing new tissue. This happens after injuries, fractures, operations with the help of nature. But sometimes the bones need help. Bone tissue is a material. It is the task of an orthopedic surgeon to mold it into beautiful shapes, adjust it and set the direction of correct growth. This is what corrective osteotomy does. An incision is made through the skin into the bone at the site where bone tissue needs to be built up. This position is fixed with a special device. There are many varieties of such devices. The only task is to hold the limb in this position long enough for new bone tissue to form. This usually takes 1-3 months. During this period, the patient can move independently with the device. Then it is removed. In leg surgeries, osteotomies of the femur and tibia are most often performed.
Progress of the operation
The instruments used are osteotomes (chisels) with a grooved or flat section, Gigli files, ultrasonic devices for cutting bones, and electric medical saws. After fragmentation of bones during osteotomy, their fixation is required, for which knitting needles, plates, screws or special devices are used. In some cases, plaster casts are additionally applied, but they try to avoid this so as not to cause discomfort to patients and eliminate the risk of developing joint contractures. Anesthesia - general anesthesia or local anesthesia, it all depends on the general health of the patient and the scope of the intervention.
Open osteotomy
A wide surgical field is created, the bone is exposed, the periosteum is separated and a dissection is made in the desired area. The fragments are connected with metal structures or a plaster cast is applied.
Closed method
The external incision on the skin is minimal - 2-3 cm. The muscle tissue is separated above the site of the intended bone dissection. The chisel is positioned longitudinally to cut the periosteum. After this, the instrument is turned perpendicular to the bone and cut through it with several blows with a hammer on the chisel. Nearby soft tissues, nerves and blood vessels are protected with special instruments to prevent damage.
Osteotomies are also classified according to their intended purpose: corrective (for example, for immobility of the knee joint), aimed at improving the supporting function, shortening the bone or lengthening it, derotational, etc.
If the patient has a clear bow of the big toe, a proximal corrective osteotomy is indicated. It is performed to correct the first metatarsal bone and is needed for the following symptoms:
- inability to put on shoes;
- pain syndrome;
- incorrect gait;
- bursitis.
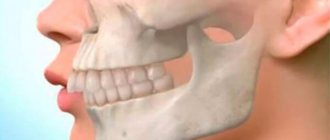
Osteotomy of the upper and lower (planar) jaws can be performed on only one of the jaws or on both at the same time. It is indicated for developmental anomalies, serious problems with bite, existing negative consequences from previous operations, displacements, and fractures. Surgical intervention can be complete or fragmentary. As a result, after the operation, the process of biting and chewing food is easier for patients, the period of tooth wear is reduced, the risk of tooth decay due to poor bite is eliminated, the relationship between the jaws is normalized, which has a good effect on the appearance in general, and the risk of developing diseases of the temporomandibular joint is reduced.
Contraindications for osteotomy
Osteotomy is an operation. Like any intervention, it has contraindications. According to ISAKOS (International Society of Arthroscopy, Knee Surgery and Orthopedic Sports Medicine), bone correction cannot be performed with the following diagnoses:
- Rheumatoid arthritis;
- Osteoporosis;
- BMI more than 40;
- Impaired blood flow in the lower extremities;
- Extra-articular deformities;
- Previous infection;
- Reduced bone regeneration ability;
- Operations on the meniscus;
- Limitation of flexion more than 25 degrees;
- Some types of arthrosis.
In other situations, surgery can be performed, because for many, corrective osteotomy remains the last chance to return to motor activity, beautiful legs and a full life.
Atrophy of the alveolar process. What it is?
Few people know that the volume of bone tissue is not a constant, and can change in the same way as the volume of muscle or fat tissue.
And just like muscle, bone tissue is sensitive to the existing load and atrophies with inactivity. Thus, when a tooth is lost, the jaw bone or alveolar process undergoes atrophy, loss of bone tissue. However, unlike muscle atrophy, bone atrophy of the alveolar processes is an irreversible process. Lack of timely assistance in the event of the loss of one or more teeth is fraught with the development of gum atrophy, frenulum deformation, malocclusion, diction and speech, and progression of facial asymmetry. When the process is neglected, the entire dentition becomes displaced and healthy teeth are damaged.
The longer a tooth or teeth are missing, the more noticeably the amount of bone tissue decreases, and the more difficult it will be to correct the problem. NKclinic undertakes surgical treatment of alveolar atrophy of any severity and severity. For our experienced specialists, leading maxillofacial surgeons, there are no impossible tasks. However, we nevertheless do not recommend that you delay treatment. Time is not on your side in this matter.
Corrective osteotomy at the Ladisten clinic
The clinic specializes in minimally invasive orthopedic surgeries. More than 6,000 patients from all over the world have already undergone osteotomy and are satisfied. Each patient is offered a tour of the facility, a separate room during rehabilitation, and 24-hour medical supervision in the first days after the procedure. The operation itself is bloodless: a small puncture is made in the leg, through which doctors correct the bone. For fixation, a unique device from Dr. Veklich is used. This is an improved design of the Ilizarov apparatus. It is less bulky, weighs little and does not involve dangerous knitting needles. Doctors at the Ladisten Clinic have been performing corrective osteotomy procedures for more than 30 years; the price varies depending on the pathology and severity of the case. To find out the exact diagnosis, consult about contraindications and discuss the cost of osteotomy, just make an appointment by calling us at: +38 +38 or Write to WHATSAPP Write to VIBER We will choose a convenient time for you to visit the clinic or online consultation.
Modern modification of osteotomy technique
Deficiency of bone tissue height in the posterior areas of the upper jaw occurs quite often in the clinical practice of a dentist, making it difficult to perform a dental implantation procedure. The combined trephine-osteotomy method was developed specifically to optimize the process of restoring the vertical parameters of the residual ridge, while minimizing the invasiveness and traumatic nature of the manipulation compared to the classical approach of forming a lateral window during sinus lift. The authors of this article propose a new modification of iatrogenic intervention, which will make the surgical procedure more effective by creating adequate conditions for the installation of sufficiently long dental implants.
The clinical cases presented below describe in detail the modified sinus lift algorithm, which increases the overall effectiveness of rehabilitation of patients with bone deficiency in the posterior areas of the upper jaw.
Approaches to augmentation of the maxillary sinus floor
The success of dental implantation is determined by a number of factors, including the quantity and quality of bone tissue, the distribution of occlusal loads, and the characteristics of the anatomical structure of the jaws. After the extraction procedure, in the first six months, the processes of bone tissue resorption begin to progress, the vertical and horizontal parameters of the residual ridge are significantly reduced, thereby limiting the possibilities for adequate installation of titanium infrastructures.
According to Lil, it is the deficiency of bone crest height that is the main reason for the lack of implant success in the posterior maxilla, while several previous studies have pointed to the dominant role of bone type 4 as the main unfavorable condition for predicting long-term rehabilitation prognosis.
The lack of functional load due to the loss of teeth provokes bone resorption in the area of the bottom of the maxillary sinus, due to which the parameters of pneumatization of the sinus increase significantly. Thus, to install implants in such cases, it is first necessary to reconstruct the alveolar ridge in the area of the floor of the maxillary sinus (often through a lateral approach), and only then can subsequent implantation proceed.
Fugazzotto, in turn, developed an alternative approach to performing a sinus lift, combining the principles of trepanation and osteotomy. If the height of the residual ridge in the posterior part of the upper jaw is 4-5 mm, then in order to reduce the parameters of trauma during the manipulation, only a trephine is used. In addition, this technique eliminates the need for autogenous bone and also reduces the risk of perforation of the Schneiderian membrane with a 2-mm twist drill, the use of which is not included in this approach. Fugazzotto proved that the iatrogenic intervention algorithm he proposed ensures 100% efficiency of manipulation, compared to the implementation of a surgical procedure according to the classical protocol through the lateral window, which is 97.3% effective. This technique is also advisable to use to prepare multiple implantation sites when implementing a standard protocol is not possible.
Bone sites in the maxillary molar region show a 96-97.8% implantation success rate over a three-year period, but Kolerman et al demonstrated a 100% success rate for intraosseous screw placement using a modified approach, thereby proving its effectiveness and clinical feasibility. At the same time, the adapted algorithm for performing osteotomy is suitable both for the preparation of a single site and for the simultaneous installation of several implants. Fugazzotto previously developed a technique for the immediate installation of implants 8.5 mm long in the area of the bottom of the maxillary sinus, but when implementing the technique proposed by the authors of the article, the possible length of the screws can be increased, since it has been proven that intraosseous elements of 10 millimeters or more ensure 93.4% of implantation success , while 8 mm - only 88.9%, of course, under the same conditions for performing a sinus lift.
Surgical technique
To preoperatively assess the height of the residual ridge, appropriate measurements are taken on the radiographic image. Then a palatal incision is made in the edentulous area; if the procedure is performed immediately after extraction of the upper molars, then the incision is made in the area of their palatal root. This helps in the future to adapt the coating membrane as efficiently as possible.
On the buccal side, releasing vertical incisions are made, after which full-tissue flaps are separated with additional separation of periosteal tissues to improve tissue mobilization parameters.
A calibrated trephine drill is used to create a kind of socket, which is often formed through the bone of the interradicular septum. The created socket should be at least 2 mm less than the bucco-palatal width of the ridge, providing a remaining 1 mm of bone tissue on each side. The upper limit of the osteotomy at this stage should not reach the bottom of the maxillary sinus by at least 1 mm. To achieve good contact with the alveolar ridge, the trephine is first used in reverse mode to collect bone, and then in normal mode: actually, for cutting the bed. The maximum osteotomy speed is 1200 rpm. After completion of the osteotomy, there should be some gap between the lateral walls and the formed socket, while in the apical part there should be contact with the bottom of the maxillary sinus.
Next, a calibrated osteotome corresponding to the diameter of the trephine is used. With a slight movement of the hand and without excessive pressure, the previously prepared bed is deepened by approximately 1 mm. If the results of CBCT revealed a thick Schneiderian membrane, the depth of the osteotomy can be even slightly increased using a chisel, observing maximum care when performing such a manipulation.
After achieving the required vertical parameters in the problem area of future implantation, the bed is packed with allograft material and covered with a resorbable membrane. If it is impossible to achieve primary closure, a dense polytetrafluoroethylene membrane can be installed instead of a resorbable one. Once the membrane has been stabilized, the mucoperiosteal flaps are positioned and the intervention area is sutured to achieve wound healing by primary intention. Regarding membrane stability: we have found that in small areas it can be achieved through the adhesion of a fibrin clot, and in case of long defects, fixing screws can additionally be used. The wound healing period ranges from 3 to 6 months.
During repeated intervention, the installation of implants is carried out either in parallel with the internal sinus lift, or through the usual algorithm for preparing the implantation bed. To achieve adequate primary stability parameters, it is recommended to use a conical implant design, especially in thin areas of bone, or with type 4 bone density.
The following clinical cases describe practical examples of the use of the proposed modified technique for osteotomy of implant sites.
Clinical case 1
A 62-year-old man with a medical history presented to the Graduate Department of Periodontology at Rutgers University in Newark, New Jersey, for restoration of an edentulous area on the left side of the mandible. During clinical and radiological diagnostics (photo 1), it was found that the prognosis of the 12th tooth was unfavorable, and the maxillary sinus in the area of 14 was excessively pneumatized.
Photo 1. Clinical case 1: radiograph before intervention.
Due to the inadequate anatomy of the roots of the 15th tooth, the use of conventional fixed structures was contraindicated; therefore, the option of prosthetics based on dental implants installed in the area of the 12th and 14th teeth remained. The implementation of the immediate implantation procedure was not possible due to the presence of a periapical lesion in the area of the 12th tooth. Preparation of the implantation site using a modified bed formation technique has been proposed as most suitable in the area of the 14th tooth. After local anesthesia (2% lidocaine, 1:100,000 epinephrine), palatal crestal and intrasulcular incisions were made, after which the complete mucoperiosteal flap was separated in the buccal direction. A trephine drill 2 mm smaller than the buccopalatal width of the molar socket was used to form the socket, after which the apical border of the socket was moved slightly apically using an osteotome of similar diameter (Figure 2).
Photo 2. View after separation of the full flap: sufficient bone width allows the formation of an adequate bed, which is subsequently filled with allograft material, on top of which a membrane is subsequently installed.
The surgical site was filled with mineralized cortical allograft and covered with a resorbable membrane, after which it was carefully sutured with 4.0 Vicryl sutures (Johnson & Johnson) without excessive tension on the sutures. The extraction of the 12th tooth was carried out during the same visit, after which a thorough revision of the socket was provided and it was filled with a bone substitute to optimize the process of bone tissue formation. Radiographs were taken immediately after the surgical procedure (Figure 3) and 4 months after the initial procedure. After some time, two conical implants (4 & 5 mm x 11.5 mm) (photo 4), made of commercially pure titanium with a rough surface (Biomet 3i), were installed in the area of the first premolar and molar of the upper jaw.
Photo 3. X-ray after performing a sinus lift in the area of the 14th tooth.
Photo 4. View of the intervention area after 4 months, installation of two 11.5 mm implants.
In the postoperative period, the patient was prescribed amoxicillin 500 mg three times a day for 7 days after surgery, as well as ibuprofen 600 mg as needed. To maintain an adequate level of oral hygiene, it was also recommended to use 0.12% chlorhexidine gluconate solution (Peridex, 3M ESPE) as a rinse twice a day for 10 days, as well as avoid hard foods and brush teeth gently for subsequent periods. 2 weeks. The sutures were removed 14 days after surgery, and no complications were observed in the postoperative period. During the first month, the patient was re-examined every two weeks, and in the next two months - once every 30 days. Four months after implantation, a three-unit metal-ceramic screw prosthesis was placed, which demonstrated excellent clinical and radiological stability one year after fixation (Figure 5).
Photo 5. Fixation of a prosthetic element of 3 units.
A schematic representation of the stages of surgical technique is shown in photos 13-18.
Photo 13. Determination of the vertical parameters of the residual ridge on a radiograph using a template.
Photo 14. Preparation of the bed using a trephine at a speed of 1200 rpm, not reaching 1 mm to the Schneiderian membrane.
Photo 15. Remnants of bone remain in the area of the implantation bed. If the sinus floor is uneven, piezosurgical attachments can be used to optimize the procedure.
Photo 16. Disposition of the bone crust for raising the Schneiderian membrane using an osteom (the diameter of the latter corresponds to the diameter of the previously used trephine).
Photo 17. To optimize the apical displacement of the sinus floor, crushed bone is additionally used.
Photo 18. Depending on the achieved ridge height, the procedure is either modified or implants are installed according to the usual protocol.
Clinical case 2
A 58-year-old healthy man presented to the Graduate Department of Periodontology at Rutgers University in Newark, New Jersey for restoration of a right maxillary molar (Figure 6).
Photo 6. Clinical case 2: radiograph of the 3rd tooth.
Clinical and radiographic examinations helped to detect a recurrent area of carious lesions under the existing prosthesis; therefore, the prognosis of the tooth in terms of therapeutic treatment was unfavorable. To preserve the integrity of the dentition, it was proposed to carry out an implantation procedure followed by orthopedic rehabilitation. After performing local anesthesia with a 2% lidocaine solution with an epinephrine concentration of 1:100,000, the molar was segmented and removed in a minimally traumatic manner. After extraction, an area of buccal digestion was discovered, although the integrity and volume of the interradicular bone tissue remained quite acceptable. To assess the extent of the defect, vertical releasing incisions were made on the buccal side of the jaw. A trephine drill was used to form the socket, and an osteotome of the same diameter was used to deepen it without damaging the sinus (photo 7).
Photo 7. After molar removal, the implantation bed was prepared through the interradicular bone tissue.
The prepared bed was filled with mineralized cortical allograft and covered with a resorbable membrane in such a way as to also isolate the area of the buccal defect. The flap was positioned and the surgical site was sutured using 4.0 Vicryl sutures to achieve primary wound closure without excessive tension. Radiographs were taken immediately after the surgical procedure (Figure 8).
Photo 8. X-ray after iatrogenic intervention.
In the postoperative period, the patient was prescribed amoxicillin 500 mg three times a day for 7 days after surgery, as well as ibuprofen 600 mg as needed. To maintain an adequate level of oral hygiene, it was also recommended to use 0.12% chlorhexidine gluconate solution (Peridex, 3M ESPE) as a rinse twice a day for 10 days, as well as avoid hard foods and brush teeth gently for subsequent periods. 2 weeks. The sutures were removed 14 days after surgery, and no complications were observed in the postoperative period. During the first month, the patient was re-examined every two weeks, and in the next two months - once every 30 days. No complications from the maxillary sinus were recorded. Four months after the initial intervention, a conical dental implant 5 mm x 11.5 mm was installed (photo 9), onto which a screw metal-ceramic crown was fixed six months later. One year after installation of the superstructure, the implant remained clinically and radiologically stable (Figure 10).
Photo 9. Installation of a dental implant.
Photo 10. View of the final restoration 1 year after surgical manipulation.
Discussion
A sinus lift is inherently an iatrogenic intervention aimed at restoring the vertical parameters of the residual ridge in the distal areas of the upper jaw. And although the classic approach through the formation of a lateral window is quite effective, there are also some disadvantages of this method: it is more invasive, and the technique of its implementation depends on the presence of teeth in the problem area. There are also risks associated with the possibility of perforation of the mucosa at the bottom of the maxillary sinus, and, even despite the professional skills of the doctor, the percentage of postoperative complications remains quite high. Therefore, the development of a less invasive technique for performing this procedure is highly advisable. The technique of forming a kind of nest using a trephine and osteom is not only less traumatic, but also safer, which is ensured by the replanting of an autogenous component in the area of the bottom of the maxillary sinus. In principle, the procedure is technically simple to perform and helps save the overall working time of the dental surgeon. In addition, the proposed modification of the surgical approach can be used when implanting single areas, in the area of periodontologically compromised molars, when the presence of lateral teeth complicates the standard procedure through the lateral window, and immediately after the removal of problem teeth, as well as when preparing an implantation bed for several titanium teeth at once intraosseous units.
Anatomical limitations associated with an uneven floor of the maxillary sinus or a thick Schneiderian membrane can be successfully circumvented by combining the proposed reconstruction algorithm with a piezosurgical approach (photos 11 - 12). In addition, unlike the traditional Summers technique, our innovative approach allows for the preparation of several implant sites at once during one clinical visit, minimizing invasiveness and duration of manipulation.
Photo 11. Combination of a modified technique with piezosurgery for apical reposition of the bottom of the implantation bed.
Photo 12. View of the implantation bed for installing several implants after implementing a modified approach together with piezosurgery.
conclusions
The technique of forming an implantation bed through trephine-osteotomy preparation of the jaw area has previously been described in the literature as one that helps optimize the process of immediate implantation in the distal areas of the upper jaw.
Fugazzotto’s publications describe how, using a similar technique, it is effectively possible to place 8.5 mm implants in the area of the bottom of the maxillary sinus, but today the modification of the method has reached the point that it can be used to install implants even longer than 8.5 mm without fear postoperative complications.
In addition, the use of longer intraosseous elements has been shown to increase the overall success rate of the rehabilitation procedure for edentulous patients, both in the restoration of single and longer defects.
In conclusion, it can be summarized that the proposed approach not only saves overall treatment time and is less invasive, but also helps to more optimally achieve the proper conditions for the placement of long implants in the posterior areas of the maxilla.
Authors: Anna M. Brunetti, DMD, MDS Howard Drew, DMD Andrew Sullivan, DDS Joel Pascuzzi, DMD Emil Cappetta, DMD
Methodology of V. S. Vasiliev
It differs in that after osteotomy and displacement of the lower jaw posteriorly, a small fragment of the branch is superimposed on the outer surface of the branch. The negative side of this modification is the creation of unfavorable conditions for consolidation due to the contact of fragments not with a spongy, but with a compact layer.
Most surgeons perform osteotomy on the mandibular branch not in an oblique, but in a vertical direction. In 1910, WW Babekosk performed a vertical osteotomy of the branches of the lower jaw, the line of which connected the middle of the semilunar notch with the angle of the jaw. After the lower jaw was displaced upward and an orthognathic bite was established, a wedge-shaped defect formed in the area of the osteotomy; the fragments were in contact in the upper section only in a small area, where osteosynthesis was carried out with a metal wire through two holes (Fig. 33).
Too small a contact area of bone fragments after osteotomy creates unfavorable conditions for consolidation, which makes the WW Babcock method one of the imperfect ones. This method continues to be used today [Tyukalov K.V., 1967; And rzhantse in P. 3. et al., 1970; Alekseev-L, I., 1970; Y. V. Caldwell, G. S. Zettermann, 1954; M. Robinson, 1954; Toman Y., 1958; Shira R.V., 1961; Ailing G., 1965: Ginestet G., Merville L., 1965, 1966; Constantinidis Y., 1967; BerenytB., 1968; KoppW.K., 1968, etc.).
In addition to the listed methods, some surgeons use vertical wedge resection on the branches of the lower jaw. Thus, Van Zile (1955) proposed an original method of triangular resection in the vertical direction of the branch using a submandibular approach. First, he performed a vertical osteotomy of the ramus from the middle of the semilunar notch to the corner of the jaw, and then shifted the medial fragment of the jaw posteriorly (or upward when prognathism of the lower jaw was combined with an open bite) until the correct bite was established. In this case, a small fragment of the ramus was superimposed on the branch, revealing the dimensions of the excess part on the large fragment, resected by the author in the form of a triangle, the apex of which faces the angle of the jaw, and the base faces the semilunar notch. The wound surfaces of the branch were compared end-to-end, and osteosynthesis was performed with metal wire (Fig. 34).
The advantage of this technique is that it allows you to increase the height of the jaw branch, reduce the angle of the jaw and preserve the neurovascular bundle. A similar technique, but with more accurate mathematical calculations and strong fixation, was carried out in 1966 by V. F. Rudko (Fig. 35).
In our practice, we have somewhat modified the vertical “sliding” osteotomy. In December 1966, patient S. underwent bilateral vertical “sliding” osteotomy of the branches of the lower jaw for lower prognathia of the second degree and an open bite of the first degree. After osteotomy and installation of the middle fragment of the jaw into the correct position, its excess was determined, since the small fragments were displaced onto the remainder of the branches of the large fragment. To eliminate excessive layering of branch fragments and improve their contact, we removed strips of the compact layer of branches from the outer surface of the large fragment and from the inner surface of the small fragment. The width of the strips was determined by the level of layering of small fragments. Thus, the exposed surface of the spongy substance of the branches had the shape of an inverted trapezoid. Fragments of branches were compared until complete contact of the spongy substance. Fixation was performed with two wire sutures (Fig. 36).
In the postoperative period, intermaxillary fixation was carried out for 37 days using dental wire splints and rubber traction. This operation achieved good cosmetic and functional results (Fig. 37-40).
Currently, planar osteotomies in the area of the angle and lower part of the mandibular ramus are quite widely used [Arzhantsev P. 3. et al., 1970; Mitrofanov G. G., Rudko V. V., 1972; Arzhantsev P. 3., Sukachev V. A., 1974; Sukachev V. A., Gritsai N. P., 1975, 1977; Rudko V.V., 1975, 1976; Semenchenko G.I., Lozenko P.A., 1975; Dal Pont, 1961; Obwegeser H., 1968; Tsvioro F., 1972, 1978, etc.].
The most successful and promising was:
Depending on the level and direction of osteotomy, there are:
Horizontal, oblique, vertical, arched, ledge-shaped, stepped, planar, etc. W. Lane in 1908 performed a horizontal osteotomy of the branches at the level of their middle third with damage to the neurovascular bundle using the submandibular approach. After the middle fragment of the jaw was shifted posteriorly to the correct position, the bone fragments were fixed with the author’s plate (Fig. 24).
In the postoperative period, intermaxillary fixation was carried out using naubal splints.
Ch. Bruhn (1920) and AL Zindemann (1921) abandoned the use of this plate. They fixed the jaw fragments only with the help of dental splints. They performed osteotomies of the branches of the lower jaw using a hacksaw through a preauricular incision.
Method of “intercortical” osteotomy of the branches of the lower jaw
Proposed in 1962 by G. G. Mitrofanov and V. V. Rudko. Its essence lies in the sagittal splitting of the lower part of the branches of the lower jaw when eliminating lower prognathia or its combination with an open bite. After exposing the bone using the submandibular approach, an osteotomy is performed with a fissure bur in the form of an oval (on the outer surface of the vegvi), as well as separation of the outer and inner compact plate in the retromolar region and along the posterior edge of the ramus. The internal compact plate is intersected in the transverse direction using a Gigli saw, moving upward from the mandibular foramen by 1 - 1.5 mm. The final splitting of the bone is carried out with a flat chisel. After the jaws are established in the correct bite, the fragments are fixed with one wire suture (Fig. 50).
Subsequently, one of the authors [Rudko V.V., 1975, 1976] called the osteotomy “planar.” The positive side of this method is a fairly large area of contact between bone fragments, a good postoperative effect, and the ability to form normal dimensions of the mandibular angle. The disadvantages of this method include the laboriousness of osteotomy with a Gigli saw, since damage to the neurovascular bundle cannot be ruled out; horizontal linear cutting along the inner surface of the branch makes it difficult to carry out rotational displacements of fragments.
Our experience in treating adult patients with malocclusion indicates the high effectiveness of sagittal retromolar osteotomy; 95.2% of patients had a good functional and cosmetic result. However, this surgical method was not without one significant drawback: the rectangular edges of the bone wound on the inner surface of the branch of the delicate jaw limited the mobility of the small fragment. With combined forms of malocclusion, it was necessary to constantly correct the bone edges. Otherwise, the fragments could not be in close contact with each other, and this in turn prevented favorable consolidation.
Our modification of the Dal Pont operation (1977) to form an oval rather than a rectangular incision on the inner surface of the jaw branches only partially eliminated this drawback (see Fig. 45). In this regard, we proposed to form an oval incision on the outer surface of the angle of the lower jaw [Sukachev V.A., Gunko V.I., 1977]. The experience of treating 14 patients showed that “oval planar retromolar osteotomy,” as we called it, without causing damage to the size of the area of contact of bone fragments, allows with a good outcome to eliminate all types of combined forms of malocclusion that cause deformation of the lower jaw (Fig. 51).
In the literature, this method is sometimes called “Swedish”.
In 1910, W. Babcock also used horizontal osteotomy of the branches at the level of their upper third. No bone fixation was performed. WW Babcock inserted a piece of ivory as a spacer between the fragments (Fig. 25).
In the postoperative period, the jaw was fixed using dental splints and rubber traction.
The Czech surgeon F. Kostecka in 1924 performed a horizontal osteotomy of the branches of the lower jaw without a soft tissue incision - blindly. The essence of the operation is as follows. Using a Kerger needle, an injection is made below the earlobe 5-6 mm from the posterior edge of the branch. Then, all the time feeling the medial surface of the jaw branch with the end of the needle, they move it anteriorly towards the lower edge of the zygomatic bone. At the front edge of the branch, the needle pokes out through the cheek. It is important that the needle passes above the entrance to the mandibular canal, between the medial surface of the ramus and the soft tissues containing the neurovascular bundle (inferior alveolar artery, nerve and vein). At the same time as the needle, a silk thread is passed through, held in a hole at the end of the needle. Then they do it in two ways: either the needle is removed, leaving a silk thread in the wound for further insertion of the Gigli saw, or the needle is inserted without the silk thread, and the Gigli saw is fixed to the end of the needle and brought to the level of the posterior edge of the branch. Using sawing movements in a horizontal direction (the skin at this moment must be protected from damage), the jaw branch is cut first on one side and then on the other. After this, the lower jaw is shifted posteriorly until the correct bite is established and fixed to the upper jaw using dental splints and rubber rings for a period of 2 - 3 months, and sometimes more (Fig. 26).
The main disadvantages of the Kostechka method are bleeding, the formation of salivary fistulas, damage to the facial nerve and frequent relapses (up to 50%, according to E. Reichenbach, 1955).
The operation using the Kostechka method in its initial version was used by many surgeons in our country and abroad [Kabakov B. D., Pasternak A. A., 1962; Mukhin M.V., 1963; Egiyan G. M., 1964; Klementov A.V., Vasiliev V.S., 1964; Mikhelson N. M. et al., 1965; Vasiliev V. S., Popov S. E., 1967; PopudrenkoP. I, 1970; Pichler N., 1928; Pearson W. N., 1943; Traunham V. N., 1944; Reichenbach E., 1955; Hinds E. S., 1957; Toman Y., 1957, 1968; Shira R.V., 1961; Urban F., 1961; Ullik R., 1962, etc. ] .
While maintaining the basic principle of the method, a number of surgeons made some modifications to Kostechka’s operation. Thus, A. Zindemann (1921) performed osteotomy of the branches not with a Gigli saw, but with a hacksaw. E. Skaloud (1954) performed this operation using intraoral access. S. M. Davydov (1960) proposed a protective plate to prevent injury to soft tissues and the neurovascular bundle. S. Moose (1945) performed osteotomy of the mandibular branches intraorally using a mechanical saw with a protective plate. To prevent anterior displacement of the small fragment, K. Mushka (1971) proposed fixing the fragments with a wire loop from the semilunar notch to the angle of the jaw; The author passed the wire subcutaneously using a special conductor.
In the practice of surgical treatment of lower prognathism.
Or its combination with an open bite, horizontal osteotomy of the branches has found widespread use. Thus, A. A. Limberg (1928) performed this operation using a submandibular approach, performing an osteotomy slightly above the mandibular foramen. After moving the lower jaw into the correct position, the overhanging excess of the anterior edge of the upper fragment was removed. Fixation of the fragments was carried out with a wire suture and intermaxillary bimaxillary splints (Fig. 27).
This method is technically simple and has found wide application in the practice of other surgeons [AssM. S, 1931; Lando R. L., 1933; Rauer A.E., 1935; Rudko V.F., 1966; Yovchev V.S., 1967; Hogemann K. E., 1951; Rowe NZ, I960; Shira R.V., Ailing G.196I; Anastacov K., 1964; Gorski M., Tarezynska I.N., 1969, etc.].
M. Wassmund (1935) formed a spike-like protrusion on a small fragment, placing it in the corresponding notch on the outer compact plate of a large fragment of a branch (Fig. 28).
Y. Heiss (1957) made the spike on a small fragment longer, and the operation was completed with osteosynthesis with a wire suture. This surgical method was also used by other surgeons.