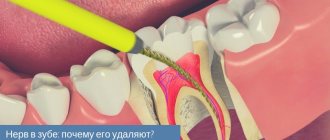
Gutta-percha in dentistry
Gutta-percha is used as a natural material in many fields. The product has also found its application in dentistry.
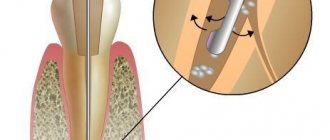
Gutta-percha is a material obtained by processing the well-known latex, which is produced from the juice of the Gutta-percha plant. This product has high plastic properties, but at the same time is able to maintain a solid shape. The material acquires softness and pliability only under the influence of high temperatures, so canals are often filled with hot gutta-percha.
In dentistry, special gutta-percha is used to make pins, which, after treating the canals during endodontic treatment, are installed directly into the tooth canal. However, such a pin consists of only 20% gutta-percha (the upper part of the product), while the base is made of zinc oxide. In order for the treatment to be of high quality and, as a result of filling, each canal cavity is filled, gutta-percha pins of different sizes in length and width are produced.
Kinds
There are two types of endodontic gutta-percha products:
- Standard. The structures are manufactured in clearly defined sizes in accordance with European quality standards.
- Non-standard. They are distinguished by their atypical shape and taper. The products are wider and shorter than conventional pins and have a pointed end.
Compound
Components of gutta-percha points:
- beta-gutta-percha;
- zinc oxide;
- X-ray contrast connections;
- pigment dyes;
- antioxidants.
The product packaging indicates the thickness of the model, the number and color of the marking. The doctor selects the rod option according to clinical indications.
Stages of the procedure
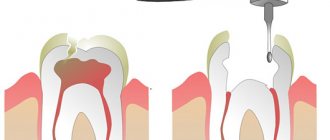
The clinical protocol provides for a specific algorithm for filling with a gutta-percha pin:
- Identification and amputation of a fragment of dental tissue affected by caries.
- Pulp extraction from the root and coronal parts.
- Channel expansion.
- Antiseptic treatment of the working area.
- Screwing the sealer and rod into the passage cavity.
- Cutting off the top of the pin.
- Installation of temporary filling composite.
- Tooth filling.
Staging methods
There are two staging methods:
- Hot. The component is heated and injected into the root area. The liquid fills the cavity and prevents voids from forming. The technology is called the volumetric filling principle.
- Cold. Less popular. There is a risk of the rods not being fully screwed in and infection of the tooth root.
Methods for filling canals:
- Single rod option. Choosing dentists with experience in paste treatment. Minus - there is a guarantee of filling only the channel zone without branches. To prevent the formation of voids, a sealer is applied and a pin is implanted.
- Lateral condensation. The canal is dried, the walls are treated with paste, and the rod is implanted close to the walls of the cavity. The end of the pin is impregnated with sealer. Using additional rods, the remaining channel space is filled. The ends are trimmed and the material is pressed to condense. The technology is difficult to use.
- Thermomechanical injection. The technology is associated with the likelihood of complications during the rehabilitation process. Gutta-percha is administered using an injector. It is characterized by a long rehabilitation process and discomfort.
- Softening the component. It is carried out using the Thermafil system. During the heating process, the mass turns into a liquid that fills the channels and branches.
Potential Complications
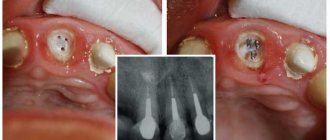
The risk of complications is present during the work process and at the rehabilitation stage. The main reason for the development of complications is the inflammatory process that occurs as a result of poor-quality cavity filling with gutta-percha.
Repeating the procedure will correct the situation. Another danger is unintentional perforation. Pathology is detected when a dental instrument falls into the organ cavity. The affected area is covered with a cement mass and then sealed.
Indications for filling
Gutta-percha is not a classic composite material, so it is used only for certain indications. Considering that the product is in the form of a pin, the dentist uses it only during endodontic treatment to fill and seal the dental canal.
Indications for filling root canals with hot gutta-percha:
- destruction of the dental crown more than 50%;
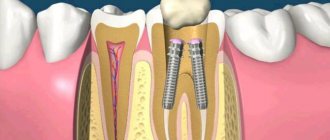
- saving only one root;
- curved dental root canals.
A gutta-percha point can be used to provide support for a single denture or crown. The product is not used if the destruction of the crown does not amount to more than half of its surface. This is explained by difficulties with installing the pin.
Installation: methods and features of filling
Various methods are used for filling. Hot involves introducing heated material into the channel to uniformly fill the cavity. Cold method - insertion of the rod without heating. However, this option is not the best; there is a possibility of infection and the development of periodontitis.
When filling, the following types of techniques are used:
- The use of one rod is practiced by doctors who have experience working with the paste. To avoid the formation of voids, a sealer is used for the work; a pin is first implanted into the canal, which is shortened to the required length.
- Lateral condensation. The root canal is dried and impregnated with sealer. Then a rod is inserted into the mouth and processed with a heated tool. This technique is complex and requires the doctor to have some experience.
- Injection thermomechanical method. With this option, gutta-percha is injected with a special syringe, but rehabilitation is long and there is a risk of infection, which does not make the method popular.
- Introduction of softened mass. The material is preheated and then introduced into the channel cavity. The advantage of this method is high-quality filling without voids.
The technique is of high quality, but the doctor must have experience. Otherwise, there are likely risks of tooth perforation and infection during filling.
Benefits of gutta percha
The peculiarity of gutta-percha is its composition. The product itself has a natural base, so it is absolutely safe for the body. The use of gutta-percha and zinc to make a pin is also considered an advantage of this filling method, since both materials have a high biocompatibility.
The advantages of filling dental canals with gutta-percha also include:
- complete sealing of the canals - due to the plasticity of the material, after heating it completely fills all cavities in the root canals, therefore eliminating the possibility of the filling falling out and the risk of infection getting inside;
- possibility of unsealing - in some cases it may be necessary to remove the pin; professional removal of all material will not cause difficulties for a specialist;
- interaction with medicinal substances - the filling material does not react with any drugs, as well as with the materials from which crowns are made;
- high strength - the gutta-percha pin does not deform, does not change color, does not oxidize and does not dissolve over time;
- visibility on x-rays - the base of the pin is made of zinc, so it is visible on x-rays;
Dentists prefer gutta-percha filling when treating canals, since this method is of higher quality, and during the filling process there are no difficulties with filling the canal voids or fixing the material.
Advantages and disadvantages
It is not for nothing that gutta-percha has been used in dentistry for many years. Among its advantages are the following:
- the material is flexible and elastic, therefore it fills the entire tooth cavity and seals the canals well;
- does not cause allergic reactions;
- preserves the tooth for a long time;
- clearly visible on x-ray;
- easy to unseal;
- affordable price.
The material also has disadvantages, although, compared to its advantages, they are much fewer. For example, gutta-percha does not have the ability to adhere to dentin and affect the microflora inside the tooth. Theoretically, this can lead to the development of caries and pulpitis, but the lack of these properties is compensated by other substances that dentists use during root canal filling.
The second disadvantage is that gutta-percha pins are too thin, and working with them requires great professionalism from the dentist. However, specialists often cope with this task successfully, and gutta-percha in dentistry remains the most popular material for these purposes, so there is clearly no need to be afraid of it.
The iOrtho clinic network provides high-quality services for correcting malocclusion with Invisalign aligners, sign up for a consultation now!
Filling process
Dental treatment when it is necessary to clean the canals always requires special professionalism of the dentist and the right approach to choosing treatment tactics. A qualified specialist will not resort to the procedure of installing a filling without first preparing the tooth.
Before filling the dental canals with gutta-percha, the entire cavity is treated using endomotors (special instruments). This method of cleaning the canals is considered to be of higher quality than laser or other procedures. After the channels are cleaned, they are dried with paper pins to eliminate the presence of saliva in the cavities.
The duration of treatment depends on the number of channels, the type of pathology and the characteristics of the cavities. On average, the procedure lasts 30–40 minutes.
Stages of gutta-percha filling:
- cleaning and drying the canals;
- installation of pins;
- softening gutta-percha using a special apparatus;
- condensation of gutta-percha in the upper part of the canal;
- supply of gutta-percha paste.
Filling the canals with material occurs in two stages, when the pin is softened and when additional heated gutta-percha paste is fed through the nozzle. In this way, it is possible to hermetically fill all channel voids.
Advantages and disadvantages
The advantages of using gutta-percha are:
- high indicators of material inertness, safety for the patient;
- the fit to the channel walls is high, compensation for shrinkage is observed;
- the material is stable, not subject to deformation or shrinkage;
- the degree of toxicity is low;
- hypoallergenic;
- When heated, the material softens and can be injected with a syringe.
Disadvantages include:
- with a narrow channel, difficulties arise in inserting the rod;
- when introducing, it is necessary to use sealed masses, since the material does not have high adhesion;
- control of administration is difficult;
- The material is neutral, that is, it cannot release active substances to tooth tissues.
Types of titanium pins
Titanium pins in dentistry are classified according to several points:
- Shape: conical;
- cylindrical.
- smooth;
- passive;
Also, a titanium pin can be standard or customized. In the first case, we are talking about factory designs, which theoretically can be installed in any root. Individual pins are made personally taking into account the parameters of a particular tooth. They are more reliable, but due to manufacturing difficulties, prices for titanium pins of this type are correspondingly higher.
Flaws
Despite numerous advantages, titanium pins also have disadvantages that are important to consider when installing:
- there is no strong molecular relationship between the artificial crown and dental dentin, which sometimes leads to chipping;
- in some cases, the roots may become deformed due to incorrectly distributed load;
- minor technical difficulties when removing titanium from the canals;
- the likelihood of thinning of coronal tissues.
Before installing a pin, be sure to consult with an experienced specialist who can determine possible contraindications.
The Sanident dental clinic has the opportunity to efficiently, quickly and inexpensively restore lost teeth, treat dental diseases and undergo high-quality diagnostics.
Our clinic is located in Shchelkovo, at the address: Tsentralnaya str., no. 80.
Material characteristics
Gutta-percha structures are divided into the following types:
1. Conventional, manufactured in accordance with the dimensional standards for dental instruments accepted in Europe.
2. Non-standard, conical. They differ from standard solutions in their shorter length, larger width and pointed end.
Gutta-percha pins consist of the following components: – beta-gutta-percha, which occupies 1/5 of the entire product;
– zinc oxide, which plays the role of a framework;
– X-ray contrast compounds;
– antioxidants, pigmenting dyes.
The thickness of the structure corresponds to the color and number of the marking indicated on the packaging. The dentist, based on the clinical picture, selects the desired option.
Little tricks of endodontics: calibrating the master pin
A. B. Khananov , dentist at IC "Dentic Lux"
There are many methods of root canal obturation, all of them are widely known, have long been tested and are successfully used in endodontics. Each doctor chooses the most convenient one for himself, depending on the skills and equipment of the clinic. Everyone has identified some nuances for themselves, knows little tricks that make it possible to simplify the technique, make it better, and, if possible, reduce the patient’s stay in the chair, of course, without compromising the quality of treatment.
I will talk about a method for calibrating a gutta-percha pin, which, in my opinion, allows you to correctly and quickly fit the master pin for obturation of the root canal.
Correct fit of the master pin (or main pin) is important with any canal obturation method. We will analyze the method of calibrating the pin when filling the root canal using the lateral condensation method. Briefly about the stages of endodontics:
- opening, formation of a tooth cavity;
- determination of the mouths of the canals (with a focus on the group affiliation of the tooth);
- passage of the canal along its entire length;
- determining the working length of the canal (although many modern endomotors with a built-in apex locator allow you to omit this stage, nevertheless, additional control allows you to obtain a better and more predictable result);
- mechanical and chemical treatment of the canal;
- obstruction of the canal.
The last stage can be roughly divided into several sub-points:
- re-determination of the channel length;
- calibration of the apical opening of the canal;
- calibration of the master pin (central pin);
- medicinal treatment of the pin and canal;
- directly filling the canal.
After final processing of the canal, we determine the working length again, since the length of the canal before and after processing may not be the same.
Rice. 1. Endodontic ruler. The diameter of the metal rings corresponds to the dimensions of endoinstruments.
Now you need to determine the diameter of the apical foramen. To do this, we use a hand tool of the same size with which we completed the mechanical treatment of the canal (let’s assume that we finished the treatment with size thirty), insert it into the canal without force and lightly tap the end part of the tool handle with our finger so that the tool is firmly installed in the canal, and using an apex locator or an x-ray, we determine the position of the instrument in the canal.
If the file is determined exactly by the apical stop, it means that the apex is calibrated to the thirtieth size and you can proceed to the next stage. If the hand instrument stops behind the apical foramen, which often happens during retreatment, then it is necessary to continue processing the canal, taking an instrument one size larger, in our case, size thirty-five, and then re-calibrate the top of the canal, respectively, taking a hand instrument of number thirty-five.
So, the channel has been processed, the diameter of the apex has been determined, we move on to calibrating the master pin. For this we need an endodontic calibration ruler. The peculiarity of this line is that it has calibration holes, the diameter of which from 20 to 140 is indicated opposite each hole and corresponds to the number of endoinstruments.
Rice. 2. View from the back. Next to each hole the corresponding size is indicated.
The essence of the method is as follows: having finished processing the canal, say, with the thirtieth tool, having determined the diameter of the apex of the appropriate size, we want the tip of the master pin to also be the thirtieth number. Unfortunately, the blue marking of the pin does not always indicate that its tip corresponds to a given diameter, and if there is no calibration ruler at hand, we have to, focusing on the working length of the canal, trim the tip of the pin with a scalpel or scissors, intuitively achieving the desired position of the master pin in relation to the apical stop.
This wastes precious time and gutta-percha points. The ruler greatly simplifies the pin calibration process.
Rice. 3. An uncalibrated pin does not even match its size.
Rice. 4. Stage of calibration of master pin No. 25 to size thirty.
Rice. 5. The pin is cut with a sharp scalpel along the ring with No. 30.
Rice. 6. Calibrated pin. The diameter of the end part of the pin corresponds to the thirtieth size of endoinstruments.
To get, say, the thirtieth tip, we need to take a pin one size smaller, that is, twenty-fifth, insert it into the hole on the ruler opposite the number 30 and trim the protruding tip of the pin with a scalpel. All! We received a master pin with a tip size of #30.
We fit the pin and do x-ray control. If everything is done correctly, the pin is where we intended.
The immediate filling stage. We remove the master pin, disinfect it with alcohol or sodium hypochlorite solution, rinse the root canal, and while the assistant is drawing the next portion of irrigant into the syringe, it is advisable to inspect the canal to the working length with a small-diameter hand tool in order to clean the canal from possible dentinal filings and better delivery sodium hypochlorite into the apical third.
After rinsing the canal, dry it with paper points and proceed directly to filling. We mix the sealer, dip the master pin in the sealer and with forward movements so that air bubbles have time to escape, install it tightly into the channel, checking the specific working length. There should be a little sealer, just to lubricate the pin, because our task is to tightly obturate the canal with gutta-percha, and the sealer acts as a connecting link and lubricant, facilitating the sliding of the pin along the canal wall.
After installing the master pin, we proceed to obturation of the canal with additional pins. We introduce the first additional pin as follows. We set the stopper on the spreader one mm less than a certain working length and insert it along the canal wall, making rotational movements, pushing back the master pin and creating a bed for the pin, and if the spreader does not reach the marked length, there is no need to press hard to avoid root fracture.
In cases where the channel is curved, we move the spreader along the wall with the largest radius of curvature. It is important to remember that the spreader number must be one size larger than the additional pins, for example, if the additional pins are white marked, then the spreader should be No. 20.
Subsequent additional pins are installed without reference to the working length of the canal to the length traveled by the spreader according to the following scheme: the apical third is filled with pins of a smaller size, for the middle third we select pins one size larger and the ostial third is filled with pins two sizes larger than the apical additional pins, changing the spreader accordingly to the required size.
The number and marking of pins will depend on the width, shape and taper of the canal. We complete the obturation until the spreader enters the canal no deeper than 1-2 mm. After this, we cut off the gutta-percha in the area of the mouth with a heated instrument, compact it with a hand plugger, and do X-ray control. If in doubt, you can take an x-ray before cutting the pins, but for one purpose - to make it more convenient to remove the pins from the canal, if you are not satisfied with the quality of the work, because if the canal is tightly obturated (and it should be tightly obturated), tighten something - it will no longer be possible to push through.
The method described above for calibrating gutta-percha pins is applicable to any pins with a constant (not progressive) taper; the main thing is to determine what apical diameter of the pin is required. When using a calibrating endodontic ruler, the operating time is significantly reduced and the quality of root canal filling is improved.
It is important to remember that in all cases, the success of any obturation technique depends on the quality of the instrumental processing of the canal; moreover, for more effective filling of the canals, in certain cases, due to the individual anatomical characteristics of the root canals, combinations and modifications of standard filling methods can be used.
Using the pin
Most often, pins are made of a special titanium alloy, which provides the product with maximum strength, exceptional lightness and compatibility with the human body.
For more than 25 years, titanium pins have been used in dentistry to correct the consequences of dental injuries if:
- it is possible to restore using an artificial crown and install a special support for it;
- a large coronal part is destroyed, up to the edges of the gums;
- it is necessary to increase the strength of the tooth and its resistance to heavy loads.
The titanium used in the production of the pin has powerful anti-corrosion properties, which creates a virtually indestructible basis for bridges.
Installation of titanium pins – Prices
| Services | Price |
| Installation of intracanal anchor pin | 1200 rub. |
Make an appointment
Installation of titanium pins: before and after photos