L. M. Lomiashvili Doctor of Medical Sciences, Professor of the Department of Therapeutic Dentistry of Omsk State Medical Academy
S. V. Vaits postgraduate student of the Department of Therapeutic Dentistry of Omsk State Medical Academy
“Going there, I don’t know where, and doing something, I don’t know what” is a difficult task! This applies to almost all areas of our lives, including dentistry. Even if you imagine the future design of the tooth being restored, your hands do not always reproduce the correctness of its shape and volume.
Students of the Faculty of Art and Graphics are taught that “one hundred still lifes must be written in order for the one hundred and first to turn out correctly”! Unfortunately, in universities, dental students are given limited knowledge about the shapes of teeth, and an insufficient number of hours are devoted to reproducing teeth from available materials (clay, plasticine, plastic). But the correctness of the newly created forms is the path to the solution to harmony!
The ability to correctly restore the shape of missing hard dental tissues in clinical dentistry is of paramount importance.
The dentist's hands are the main tool for modeling teeth! You can develop this skill through artistic modeling classes.
The purpose of the classes: development of visual memory, manual skills, creative thinking and the ability to perceive shapes in space. Anyone who wants to know the stages of recovery can begin the first exercises with a minimum of conditions - material and simple tools.
Dental modeling is a creative process where, in addition to knowledge of anatomy, there must be freedom to choose the material from which models can be created. Before you begin, you need to familiarize yourself with the basic properties of the materials and choose which one suits you best.
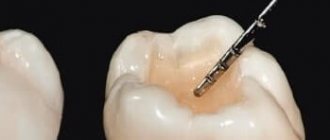
When cutting out a form from hard materials: wood, stone and others , the sculptor gradually, step by step, cuts off the material, freeing the form contained in it. This technique is widely used in therapeutic dentistry, for example, at the stage of competition of the filling surface.
Modeling is the making of sculpture from soft materials. For modeling, you can choose any material that has plasticity. It can be plasticine, sculpture clay, plastic, wax.
The main stages of modeling the 16th tooth from sculptural clay
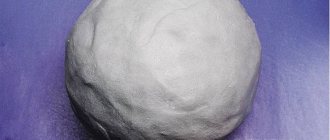
Sculpture clay has long been used in art to recreate shapes. This inexpensive material is ideal for sculpting teeth; working with clay is pleasant in its own way, it is soft, does not stick to your hands, and hardens gradually. Sculpting clay requires longer preparation for work than plasticine, which is most often used for modeling teeth. If the clay is dry, then first you need to mix it with water to the consistency of sour cream, leave for some time until it dries and forms a plastic mass. After this, the clay becomes hard only after a few hours, this time is quite enough to successfully complete the work. The smaller the volume of available material, the faster it hardens. When the desired consistency is obtained, the clay is shaped into a ball (Fig. 1).
Rice. 1. The material has the necessary plasticity and is ready for use. Giving the future model a ball shape
Let's consider modeling the first right molar of the upper jaw (16th tooth). The overall outlines of the model of the 16th tooth are set (Fig. 2, 3), the location of the main surfaces is outlined: medial contact (M), distal contact (D), vestibular (V) and palatal (P).
Rice. 2. Giving the overall outline of the model
Rice. 3. Modeling the tops of the main tubercles.
The tops of the main hillocks are determined. Markings are applied on the chewing surface (Fig. 4), corresponding to the first-order H-shaped fissure.
Rice. 4. Applying markings corresponding to the first-order fissure, H-shaped, on the occlusal surface
Completion of the formation of the external contours of the model and the equator (Fig. 5) is done by hand.
Rice. 5. Smoothing out irregularities and shaping the equator
Until this stage, all actions were performed by hand (Fig. 6).
Rice. 6. Working with your hands allows you to better feel the basic properties of the material
To model the chewing surface of the tooth, it is better to use tools. Using a spatula, the fissure of the first order is deepened (Fig. 7,  .
.
Rice. 7. Deepening of the fissure of the first order, separating the anterior buccal tubercle (2) from the posterior buccal (1) and anterior palatine (4). Posterior palatine tubercle (3)
Rice. 8. 1 - posterior buccal tubercle, 2 - anterior buccal tubercle, 3 - posterior palatine tubercle
When modeling, there is no need to draw fissures, but it is necessary to divide the main tubercles so that an H-shaped fissure appears between them (Fig. 9).
Rice. 9. Completing the modeling of the first-order H-shaped fissure
Tools for work are chosen that are more convenient to work with: it can be a spatula, a smoothing iron. A fissure shaping tool, such as a probe, is required. 2-3 tools are enough.
After completing the work, the model can always be corrected by cutting off excess with a scalpel or spatula. The resulting tooth model can be stored for a long time, reminding of the results of the work.
Rice. 10. Modeling of the longitudinal (2), medial (1), distal (3) ridges of the anterior buccal tubercle
Rice. 11. Second-order fissures are formed on the anterior buccal tubercle
Rice. 12. Modeling of the main (2) and additional (1, 3) ridges of the anterior palatine tubercle
Rice. 13. Final view of the 16th tooth model
Rice. 14. Appearance of the 16 tooth model. Occlusal surface
Rice. 15. Appearance of the 16 tooth model. Palatal and chewing surfaces
A systematic approach to modeling anterior teeth
The anterior teeth of the upper jaw are characterized by both functional and aesthetic parameters. By their nature, these are the teeth that are visible both when talking and when smiling. That is why there are such a significant number of approaches trying to imitate as much as possible all the subtleties of the anatomy of the teeth of the upper jaw. Considering that in addition to shape, the technician must also understand the characteristics of color, texture, rotation and spatial position of the teeth, it is quite easy for him to get lost in all these details. That is why in this article we will focus not on individual modeling elements, but on a systematic approach to restoring the morphology and structure of the frontal group of teeth.
After completing the modeling of the basic shape, the technician can begin to restore the individual characteristics of the tooth, following the proposed protocol, thereby saving a huge amount of time.
The described approach is unique in both modeling all six anterior units and restoring the shape of a single tooth, regardless of whether the technician is working with wax or final structures, in conventional or digital mode. After all, the most important thing lies in the details, which are emphasized after modeling the basic form of future restorations.
Step by step protocol
1. When restoring several anterior teeth, modeling should always begin from the middle of the row, namely from the labial cutting edge of the central incisors. The middle of the restoration is determined by the median anatomical landmarks of the face: along the line connecting the bridge of the nose, the apex of the nose and the center of the chin. The second interpupillary line (photo 1) is modeled perpendicular to the midline of the face: the cutting edges of the incisors on the labial side should be parallel to the interpupillary line.
Photo 1. Facial landmarks and transfer of the interpupillary line to the horizontal plane of the central incisors.
2. After this, contact points are modeled: the position of those from the incisors to the canines shifts more and more towards the cervical area, as shown in the photo with a red line (photo 2 - 3).
Photo 2. The area of contact points shifts more cervically from the incisors to the canines.
Photo 3. The area of contact points moves more cervically from the incisors to the canines (red lines).
3. At the next stage, the lingual surfaces are modeled. Since all teeth take part in the act of chewing, it is therefore simply impossible to model their lingual surface without taking into account the interaction with antagonist teeth. The cutting edge of the teeth, in essence, is their cutting ridge; in the photo, the line of the cutting edge on the labial side is shown in red, and on the lingual side - blue (photos 4 - 5). These edges are the boundaries of the cutting ridge. We should not forget that the lingual edge of this ridge is not only an aesthetic, but also a functional component that interacts with the lower incisors during chewing, while the labial edge of the upper teeth is visualized when the patient smiles and talks. The labial margin of the restoration can be lengthened or repositioned as long as it does not compromise the function, esthetics and phonetics of the teeth being modeled. The cutting edges are rarely symmetrical and parallel (photos 4 - 5). Simply put, the function of the lingual side of the incisors is derived from their labial contour.
Figure 4. The incisal ridge consists of a labial edge (red line) and a lingual edge (blue line).
Figure 5. The incisal ridge consists of a labial edge (red line) and a lingual edge (blue line).
4. The mesial angle line, which is represented in the photo by a black line, is the next element for modeling (photo 6). If you look at the teeth from the front side, they can be divided into segments vertically (photo 3): the central one can be divided into three parts, the lateral incisors and canines into two. The line of the mesial angle of the central incisor begins near its contact point and ends in the cervical part of the tooth in the region of the mesial third of its lateral side. The line of this angle should correspond as much as possible to the line of the adjacent central incisor. A similar lateral landmark for the lateral incisor begins at or above the contact point and ends in the cervical region near the middle of the tooth side. The line of the mesial angle of the canines also begins above the contact point and moves towards the middle of the tooth.
Photo 6. Mesial angle line (black line).
5. After this, they begin to model the lines of the distal angles (photo 7), again moving from the area of the central incisors to the canines. These landmarks should coincide as much as possible between the teeth on the right and left sides. Of course, the width of a symmetrical tooth may differ, but they can be optically modified to ensure that the lines of the distal angles coincide as much as possible.
Photo 7. The distal angle line moves from the incisors to the canines.
6. The height of the cervical contour, drawn with a white line (photos 8 - 9), should follow the contour of the soft tissues (pink) as much as possible. Therefore, when modeling this parameter, it is necessary to use a duplicate of the soft tissue position. The apex of the cemento-enamel junction of the central incisor is located in the area of the distal third, and the lateral incisor and canine are in the area of the middle of the tooth (photo 6).
Photo 8. The height of the cervical contour (white line) follows the contour of the soft tissues.
Photo 9. The height of the cervical contour (white line) follows the contour of the soft tissues.
7. The last step in modeling is to adjust the labial component of the incisal edge. The shape of this formation (photo 10) can vary greatly, since it does not interact with the cutting edges of the lower incisors during chewing.
Photo 10. Shape of the labial edge.
Typically, the labial edges of the central incisors and canines follow a horizontal line, but during modeling the author uses a Kois Waxing Guide (Panadent) (Figure 11) to ensure that the incisors and canines are exactly in the same horizontal plane.
Photo 11: Kois Waxing Guide is used to check the horizontal plane of the incisors and canines.
If you outline the main forms of modeling without teeth, then everything becomes simple and clear (photo 12). It is important to correctly fill in these lines during restoration and connect the corresponding points correctly. After rough modeling, the technician begins to restore individual parameters. With the vestibular view of the teeth, the distal side of the canines disappears from the field of view or is very faintly traced (photo 13), so the visual shape of the dental arch can be expanded due to better visualization of the distal side of the third teeth.
Photo 12. View of the base lines without teeth.
Photo 13. In the vestibular view, the distal part of the canines is faintly visible.
conclusions
Recreating the aesthetic contours of anterior teeth requires considerable experience, knowledge and skill. During this process, all constituent aspects are important: dental morphology, facial aesthetics, soft tissue contour, as well as occlusal parameters. During modeling, it is important not to focus on any particular shape or tooth, but to take into account the entire concept of the dentition based on a basic optimal algorithm. In the future, the modeling elements can be individualized, significantly saving time in the process of restoring the necessary dental characteristics.
Posted by Steve McGowan, CDT
Modeling from plastic
Plastic is another material from which you can create a beautiful tooth model. This is a fairly dense, non-sticky material that does not require special preparation for work, but it is necessary to observe the conditions for its storage: temperature changes at which the material is stored can have a negative impact on its properties. Plastic is convenient because you can work with it for an unlimited amount of time, it does not harden, which makes it possible to work out the microrelief of the future model in more detail and clearly, and make the necessary adjustments during the work.
Hardening of the material occurs when it is placed in hot water or heated to 110-120 degrees in an oven for 5-10 minutes. The possibility of long-term work and fixation of the result by heating - this is the similarity between plastic and composite. Plastic cannot be reused. Well suited for creating phantom teeth models.
The first stage of working with this material will be to warm it up in your hands and shape it into a ball, then give the overall outline of the model, determine the main surfaces of the tooth model (Fig. 16) (M - medial contact surface, D - distal contact surface, V - vestibular surface, L - lingual surface), applying markings corresponding to the first-order fissure of the F-shaped form.
Rice. 16. Giving the overall outline of the model, applying markings corresponding to the fissure of the first order, F-shaped. M - medial contact surface. D - distal contact surface, V - vestibular surface, L - lingual surface
On the chewing surface with a tool, spatula or trowel, according to the applied markings, a fissure of the first order is deepened, five main tubercles are identified (Fig. 17) (1 - anterior lingual, 2 - posterior lingual, 3 - anterior buccal, 4 - posterior buccal, 5 - distal ).
Rice. 17. Tops of the main tubercles: 1 - anterior lingual tubercle, 2 - posterior lingual tubercle, 3 - anterior buccal tubercle, 4 - posterior buccal tubercle, 5 - distal tubercle
The equator of the 36 tooth model is also formed. The formation of second-order fissures occurs by modeling the longitudinal, medial, and distal ridges of the four main tubercles (Fig. 18-19).
Rice. 18. Modeling of the longitudinal (b), distal (a), medial (c) ridges, anterior lingual tubercle (1). 1 - anterior lingual tubercle, 2 - posterior lingual tubercle, 3 - anterior buccal tubercle, 4 - posterior buccal tubercle, 5 - distal tubercle
Rice. 19. 1 - anterior lingual tubercle: (a) longitudinal ridge, (b) distal ridge, (c) medial ridge. 2 - posterior lingual tubercle. 3 - anterior buccal tubercle: (a) longitudinal, (b) medial ridge, (c) distal ridge. 4 - posterior buccal tubercle: (a) longitudinal ridge, (b) distal ridge, (c) medial ridge. 5 - distal tubercle. 6 - additional tubercle. Rice. 19. 1 - anterior lingual tubercle: (a) longitudinal ridge, (b) distal ridge, (c) medial ridge. 2 - posterior lingual tubercle. 3 - anterior buccal tubercle: (a) longitudinal, (b) medial ridge, (c) distal ridge. 4 - posterior buccal tubercle: (a) longitudinal ridge, (b) distal ridge, (c) medial ridge. 5 - distal tubercle. 6 - additional tubercle
The distal tubercle has a less differentiated surface (Fig. 20).
Rice. 20. The final result of the simulation. 1 - anterior lingual tubercle. 2 - posterior lingual tubercle. 3 - anterior buccal tubercle. 4 - posterior buccal tubercle. 5 - distal tubercle
Models made of plastic can be stored for a long time; they will remind you of the results achieved in modeling.
Rice. 21. Lingual and medial contact surfaces of the mandibular molar model. M - medial contact surface. D—distal contact surface. V - vestibular surface. L - lingual surface
Rice. 22. Vestibular and chewing surfaces of the mandibular molar model
How to make teeth for a teddy
Today my master class is dedicated to “dentures”.
I am sharing my method, which is not the only correct one, but rather one of the options. I used this method for a fixed open mouth; for a movable mouth, I most likely would have done it differently. Nevertheless, I hope this method may be useful to someone. Perhaps it will serve as an impetus to find your own version.
To sculpt the dentures, I used whatever plastic I had on hand. Other baked or self-curing plastics can be used. For self-hardening ones, an oven is therefore not needed.
You will need materials:
- Stack for modeling (optimally a metal puppet, shown in photo 1).
- The wire is thin (I used 0.5 mm thick).
- Baking plastic (I used FIMO soft, which I had on hand. You can use FIMO classic, CERNIT or another).
- The glue is durable (I used MOMENT classic universal).
- A glue stick (a wooden manicure stick is suitable for cuticles).
- Cotton thread (I used No. 10).
- A needle from a kit for sewing dolls and soft toys.
- Regular sewing needle.
- Sewing thread (I used 45LL).
- Acrylic paints (I used white and yellow).
- Acrylic varnish (can be either matte or glossy).
- Synthetic art brush (approximately No. 5-6).
- Small narrow-nose pliers (pliers with a tapered nose).
- Scissors.
- Home oven - oven.
Step 1
Important! Before sculpting, you must thoroughly knead the plastic in your hands until it becomes malleable. If the plastic breaks, it means it was poorly dented, or it is old, which will certainly have a bad effect on the work.
Step 2
We measure the length of the wire in accordance with the size of the mouth. Two pieces: for the upper and lower jaws separately. The length of the wire is equal to the length of the proposed dental “prosthesis” by 2. Fold the wire in half and twist tightly, leaving no loop at the end. This is convenient to do with the help of narrow-nosed pliers.
Step 3
We wrap the twisted pieces of wire with cotton thread so that a tail of the thread remains at the beginning of the winding. We walked from one end to the other and back, returning to the tail of the thread. Both tails of the thread were tied together so that the thread would hold and not slip. A thread wound on a wire is needed for reliable adhesion of the plastic to the frame.
Step 4
We prepared two small balls from crushed plastic for the upper and lower “prosthesis”.
Step 5
We cover the prepared wire frame with plastic. It is necessary to rub the plastic into the thread wound on the frame until it adheres, until the plastic begins to stick to the thread and becomes difficult to come off. First you form a “sausage”. Then make it flat, not too thin.
Step 6
Using a stack knife, cut out the fangs from approximately the middle of the strip relative to the horizon. Between the fangs, from their base, cut off the excess plastic (along the horizon). You are left with half a strip between your fangs.
Step 7-8
On the segment between the fangs, scratch strips (imitation teeth). Carefully seal everything with a stack and smooth out the cuts. Form the tails of the “prosthesis” using transverse pressure, not too thin.
Step 9
In the tails of the “prosthesis”, pierce holes with a needle at both ends. Bend the “prosthesis” to the “jaw” curve required for the bear.
Step 10
Ready-made prostheses. Place in the oven at 110-130 degrees for 30 minutes (for Fimo, Cernit). After baking, cool at room temperature. And it’s better to let it sit for at least 1 hour.
Step 11
Paint the “prosthetics” with a thin layer of acrylic paints to give them more natural, natural shades. After the paint has dried, apply the finishing layer - acrylic varnish. Let it dry.
Step 12
Glue the “prosthesis” by applying glue to its base, to the lower jaw. And for reliable fastening, you also sew on the tails of the “prosthesis” with super-strong thread in the color of the “prosthesis”.
Step 13-15
Sew the tongue to the lower jaw with a hidden seam. The photo shows the finished result.
Step 16
After the glue has completely set, try it on with pins and sew the lower jaw to the bear’s face with a hidden seam with super strong threads.
Happy creativity and good luck!
Modeling tooth 36 from plasticine: main steps
Plasticine is perhaps the most common material; it is easily accessible and does not require special preparation for work. Having taken the required amount, just warm it up, knead it in your hands, and you can start working. Having no experience working with this material, in the first stages it is better to work without tools to feel its properties, and then create shapes using tools. After kneading, the plasticine is ready for modeling, but it does not need to be heated for long, as it becomes too soft and sticky and will not hold its shape well.
Let's consider the main stages of modeling the 36th tooth from plasticine. We give the plasticine the shape of a ball (Fig. 23).
Rice. 23. Giving the material a ball shape
Having outlined the main surfaces and tops of the tubercles of the future model, we deepen the first-order fissure of the F-shape. As a result, five tubercles are formed on the chewing surface (Fig. 24) (1 - anterior lingual, 2 - posterior lingual, 3 - anterior buccal, 4 - posterior buccal, 5 - distal).
Rice. 24. Formation of the overall outlines, the tops of the main cusps: anterior lingual (1), posterior lingual (2), anterior buccal (3), posterior buccal (4) and distal (5). Surfaces: M - mesial, D - distal, V - vestibular, L - lingual
Using the tool (Fig. 25), modeling of the distal ridge (B), longitudinal ridge (A), medial ridge (C), anterior lingual tubercle (1) and modeling (Fig. 26) of the medial ridge (B), longitudinal ridge ( A), distal ridge (C), posterior lingual tubercle (2).
Rice. 25. Modeling of the distal ridge (B), longitudinal ridge (A), medial ridge (C), anterior lingual tubercle (1). (2) posterior lingual cusp, (3) anterior buccal cusp, (4) posterior buccal cusp, (5) distal cusp
Rice. 26. Modeling of the medial ridge (B), longitudinal ridge (A), distal ridge (C), posterior lingual tubercle (2). Modeling is carried out with a spatula
Rice. 27. The final result, the model of the lower jaw molar is made of plasticine