A common manipulation in the daily work of a dentist is the direct restoration of lateral teeth. The most labor-intensive operation is considered to be modeling of the occlusal surface. This work requires the use of additional tools and adherence to the technique of adding material in small portions, but even in this case it does not always guarantee an ideal result. Popular proprietary methods for restoring lateral teeth cannot be called perfect. We present to your attention a simplified technique that allows you to perform aesthetic restoration simply, quickly and predictably.
Indirect modeling steps
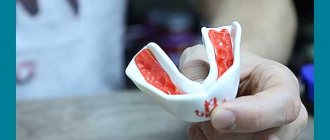
First, the dentist takes impressions of the upper and lower jaws. In this case, silicone is used, since it is very important that the material is of high quality. Then the doctor records the habitual closure of the jaws, preparing the bite ridges, and performs registration using a face bow.
The next stage is work in the articulator. This is the name of a special device that allows you to simulate the movement of the lower jaw and debug all chewing movements of the dental apparatus. If the bite decreases, then with the help of special studies, taking into account facial characteristics, they calculate how many millimeters it needs to be raised.
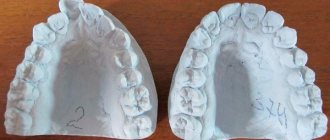
A silicone model of teeth is placed on a plaster base in an articulator and analyzed. At the same time, the dental technician takes into account the functional and aesthetic wishes of the patient and the dentist. He then makes a wax model and shows it to the patient. If necessary, correction is made.
If the patient is satisfied with everything, then a permanent prosthesis is made in the laboratory based on the Wax-up model.
How does forward modeling work?
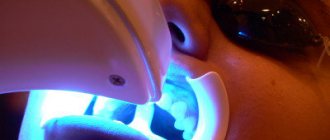
Mock-up modeling is performed directly in the oral cavity. It allows you to determine the optimal shape of the prosthesis. Direct modeling can be figuratively compared to trying on a dress.
The doctor makes silicone impressions of the teeth. Great importance should be paid to modeling the palatal surface, without which it will not be possible to make a full-fledged cast.
Composite plastic is placed into the silicone impression (it is better to use a material that is different in color from the teeth) and placed on the patient’s teeth. The impression is then removed and excess materials are removed from it. If necessary, increase the size of the teeth and reduce the width of the spaces between them.
Next, the dentist, using special brushes and prophylactic paste, cleans the teeth of plaque. At the same time, no manipulations are performed with the teeth: they are not prepared or sawed, as with conventional prosthetics, which allows maintaining the integrity of the dental apparatus.
The base shade of enamel and layer-by-layer dentine are applied to the template. Next, the doctor restores the structure of the tooth, forming anatomical details on the surface of the model, including mamelons (the so-called protrusions and tubercles on the teeth). Restoration of the dental structure is carried out sequentially, starting from the oral surface and gradually moving to the vestibular surface. Finally, an enamel shade application is made.
Mechanical finishing is carried out after the surface of the model has dried. If the model is even a little wet, it will be difficult to visually control the quality of grinding. Polish the surface carefully using special silicone heads of different shapes. In this case, their rotation frequency should be low.
The teeth are treated with a special fixing glue and the prepared model is attached to them.
The patient can walk around with temporary teeth, which will allow him to observe his sensations and determine what exactly needs to be corrected. The doctor will also have the opportunity to study the reaction of the mandibular joint.
The technician can produce several models so that the client can make the best choice.
If the patient no longer has any complaints, then the resulting model is sent to the laboratory, where permanent dentures are made based on it.
It is especially recommended to use Mock-up models for patients who need to improve their bite, as well as for those whose teeth are severely worn out. The models are also irreplaceable when performing prosthetics on implants.
Advantages and features of simultaneous modeling
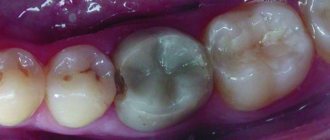
The occlusion of teeth differs in individual characteristics for each patient - the cusps can be flattened, strongly pronounced, etc. In the case where a tooth is affected by a carious process or there is a voluminous restoration, it is very important to determine the anatomy of the surface that was before the destruction of tissue by caries. To do this, it is necessary to perform an analysis of the preserved tissues and then restore the anatomical picture: the severity and depth of the tubercles, the location of fissures and depressions. This information will allow you to carry out a tooth restoration that matches your individual anatomy.
Principles of technology:
- Simultaneous application of the material in small portions makes it possible to accurately repeat the occlusion of the tooth;
- Simulation is only available for a certain cavity size;
- The following information is used to reconstruct a picture of the tooth anatomy:
— inspection before preparation;
— inspection of residual, undamaged tissue after filing;
— examination of adjacent teeth and antagonists.
Advantages of the technology:
- High restoration speed. Simultaneous application of the material in several portions reduces the multiplicity of polymerization;
- Simplification of restoration. Distributing the material towards the center of the surface will require less corrective work in the future;
- Preliminary analysis. The technology allows you to analyze, check and adjust the location, features and inclination of the restored structures before polymerization;
- Shrinkage control. The stress factor (tension) in the composite is controlled through repeated application of the material.
- Standardized technology. The standard cavity depth (dimensions below) makes the technique reproducible in many clinical cases.
The only limitation is the absence of marginal ridges - if there is significant tooth decay, this technique is impractical.
Description of technology
Knowledge of tooth anatomy plays a leading role in the success of restoration. Information is collected before work begins (analysis of the restored and adjacent teeth with determination of the anatomical features of the elements). 1. Restoration begins with preparing the bottom of the cavity. The required depth is 1-2 mm relative to the height of the marginal ridge.
The bottom of the cavity is slightly rounded or flat. With the specified cavity depth and an average distance of 3-3.5 mm from the top of the buccal cusp to the base of the fissure, structures can be precisely formed in the required volume.
The choice of composite material for cavity formation depends on the specific clinical case. As for the thickness of the tubercles: it is usually equal to or greater than 2 mm. If the value is lower, indirect restoration is advisable.
2. cusp ridges
To better determine the volume ratio, the first portions of the material are applied simultaneously, corresponding to each hillock.
Portions of material are distributed from the periphery to the central part so that the area of the slopes of the mounds is increased. These parts of the material should not be connected; complete closure of the surface is performed at the final stage.
Excess material is removed with an instrument along healthy tissue.
Before polymerization, the final correction of the ridge is performed. The composite is adjusted along the edges using a brush.
3. Extreme rollers
The distal and medial ridges are restored in the same way. The composite is added in small portions and distributed over the surface using a tool; excess is removed by moving an umbrella near healthy tissues. Correction of the position of the composite is performed with a brush.
4. Closing the cavity The central gap is filled with small portions of the composite and compacted to achieve the correct relative position of the surface structures. Portions of the material are adapted to the elements that have undergone polymerization to obtain an aesthetic deepening. The material is compacted with tools or a brush until it connects with the polymerized part. The grooves are refined with pointed instruments and after that polymerization is performed.
Closing the cavity can be done in several ways:
- By expanding the top of the tubercle (a minimum of material is taken);
- Expansion of the outer ridges;
- Adding an oblique ridge (for restoration of maxillary molars);
- By adding or expanding secondary tubercles.
5. Small cavities This technique is also applicable to small cavities. To form small areas, one edge is first modulated and then polymerized. In order for the fissure to have a natural appearance, a drop of material is modeled with a polymerized one located nearby.
Stress factor
It is known that all methods of layer-by-layer restoration of teeth are associated with a stress factor. But studies have proven that portioned restoration gives better results compared to others. Stress relates more to the volume of restoration than to the stress factor itself. When a composite is polymerized in one batch rather than in layers, the stress in the material is greater. In addition, the direction of shrinkage affects both adhesion areas and free areas. Applying the material simultaneously, which is proposed in this technique, allows us to take into account all the difficulties and eliminate the polymerization stress factor as much as possible at all stages of restoration.
The first molar of the lower jaw and its modeling
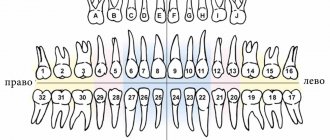
Mandibular first molar There are six molars in the mandible, three on each side. They are called the same as on the upper jaw: first, second and third. The molars are located behind the premolars. The first molar is larger than the second and third.
The shape of the crown of the first molar approaches the shape of a cube.
The vestibular surface is convex and at the edge of the chewing surface is inclined towards the oral side. The oral surface is also convex, it is smaller than the vestibular one.
The medial (and proximal) surface is larger than the distal one and more convex. Both approximal surfaces converge sharply towards the neck.
The chewing surface is rectangular in shape, its mesial-distal size is larger than the vestibular-oral one. The chewing surface has 5 cusps: 3 vestibular and 2 oral. The largest tubercle is the medial vestibular one, the smaller one is the distal vestibular one. The tubercles are separated from each other by grooves. Two main grooves run from the medial to the distal edge and from the oral to the vestibular, crossing in the middle of the chewing surface at a right angle, and the longitudinal groove does not reach the approximal edges of the chewing surface, while the transverse groove passes in the form of a groove onto the vestibular and oral surfaces of the tooth.
Modeling of the crown of the first molar of the lower jaw from plaster
The masticatory, vestibular, oral and proximal surfaces are marked on a rectangular plaster column. Modeling begins with marking the outer contours of the chewing surface. This surface on the vestibular side is divided by lines into three unequal parts to obtain the contours of three vestibular tubercles with a medial and distal facet for each. The medial tubercle is the largest, the distal tubercle is the smallest. On the oral side, a drawing of the contours of the medial (smaller) and distal (larger) tubercles is drawn. After removing excess plaster according to the drawing, mark the vestibular surface, the neck of the tooth and the vestibular bevel to obtain oral cusps with blunt edges. The approximal surfaces are marked after removing excess plaster. A drawing of the contours of the neck and chewing surface is drawn. After removing excess plaster, mark the cusps and fissures of the chewing surface, deepening the fissures. In this case, the vestibular and oral surfaces of the tooth will have a number of planes with sharp edges. The final shape of the tooth is obtained by rounding the sharp edges.