What is a stump tab?
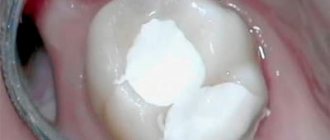
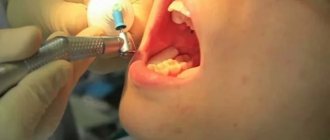
To restore a tooth affected by caries and carry out its restoration, several methods are used. The easiest way is to install a filling after careful treatment of the cavity.
Absolutely every dentist does fillings. This procedure is inexpensive. But the result does not always completely satisfy the patient. The filling may differ in color from the enamel surface, and after a while it may even darken. If filling is carried out on the front dental organs, this becomes almost a disaster, since the aesthetics of the smile suffers greatly. However, in the case of a large chip on the front incisor, it will not be possible to repair it with filling material. The filling will not hold well and will look unattractive.
For these reasons, restorative ceramic inlays are often used to restore a tooth. This procedure is more expensive than filling, but has proven itself very well in dentistry.
It is advisable to use an inlay instead of a filling if part of the tooth has broken off, or caries has affected more than sixty percent of its tissues.
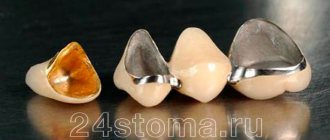
The inlay is an orthopedic structure, namely a non-removable microprosthesis. A tooth restoration procedure is carried out using a stump inlay in two or three visits to an orthodontist.
Orthopedic inlays are made from the following materials:
- photosensitive composite materials;
- metals (preferably noble);
- pressed ceramics;
- metal ceramics;
- non-metallic zirconium alloys.
The use of stump inlays not only aims to restore the tissues of a separate dental organ, they can also be used to secure bridges when there is a defect. In this case, ceramic inserts play the role of locks on adjacent teeth.
The price of such products varies greatly depending on the material used. The average cost of a stump tab is 15,000 rubles. At the same time, the work of a specialist installing this microprosthesis is paid additionally in most cases.
It happens that a destroyed dental organ can no longer be saved. When the coronal part is completely missing, it will not be possible to restore it with microprosthetics. It is better to use an artificial crown in such a situation. This way the healthy root will be preserved.
In order to securely attach the crown, a base of its tissues is left on the dental organ. In case of severe tissue damage, a stump insert is used, which will perform a technological rather than a cosmetic function.
Stump inlays are made individually for each patient.
Types of composites and bonding techniques
The practice of using composites goes back more than half a century. Dental restoration with composite material is carried out using polymer compositions that differ in filling. According to the accepted classification, the following varieties are distinguished:
- Traditional polymers;
- Micro- and fine-grained composites;
- Compositions with silicon dioxide;
- Hybrid variations.
The evaluation indicators are the mechanical capabilities and aesthetics of the filling. The chemical bond between the polymer and the crown structure ensures that the integrity of the tooth is restored. To level dentin in dental practice, etching with phosphoric acid is used, which can eliminate irregularities at a depth of up to 30 micrometers. During the operation, a bonding agent is used, usually supplied with the composite material, and providing the required level of adhesion.
What are stump inlays used for?
Before placing a crown on a tooth, it is important to prepare a base that will support it. In the presence of a healthy root, the role of the base is played by the stump of the dental organ itself. If the root is destroyed or there is not enough protruding tissue to attach the crown, it is usually removed and an implant is implanted.
The specialist can determine what the crown will be attached to by removing all the affected tissue using a drill and determining whether the patient’s own dental tissue will be sufficient or whether an inlay will have to be placed.
If there is enough native tissue, the crown will be attached to its own stump. Before the procedure, the nerve in the tooth is removed, cleaned, ground down into a stump shape and, if necessary, strengthened with a pin. Then an impression of the stump is made, according to which the crown will be made.
For many patients, this method is preferable. Indeed, with this method of prosthetics, most of the tissue of a living organ is preserved. But experts in this field, on the contrary, consider the use of pins in prosthetics without installing inlays to be unreliable, since this method can lead to the destruction of the tissue of a living dental organ under the prosthesis, reducing its service life.
Another option is to completely remove the crown of the tooth and prepare it for a metal or ceramic inlay. This service is more expensive, because you need to pay for both the work during installation and the work during the manufacture of structures in the laboratory. But after such manipulation the crown is much more securely fixed.
The price for installing an inlay varies depending on the number of roots of the dental organ. The design for single-root and double-root dental organs costs approximately five to seven thousand rubles. And for multi-rooted teeth, the cost increases.
Indications and contraindications for use
Tooth restoration with an inlay is recommended when:
- the tooth is destroyed by more than 70%, but there is a healthy canal;
- it is impossible to restore the crown in any other way;
- It is necessary to strengthen the tooth before prosthetics.
Usually, tooth restoration with a stump inlay is resorted to if the walls of the tooth are very thin or only one root remains.
Installing an inlay on a tooth is contraindicated if:
- completely destroyed or poorly treated canals;
- inflammation in dental tissues;
- gum diseases;
- abnormal tooth mobility;
- bruxism;
- allergies to the material used.
Pros of stump inlays
A pin inserted into a living tooth stump holds the crown well, but how long the structure will last greatly depends on the condition of the living tissues under the prosthesis. The pin serves the purpose of strengthening the ground part of the tooth; without it, it can break off. If these tissues are affected by caries or periodontitis, the living stump may become unsafe and the tooth will need to be removed.
When an artificial stump is used, the living dental organ is completely ground down, leaving only its root. The pulp is removed and the canals are filled. These tasks are carried out by a dental therapist, who then refers the patient to an orthodontist. He partially unfills the canals, attaches pins to a hole or several holes (for a multi-rooted tooth), and makes an impression of the base of the dental organ.
The impression serves as the basis for the manufacture of an orthopedic stump inlay. It must be strong in order to become a good support for the prosthesis and correspond to the physiological indicators of its future wearer. Thanks to modern materials used to make inlays, they are resistant to corrosion and destruction.
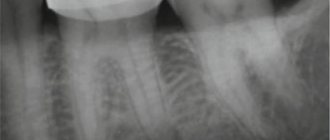
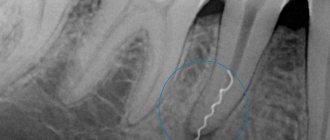
Note: The only nuance that can provoke the loss of a dental organ even with an artificial inlay installed is the inflammatory process of the base of the root in the alveolus.
This can cause suppuration in the hole and the formation of gumboil. Pain in the tooth where the inlay was installed requires an x-ray to be taken to identify possible areas of inflammation.
How does the stump form?
Several methods are used depending on the situation:
- Formation of a stump without a pin. This is possible if the tooth is not severely damaged and there is enough healthy tissue to provide reliable support for the crown.
- Creation of a stump supported by a pin. In this case, the channel, which was previously tightly sealed, expands and a pin is inserted into it. The pin is fixed to durable cement and serves to hold the material and compensate for the chewing load in the future.
- Installation of the stump tab. This approach is used when there is little native tissue and creating a stump from a composite material is impractical.
Material for making a tooth core
Artificial dental inlays are made from metal - an alloy of nickel and chromium, which is highly resistant to corrosion and does not cause allergic reactions. Removable clasp dentures have a frame made of the same material.
Inlays are made in the laboratory by casting. The structure can consist of one element (monolithic) or be a prefabricated structure (when it comes to a multi-channel tooth). Due to the location of the dental canals at an angle to each other, it is difficult to place a monolithic inlay in such a tooth. Therefore, one or two roots are placed at once, and the third and fourth are added later. Then the entire structure is united by a common stump.
When making prosthetics for teeth located in the smile zone, it is important to follow the rule: a crown made of the same material that was used for the artificial stump is placed on the inlay. Otherwise the result will be unsuccessful.
Typically, crowns for the front teeth are made of ceramic. Therefore, it is advisable to use a ceramic inlay. After all, a metal product will be visible through the walls of the prosthesis. The tooth will acquire a bluish tint.
Here it is also worth paying attention to the fact that ceramics obtained by pressing are not particularly durable, which means it is better to make an inlay from zirconium. It is much stronger, while having all the external properties of ceramics.
Zirconium inlays are more expensive, but as a result of their use, the patient receives a firmly fixed artificial tooth, which is difficult to distinguish from the real one.
Manufacturing and installation stages
First, prepare the tooth:
- remove damaged dental tissue;
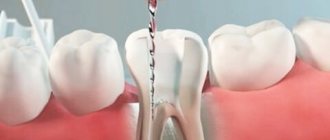
- root canals are filled;
- unseal the canal to a third or half the length;
- prepare the tooth;
- make an impression of the jaws (usually silicone A is used for this);
- cover the tooth with a temporary filling.
The impression is then sent to a laboratory where the inlay is modeled (using a computer) and cast.
Patients are interested in how long it takes to make a stump inlay. This process will take at least five days.
How to place a stump tab?
Dental prosthetics with inlays consists of several stages:
- a temporary filling is removed from the tooth;
- wipe the insert with alcohol to degrease;
- the tooth is treated with an antiseptic;
- An inlay is placed into the tooth cavity and fixed with special cement (thanks to the cement, the inlay fits tightly to the tooth, which prevents the formation of cracks);
- a crown is installed on the stump tab.
Methods of dental restoration
Dental restoration can be performed in two ways:
- By means of a pin structure, for example, a core tab, if the tooth is not completely destroyed. The disadvantage of their use is the risk of possible destruction of the root part of the dental organ after their installation. The most common are linings that protect the tooth from destruction.
- Direct method of reconstruction. The use of composite materials is combined with the use of anchor pins. This method allows you to completely restore the tooth. If necessary, the tooth can be rotated using this restoration method. The composite material can harden in the following ways: under the influence of light radiation, chemical means or double hardening. The material can be of different colors, the shade is selected from a fairly wide palette. The composition is quite durable and aesthetic.
In case of severe damage or the formation of a large cavity, glass ionomer material is used. It can be applied together with another composite or independently.
Advantages of glass ionomer material:
- practically non-toxic;
- highly aesthetic;
- highly durable;
- a long curing period makes it possible to give the desired shape and aesthetic appearance.
Tooth restoration without pins
Without using pins, teeth can be restored in the following ways:
- Using a solution of special composite cement. At the same time, the bending strength is low - this is a significant drawback of this method.
- Through reinforced ceramics. With this method, ceramics, when combined with a composite, give the composition the necessary flexibility.
Restoration using cast inlays
Pin inserts are made from one type of material. They are monoblocks, gradually receding into the background and used less and less. Their main disadvantage is that there is no load absorption. This can cause the living root to collapse.
To make the structure more reliable, orthodontists use products with a collar, thereby reducing the risk of chipping and inflammation.
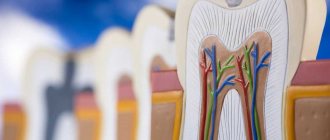
Restoration of the tooth stump after root canal treatment
The use of pulpless teeth is the highest stage in the practice of dental restoration using fixed dentures. With the exception of some publications, most authors agree that pulpless teeth need to be strengthened with one or more pins.
There are several methods for restoring the tooth stump after root canal treatment:
1. Standard metal pins. Their disadvantage is that they create significant loads on the root walls during chewing.
2. Stump cast pin inlays (“Inlay-Core”). Injected pins or "Inlay-Core" are monoblock and made from a single material. About 20 years ago, these pins were considered “perfect” when restoring the crown-root part of teeth. Currently, they are being replaced by industrially manufactured pins.
3. Standard pins made of carbon fibers bundled in a Bis-GMA composite matrix (for example, “C-Post”, Bisco). Such structures are elastic and, therefore, bend along with the root under chewing loads, causing less root fractures. Unlike metal pins, they do not cause allergies and do not corrode.
4. Luminex technique (Dentatus), combining the advantages of standard pins (fast, easy to use) and cast core inlays (exact fit to the walls of the root canal along the entire length).
In this case, standard titanium pins and analogue light conductors are used.
Methodology: after preparing the canal, etching with acid is carried out, washed, dried, adhesive is introduced into the canal, then a composite light-curing material is applied from a syringe, and a transparent light-conducting analogue of the pin is installed. After polymerization with a lamp, the light conductor is removed from the canal, the walls of the root canal are again moistened with adhesive, cement is added (glass ionomer, for example, “C&B”) and a standard titanium pin is strengthened. After this, the stump is modeled from special filling materials (“Bis Core”, “Core Max II”, etc.).
5. Creation of a stump without pins.
a) the use of special composite cements (for example, “Core Past” DenMat; “Core Flo”, Bisco). Disadvantage: low bending strength.
b) reinforcement with flexible ceramics (for example, Glasspan): it is combined with the composite into a homogeneous structure (at the same time, the bending strength increases sharply). Available in the form of tape or cord of several diameters.
Standard root posts
The choice of the type and number of pins depends largely on the volume of the canal after endodontic treatment, as well as on the loss of dentinal mass.
Some authors believe that any coronal restoration as a result of endodontic treatment must be firmly strengthened with pins, no matter the degree of tooth destruction.
Others, less categorical, believe that when the crown remains intact, the resistance of the tooth is quite sufficient not to install a pin.
Ideal pin
To meet the needs of the doctor, the pin must have the following qualities:
- ensure a long service life of the endodontic obturation;
- take into account the anatomy of the canal and the resistance of the tooth root;
- ensure reliable retention of coronal obturation;
- not subject to corrosion of residual dentin;
- ensure restoration of the crown-root part of the tooth in the simplest way;
- maintain the tightness of endodontic treatment by cementing the pin;
- allow you to begin repeated endodontic treatment by trouble-free removal of the retention element;
It is very difficult to determine what the ideal pin is that would fit all clinical cases, but such a pin would have to satisfy the following requirements:
- have a cylindrical-conical shape with a modeled head, adapted in height to the coronal part of the tooth and having good retention in relation to the filling material;
- it must be made of precious or semi-precious alloys or, better yet, titanium;
- its surface must undergo minimal sandblasting and have an evacuation groove;
- the pin must neither self-lock nor screw in;
- the pin must be of different sizes so that it can be adapted to the volume of the canal (diameter, length, etc.);
- the manufacturer is required to provide a kit with various working accessories to ensure that the pin fits in its stock.
There is no universal pin that can be used in all clinical cases. No one technique can satisfy all the requirements necessary to achieve complete success. Therefore, one should resort to a compromise and every time a contradiction arises between the need to use a pin or save a tooth, solve this problem in the most conservative way: the loose pin is fixed again; the broken tooth root is removed.
Choosing a pin according to the tooth
The head of the pin should be best adapted in height to the coronal part.
Sometimes the anterior teeth do not have sufficient space regardless of the post chosen, and then only a cast post may be used.
The pin must necessarily rest on dentin, and not on the material for filling root canals, so as not to break the tightness of the apex of the root tooth. If the channel is too widened, a commercially manufactured pin cannot meet this requirement and then only a cast pin must be used.
Depending on the position of the tooth in the dentition, it is subjected to occlusal loads going in different directions. Thus, resistance to vertical load increases with increasing parallelism of the side walls of the pin.
In contrast, for transverse and tangential loads, a cast pin of non-circular cross-section, anatomically adapted to the canal structure, will be indicated.
Choosing pin size
Whatever the type of obturation, the seat of the pin always has approximately the same length. The recommended value varies from 1/2 to 2/3 of the channel length.
The seating bed must occupy at least half the length of the canal and be supported by alveolar bone to avoid root splitting under horizontal loads.
The ideal diameter is determined by the 1/3 rule, i.e. it should be equal to one third of the mesio-distal diameter of the root in which the pin is installed, and this applies to all levels.
Selection of pin shape
The main criterion for choosing a pin is its shape
1.
Cylindrical pins are the simplest and have the best retention, but their shape does not coincide with the shape of the tooth root.
They cover fragile areas, the risk of perforation is maximum. Indicated mainly for short and massive roots. 2. For tapered pins, retention decreases as the taper angle increases. They are the most adapted morphologically and the pressure at the level of the apex of the tooth root is less significant during their cementation. However, due to their shape, they cause a wedging sensation.
These pins are stronger but less stable.
3. Cylindrical-conical pins are intermediate type pins, stronger than cylindrical ones in the apex area, and more stable than conical ones due to their cylindrical part.
A particularly important factor for retention is the condition of the pin surface. Therefore, pins are distinguished: - smooth, - corrugated, - pins with screw threads, - combined.
Cylindrical Root Pins
Smooth Pins
Cement is not a truly strong support for smooth metal. Sandblasting increases retention by acting like a keyway between micro-grooves on mating surfaces.
VLOCK (Komet) - equipped with a conical head with retention protrusions. The intraradicular part of the pin has a strictly cylindrical shape with 4 grooves necessary to relieve the load in the longitudinal direction, evacuate excess cement during pin fixation and to ensure pin retention.
Screw-posts
Screw threaded pins should be used with extreme care, not screwed in, but only locked to reduce stress.
The self-screwing screw thread of the post, which initially ensures the stability of the post once it is installed, replaces the retention grooves of a smooth post.
Combination pins
RADIX-ANKER (Maillefer) - the part of the post directly below the head has a screw thread, while the lower part is smooth, the apical tip has a rounded shape.
Conical root posts
smooth posts
(Maillefer) - these posts have a helical groove that allows excess cement to escape when the pin is seated in its bed.
The heads of these pins are flattened and have grooves. Each diameter corresponds to a conical bur, which is called an auxiliary bur, as well as a bur for contra-angle handpieces.
Screw pins
UNIMETRIC (Maillefer) - these pins have square heads with retention grooves. Available in 2 diameters: 0.8 mm with short or long head.
Cylindrical-conical root pins
Combined
CYTCO pins (MAILLEFER) - this type of pins has a conical shape in its apical part and a cylindrical shape in the cervical part. Only the first third of the cylindrical part is equipped with a retention thread for self-screwing, while the conical part of the pin does not have it.
This type of pins has sufficient retention when using dense walls of the tooth root, reducing the risk of fracture.
The head is made in such a way as to ensure good retention of restorative materials. Its base is horizontal at the level of the tooth root, providing it with strong support.
The conical part of the pin without screw threads is located at the level of the apex of the tooth root, respecting its anatomy and not leading to unnecessary thinning of its walls.
Two longitudinal grooves ensure the release of excess cement during pin fixation.
Screw pins
FLEXI-POST (SDS) are titanium pins with a long and thick retention head. They have screw threads and are self-screwing, creating their own threads in the dentin.
They are equipped with annular projections that are precisely adapted to the centering calibrated hole. This design ensures correct distribution of lateral load over the entire useful height of the root.
Their originality lies in the fact that they have longitudinal slots, thanks to which it becomes possible to avoid the risk of excessive pressure when tightening the pin, which can be dangerous for the tooth root, and in addition, they provide an outlet for excess cement during fixation of the pins.
This system has the best retention. According to photoelasticity data, FLEXI-POST pins optimally distribute loads (minimizing root stress as much as possible), while SCREW-POSTS cylindrical pins have the most unfavorable characteristics (Greenfeld RS, 1989).
Length can be adjusted by simple grinding or sharpening
Preparation of the root for a post with a screw thread includes 4 stages: grinding the supra-root part of the tooth, widening the root canal, forming a seat, cutting the thread.
Preparation of the supragingival part of the root consists of grinding the hard tissues of the tooth from the labial side to the level of the gingival margin and leveling the root surface. Preparation of the supragingival part of the root should be carried out with carborundum stones of different sizes and styles. To avoid breaking it, the edge of the supragingival part of the tooth must be beveled at an angle of 450 to a height of 1-1.5 mm (“rebate”) - Fig. 1.
The root canal is expanded using a canal expander of the appropriate diameter. Then, using a drill fixed in a collet, calibration drilling is performed at low speeds of the drill (Fig. 2). Drilling should be done intermittently, with full water cooling. In this case, dentin crumbs are washed out of the root canal. In the case of continuous calibration drilling, dentin chips accumulate in the canal and stress occurs in its apical section, which can lead to root splitting.
The seat is formed with a carbide cutter. Milling is carried out at low speeds of the drill with full water cooling.
The diameter of the cutter must be smaller than the diameter of the root so that the thickness of the canal walls on any side (vestibular, oral, mesiodistal) after milling is at least 1.5 mm. The depth of the seat should not exceed 2 mm to avoid weakening the root wall.
The thread in the root canal is cut using a calibration tap with little force. After 1-2 turns of the tap, it must be turned in the opposite direction, removed from the canal and cleaned of root dentin, rinse the canal with water and continue cutting. The length of the thread in the root canal should be 1-2 mm longer than the length of the thread on the pin.
After cutting is completed, the channel is thoroughly washed with water, dried with a stream of hot air, washed with alcohol and degreased. Then the correctness of thread cutting is checked (Fig. 3) and the intra-root pin, after exactly the same preparation, is fixed in the canal with cement. The cement is mixed not too thickly and injected into the canal with a canal filler. The cement should not be mixed very liquid either - in this case it does not provide reliable fixation of the pin. The optimal consistency of cement is achieved by following the manufacturer's instructions. The cement is applied in a thin layer to the top of the root post, which is screwed into the root canal using a socket wrench. It is recommended to turn the pin first counterclockwise, then clockwise until it stops, followed by a 0.25-0.5 turn counterclockwise. With this technology of pin installation, excess cement is removed from the root canal and internal tension is reduced, therefore, the risk of root splitting is reduced.
After the cement has completely hardened, you can begin to form the supra-root part of the combined pin. To do this, select a temporary cap made of polyvinyl chloride that matches the shape of the root part of the pin. A hole with a diameter of about 1 mm is made in the bottom of the cap using a hot probe, the cap is filled with a composite material and placed on the supra-root part of the pin (Fig. 4). Excess composite material comes out through the hole. Then, after polymerization, the temporary cap is removed with a hot spatula or diamond bur and, using a cutting tool, the supra-root part of the combined intra-root pin is processed, giving it the shape of a reduced tooth stump, which can later be used as a support, for example, for a metal-ceramic crown.
It should be noted that this design of standard pins with an artificial stump is applicable for the restoration of single-rooted teeth, provided that there is no need to change the inclination axis of the stump part of the structure. In cases where it is necessary to change it (in case of anomalies in the position or inclination of the anterior teeth), the usual design of a cast stump pin with individual modeling should be used.
Modified design of cast stump pin insert
The traditional design of a cast stump pin is not optimal. It does not absorb the horizontal component of the occlusal load (F). At the top of the root post, a significant stress (F2) is concentrated, equal to 250% of the external chewing load, which can lead to destruction of the tooth root.
These shortcomings are eliminated by a design that has a “crusher” of the horizontal component of the functional load (Fig. 5). Then, stress (F2) equal to 80% of the external influence is concentrated at the top of the root pin. The optimal value of angle a should be 40-500 relative to the tooth axis.
To improve the fixation of the cast stump pin insert, with a shortened pin and to prevent chipping of the cervical part of the root, a design with a “collar” is shown (Fig. 6). It is indicated for the third degree of pathological abrasion of teeth and weakening of the walls of the root canal in the cervical region. The location of the edge of the covering crown on a ledge formed on the “collar” allows you to restore the anatomical shape of the tooth and serves to prevent inflammation of the marginal periodontium.
If there are subgingival lesions of the root walls (up to 5 mm), then the subgingival “protection” should be adjacent to the affected root wall so that a ledge with a bevel of 1350 is formed.
Composite or ceramic
Restoration using indirect techniques limits the ability to use standard materials. During large-scale operations, tooth restoration with a composite is less effective, since the resistance of ceramic structures to natural wear and the influence of external factors is much higher. Despite the lower cost of the procedure, restoring the front teeth with filling material is recommended only in rare cases - the cost of restoration is offset by the durability of the ceramic, so dentists tend to use a more practical approach.
Direct and indirect composites
There are two ways to use composite polymers:
- Direct restoration - carried out in a clinical setting using a hand-held laser to polymerize the composition. Recommended for eliminating cavities and interdental gaps, as well as adjusting the appearance of dental elements;
- Indirect restoration - involves hardening of the filling composition outside the oral cavity, using devices that supply energy more intensively, which guarantees deep polymerization. It is recommended for the manufacture of onlays and inlays, the creation of artificial crowns and bridge structures, as well as the reshaping of the dentition.
It is worth noting that composite dental crowns have a shorter service life than models made of porcelain, zirconium or gold, which necessitates periodic updating. In some cases, it is possible to use a metal shell that strengthens the structure of the structure, however, to create aesthetic models, it is necessary to cover the replacement product with a composite on all sides, visible when communicating with others. Restoration using composite materials is used when the patient’s budget is limited, there are medical contraindications, and also as a temporary solution preceding a comprehensive restoration of the dentition.